|
Below are
the "Tips and Tricks"
submitted by our
membership. If you have any to submit e-mail me
and we
will list them ASAP (after careful scrutiny, of course).
These
could
include but is not limited to tool supply, parts substitutions, parts
suppliers, tricks of the trade, etc. Click on links below to get to that section. (Not responsible for accuracy. Use
at your own risk)
|
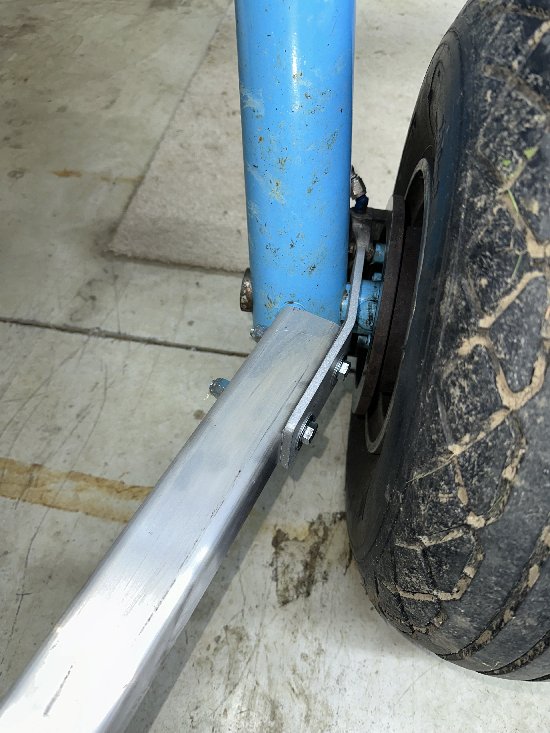
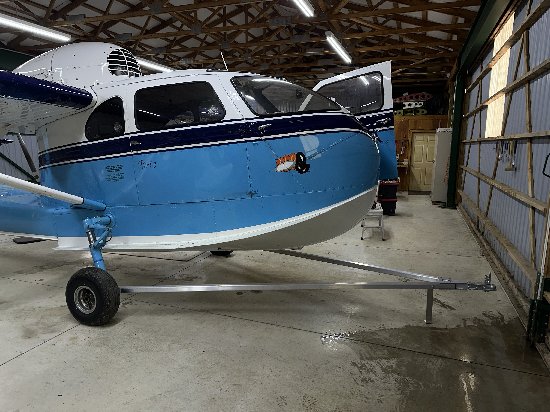
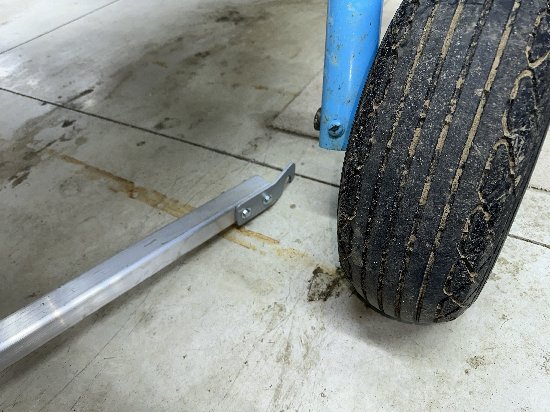
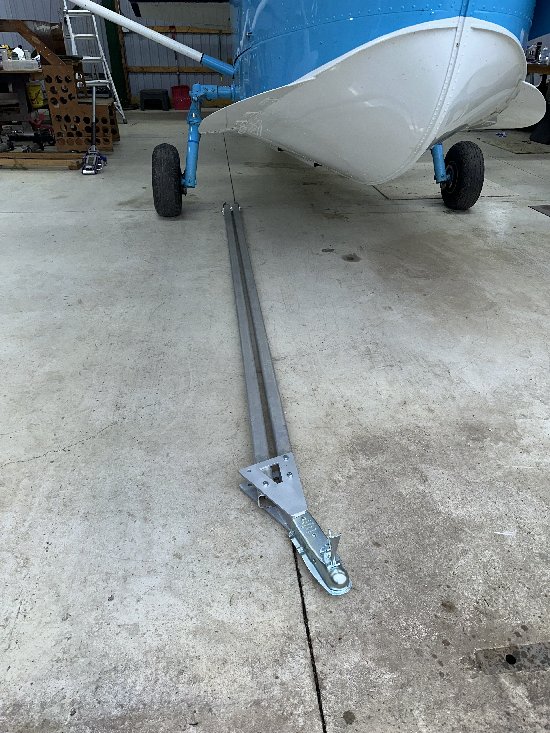
| New Main Gear Tow Bar A
long-time member, Dr. Henry Chapeskie, recently submitted a NEW tow bar for our Seabees. It looks very easy to make and should last for years! Not much money either. Thank you Dr.!
|
||||||||
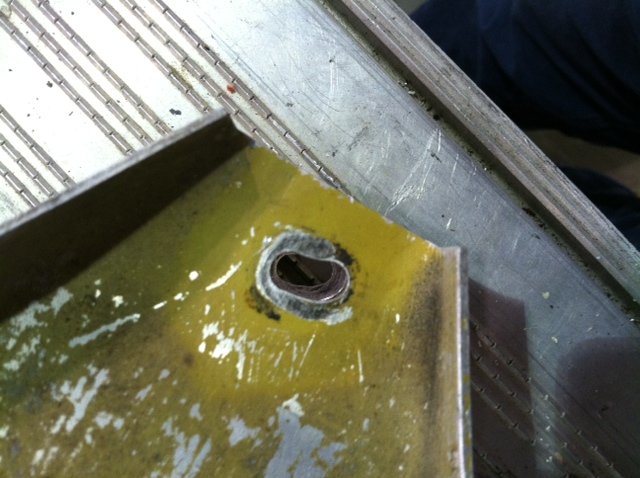
| Aileron bell crank fix A
member recently found that the bushing around the aileron control horn
pivot bolt was turning. It wore an elongated hole right into the
aileron bell crank bracket! This could have been a real disaster. Here
is what they did to fix it:
"You will have to disconnect the aileron to get a good look at the bellcrank attach bolt. All four of our holes were elongated. The bushing seized in the bell crank and the thru bolt started turning (with each movement of the aileron) in the hole elongating the hole. The wing has to be opened to get the assembly out. Could not remove the seized bushing with things installed. ...the corner of the wing gets opened up. I think the Twin-bee has an extended wing, so there was a skin joint we could work with, opened up an "L" shaped corner. I would suggest folks make sure this area gets lubed, once the bushing seizes in the bell crank its down hill. You should not see the nut turning when the ailerons are moved. This is how we repaired the aileron brackets (right photo)....doublers on the top and bottom of each leg (4places). Used .063 on the outside and .040 on the inside." (Ed note: This is great information and I would recommend checking these out now and at every annual inspection. This aileron bracket is bolted to the aft side of the trailing edge spar with four bolts. Trouble is you can't get it out through the lightening holes in the spar so the wing has to be drilled apart in strategic locations. Lubrication is the key! I spray those things at least every annual with LPS-2. Spray them until they start dripping down the trailing edge! S.M.) |
||||||||
| Tail Wheel Donuts and Shims Member Ken Deyo has a great way of making the Tail Wheel donuts and spacers. You guys never cease to amaze me! You can read his instructions here. If you need Donut replacement instructions download them here. Thanks Ken! Good job! 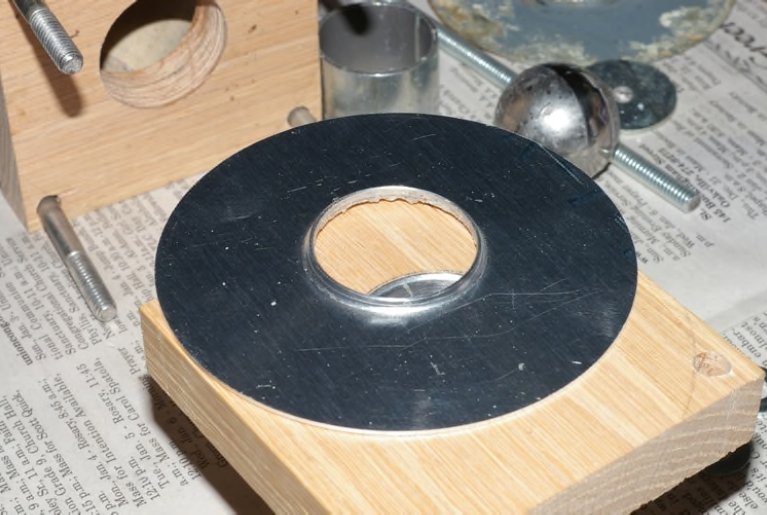 |
||||||||
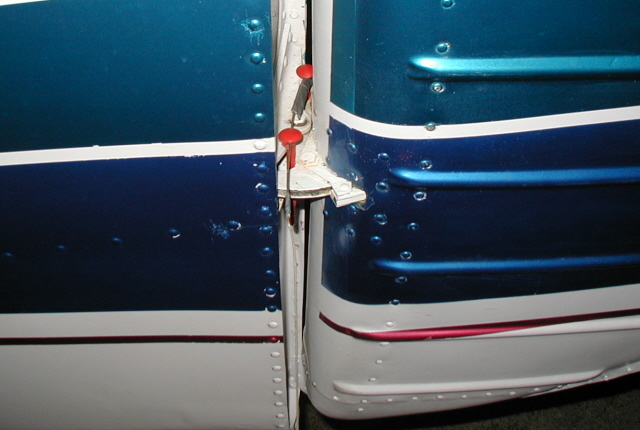
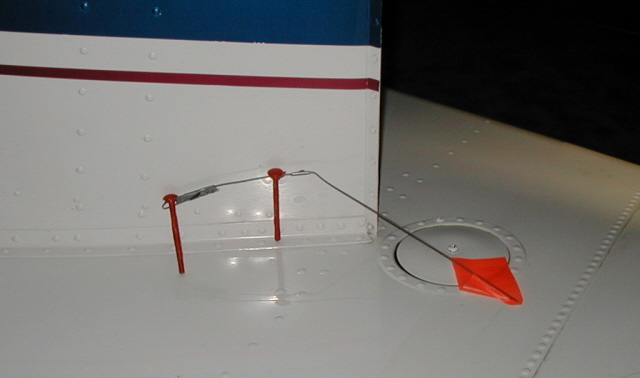
| Bow Door Hold-Open Rods There are probably as many Bow Door hold-open options as there are Seabees. Send me an email with your installation and I will list it here. Mine is listed below: It is a very basic design but has worked for 15 years so far with no adverse effects. It is simply a 7/16" diameter rod bent carefully to the Bow Door curve with a universal type joint on the top end and a ball joint link on the free end of the rod (available at McMaster Carr here). The socket end is screwed into a stud that is riveted into the rod. A 1/16" stainless steel cable is attached under the ball on the door frame and under the universal joint on the door side of the rod. 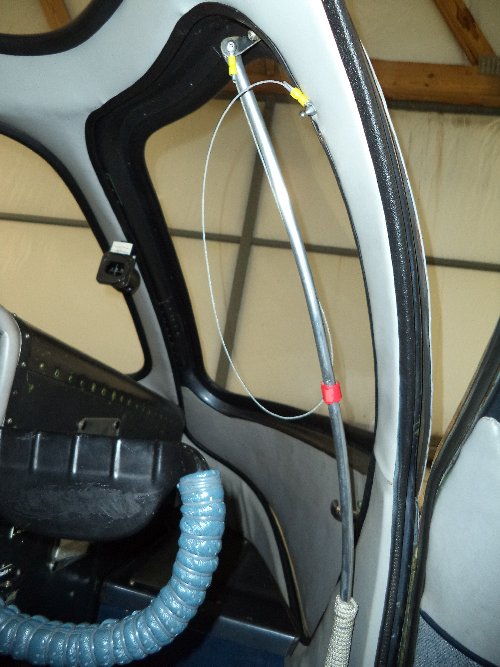 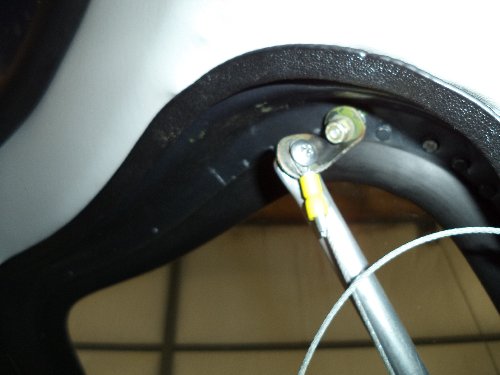 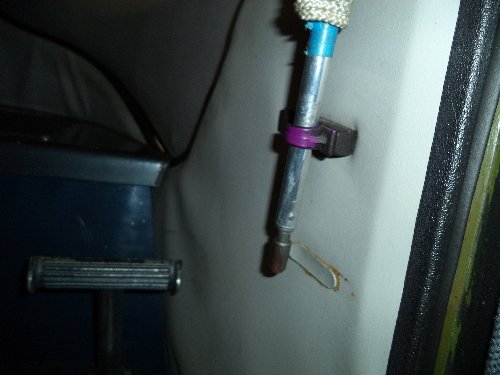 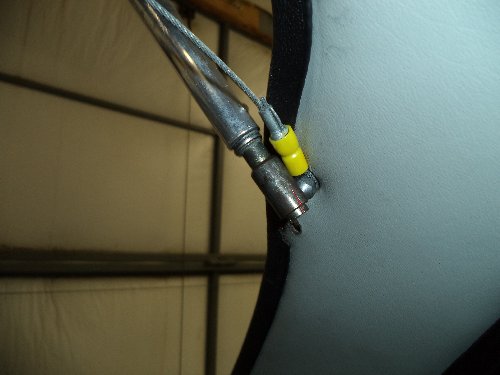 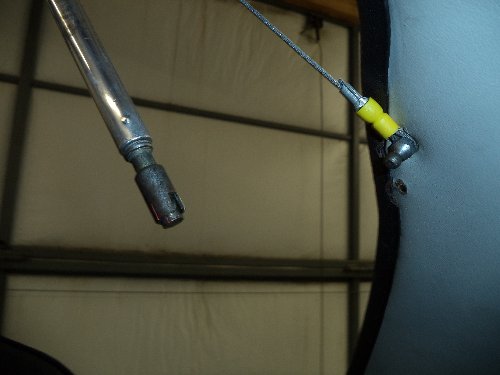  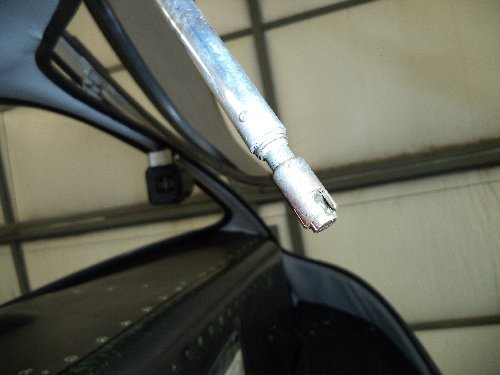 ==================================================================================================== This is Simuflight's version. You must contact Scott Henderson at Simuflight for this one. Notice the clip in the upper right hand side to secure the bow door rod. Good idea. 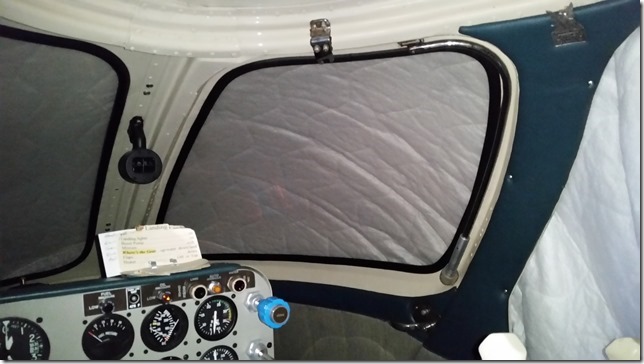 ===================================================================================================== New Bow Door Rod! A Gas Spring opens it. 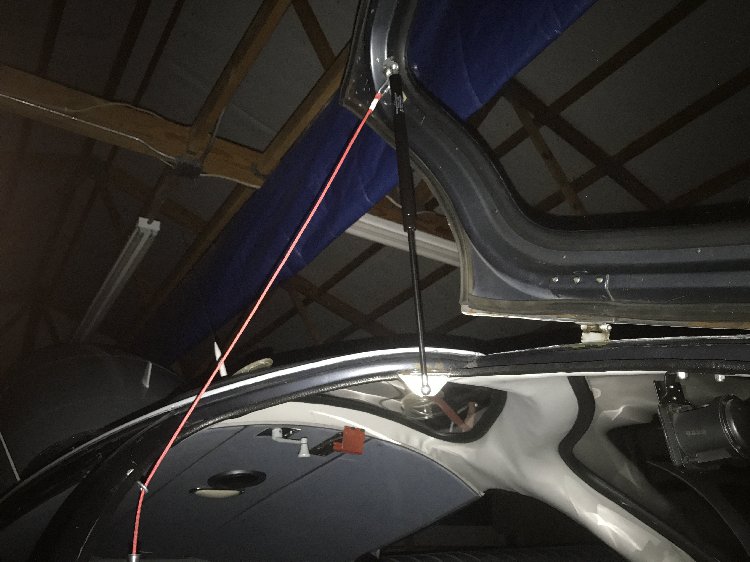 A Bow Door Rod that really works. The Gas Spring opens it slowly and allows opening and closing from the left seat with one hand. Cost? About $30. See PDF article here |
||||||||
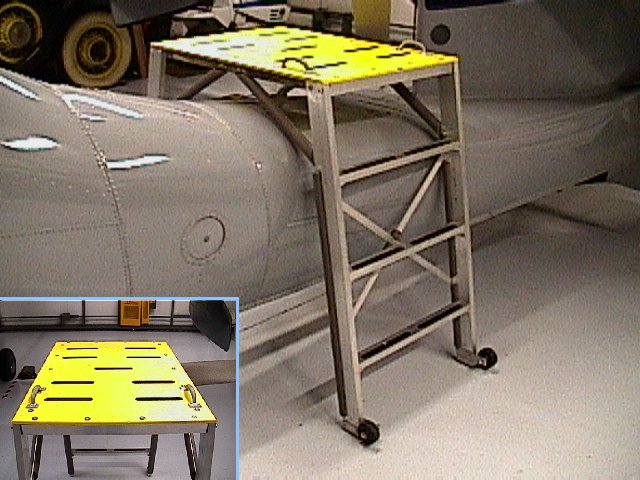
| Bridge Stand by Steve Mestler Have you ever needed to work on the engine or propeller and tired of using an unstable ladder or standing on the Seabee hull? Try making a New and improved Bridge Stand! Inspired by Service News No. 4, page 4, I went to work to design a more up-to-date Bridge Stand for the Seabee. Using 'Architectual Aluminum' (1/8" wall) the stand is very solid and will easily support two men on the steps. I have had the propeller resting on top with two men on the steps! It is easily removable in one piece as opposed to the three piece Republic Bridge Stand. It weighs about 25 pounds! Wheels were added to one side of the Bridge to facilitate removal before flight. 1/2" plywood was used as a top and secured with self tapping screws. Handles were added for rotating the stand up and over the Seabee deck. Foam pipe insulation was used on ALL interior parts of the bridge that would be a potential 'scratch maker'. The steps are reinforced with aluminum angle under each end of each step and two rubber bumpers are on the bottom of each leg. The photographs below illustrate the geometry of the Bridge Stand. Here are the drawing and building notes. E-mail Steve if you have any questions. 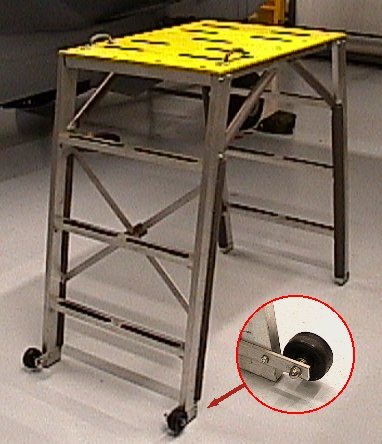
 |
||||||||
| Easy to make Hydraulic Powerpac stand After working on my hydraulic powerpac a few times, I knew there was a better way to support the pump and prevent the inevitable mess of hydraulic fluid all over my workbench. It is simply a gallon tin can with the side cut out and an aluminum frame that sits on the edges of the tin can. It is very sturdy and allows for testing the pump functions. I also use the tin can for washing parts. See the photos below for details: 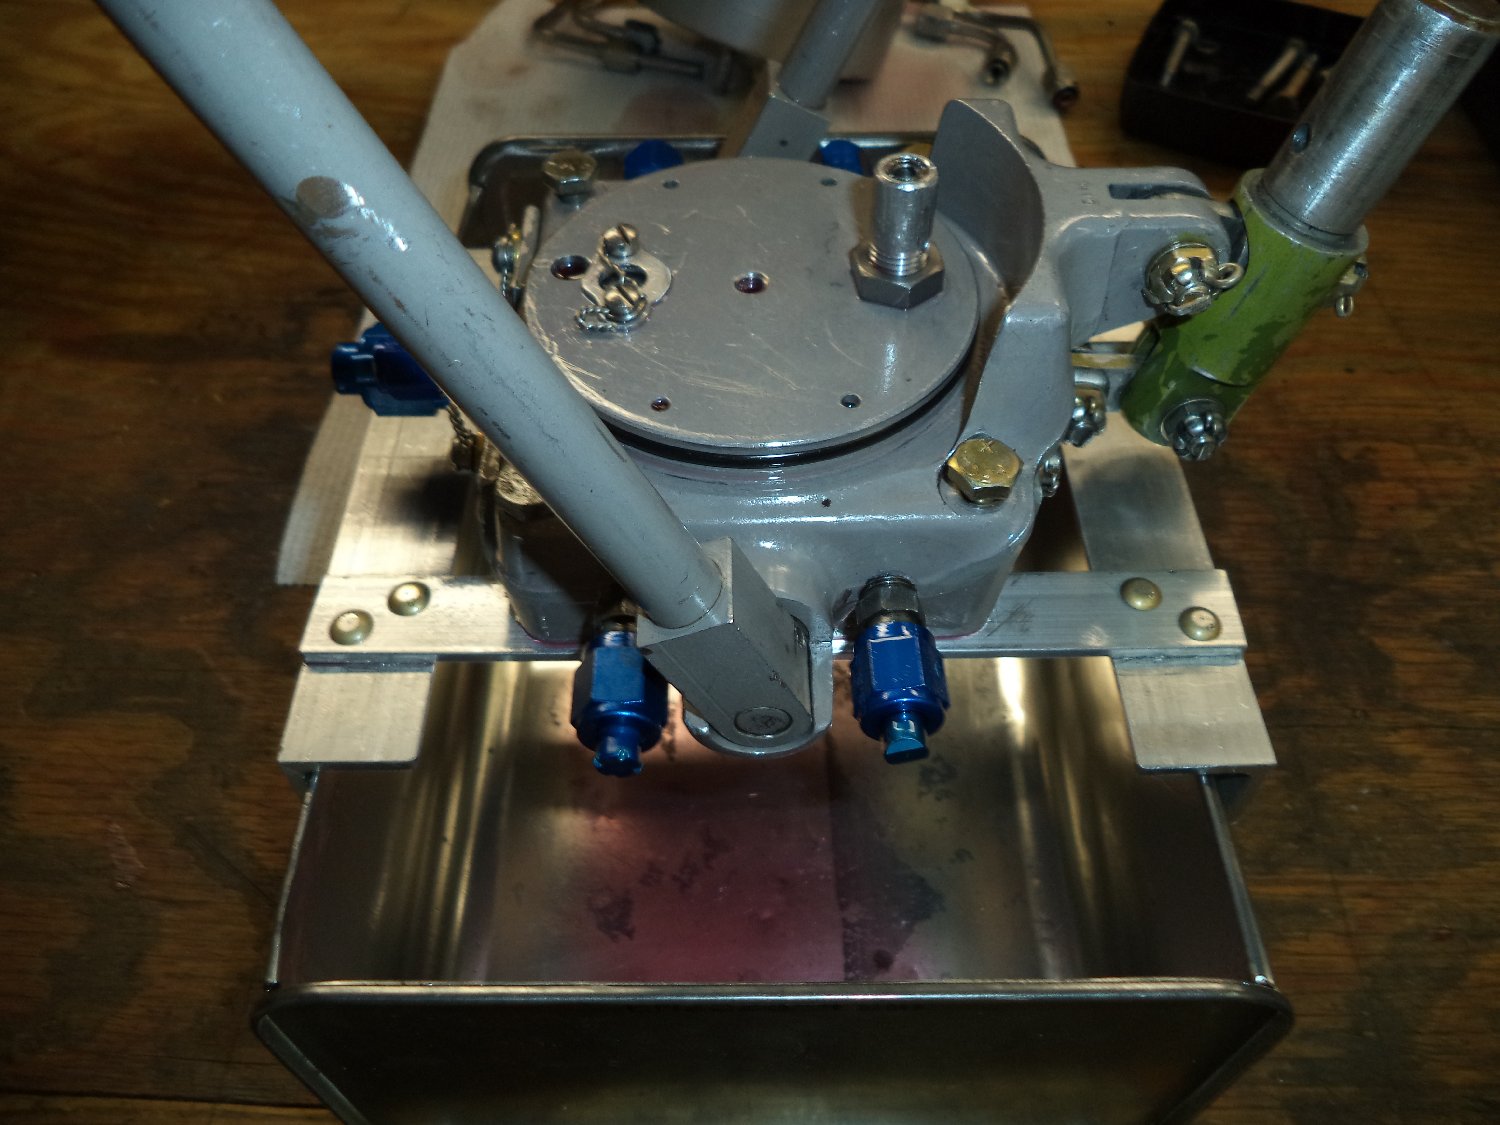 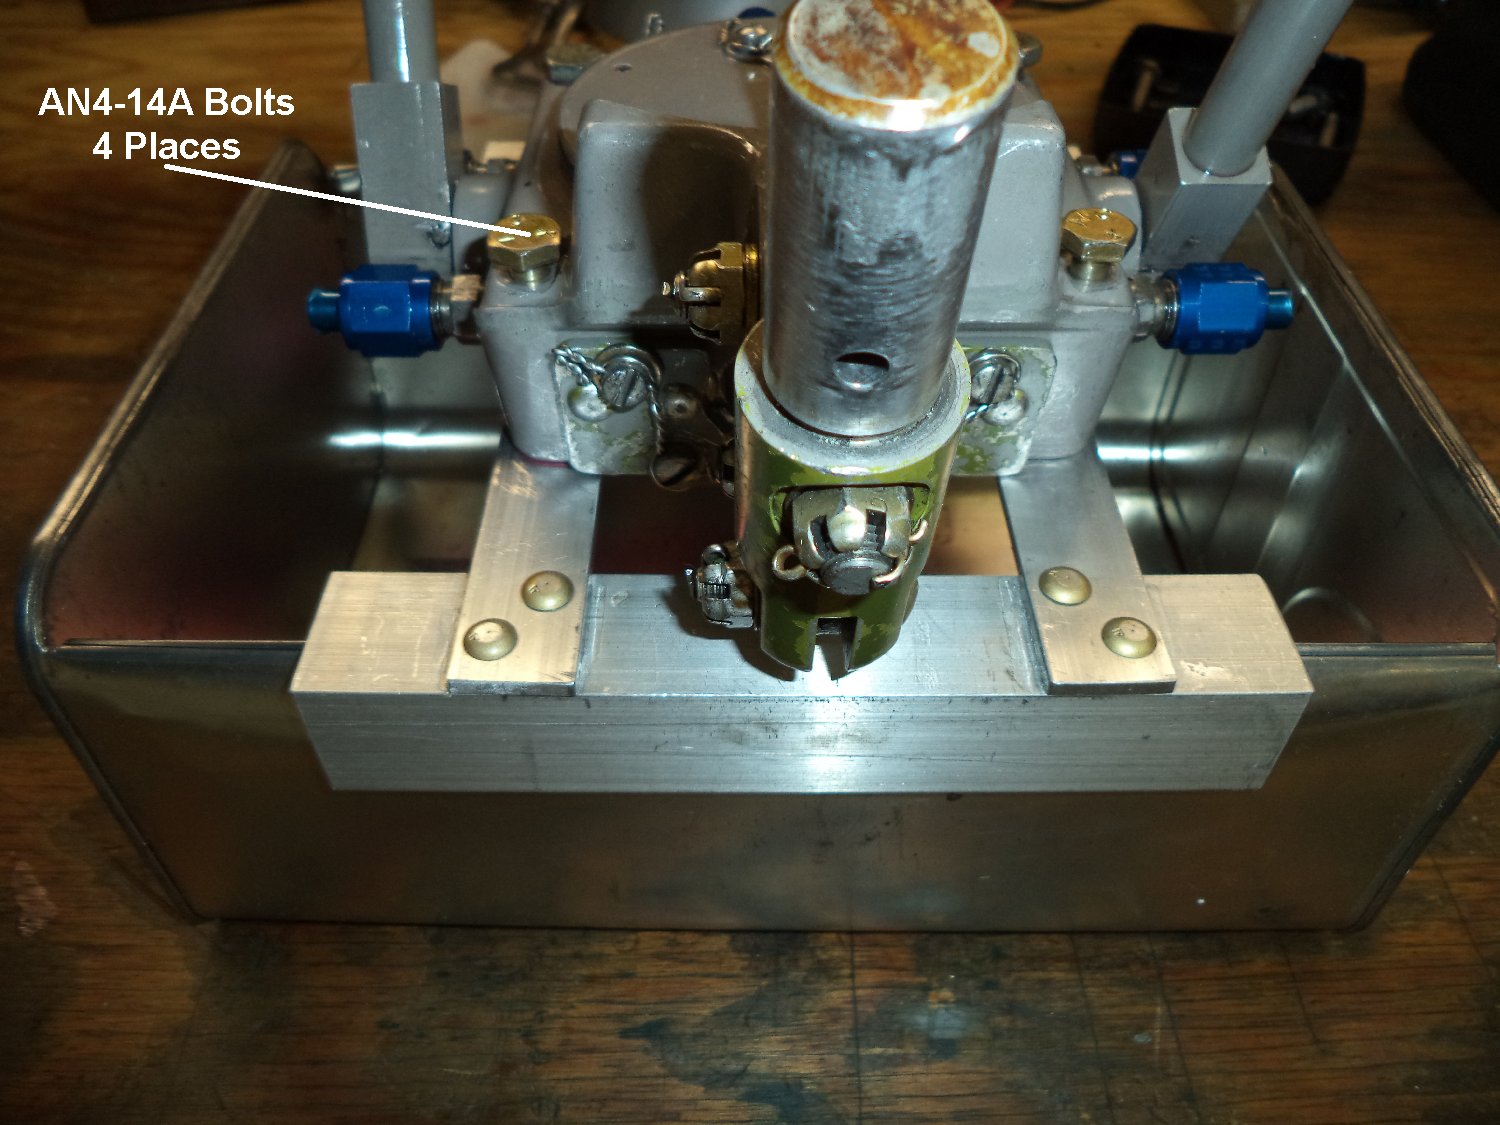 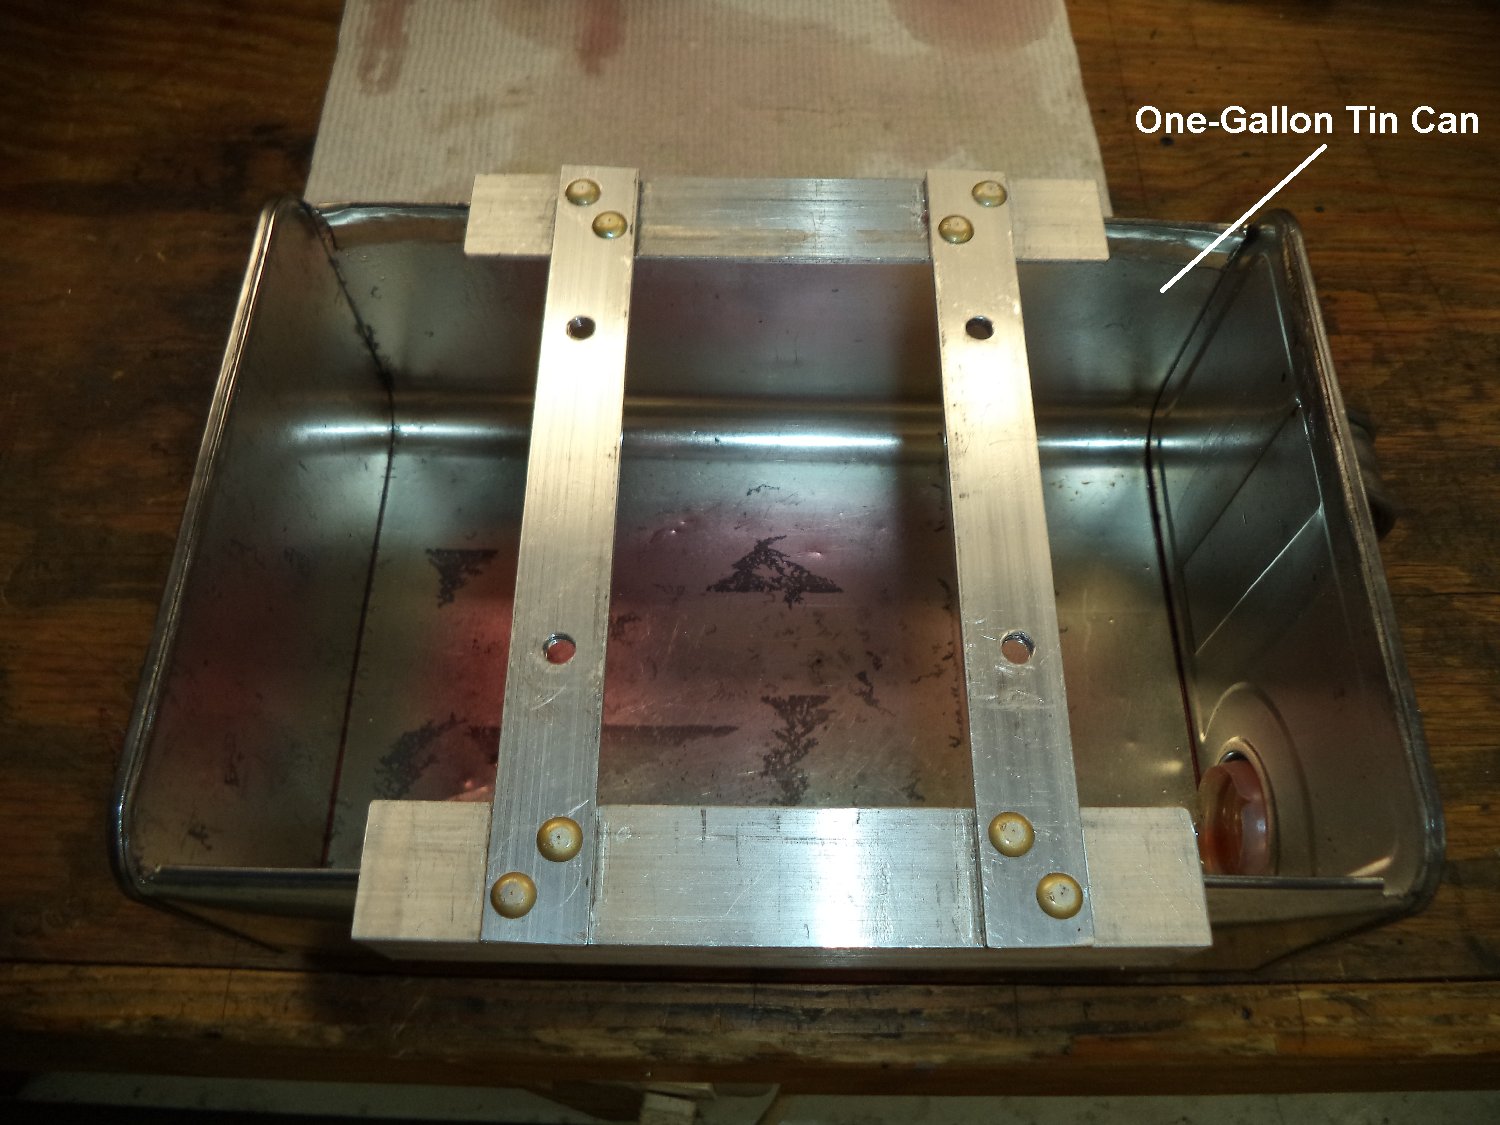 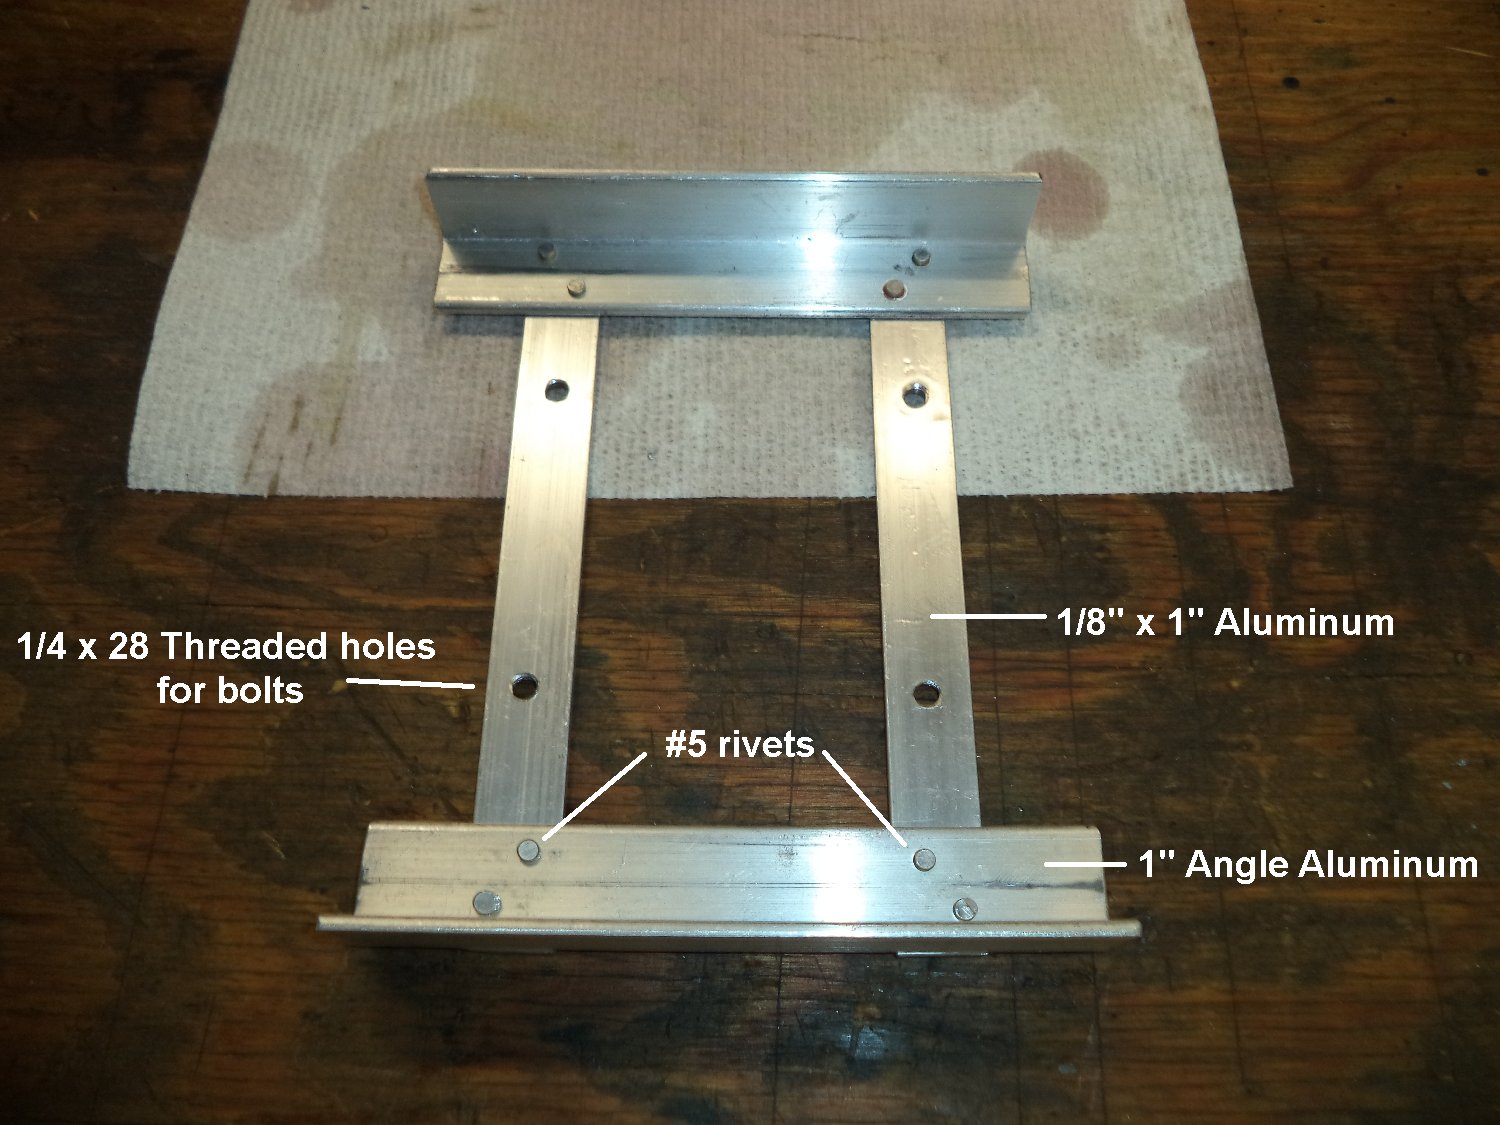 |
||||||||
| Check your gas for Alcohol This is an article submitted by former member Don Booth to the Seabee Club years ago. A simple way to see how much alcohol is in your gas. Do-it-yourself Alcohol Percentage Detection (PDF file) |
||||||||
| Jack plate for Axles New
member Greg Wicker from South Carolina has made a simple Jack Plate for
changing tires or working on the bearings. It weighs about a pound and
can easily be put in the baggage compartment for those long-range
trips. Greg says, "Don't forget to chock the other wheel and the tail
wheel before jacking the Seabee." The Jack Plate can be used from
either side of the axle. A bottle jack is all that is needed to jack up
one side of the Seabee. Thanks Greg!
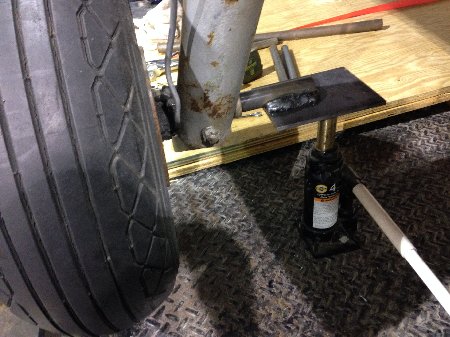 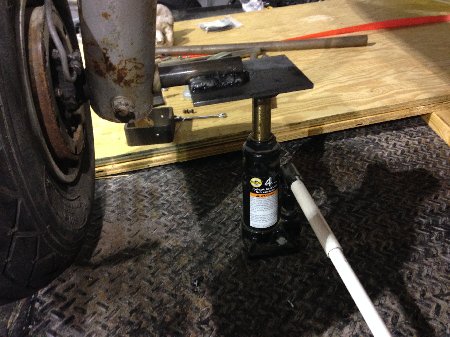 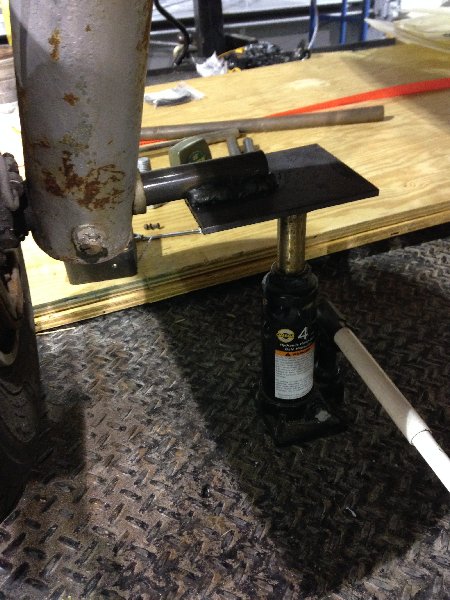 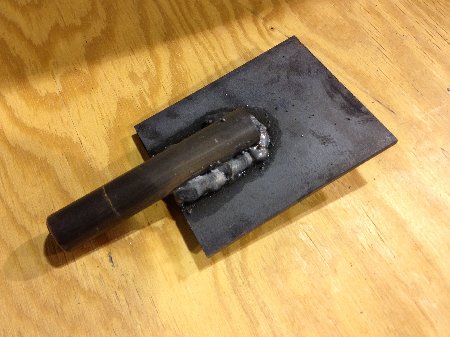  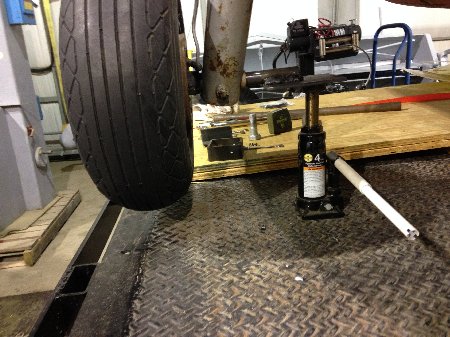 Click on images for full size view |
||||||||
|
Member Herb Sherwin on "one float strut missing" (and a towbar)...
"I wanted to pass on a recent modification I made to my bee to prevent the problem that the Lake Tahoe bee had when it lost a wing float. Walmart has a water toy that some call a noodle that's made of closed cell foam that is about 56" long by 3" diameter with a 1" hole that runs the length of the tube. It weighs 5 oz. and according to my calculation provides 12.7 lbs. of buoyancy. I put 5 tubes in each wing tip by putting 3 in each droop tip (two whole one and one cut in half with both pieces in the tip) and two in each wing folded in half between the two outermost ribs and the front and next trailing spar. This should provide over 60 pounds of floatation with a moment arm that should help keep the wing from going under. I know "no engineering approval" but I am willing to chance it. I hope to perform an engineering test by taking off a float and letting the wing rest in the water and videoing the results. I will send the video if it turns out ok. I don't know how other bee folks do for a tow bar but I designed one many
years ago that works for me. If this is an item of interest, I will provide
details."
(Ed Note: Thanks Herb! If we can prevent just one of these disasters it would all be worth the effort. Herb says Walmart has the "noodles" for a buck a piece.) |
||||||||
| Donut removal tool... Member Tom Hoag uses a common tool to remove those stubborn tail wheel donuts and spacers. A cotter pin removal tool, available at most hardware or Automotive shops, works well to get the donuts out. You may have to get them out one at a time. After years of shock absorbing the donuts "lock" themselves into the tail wheel tube. Some kind of tool is a must to get them out. Thanks Tom! 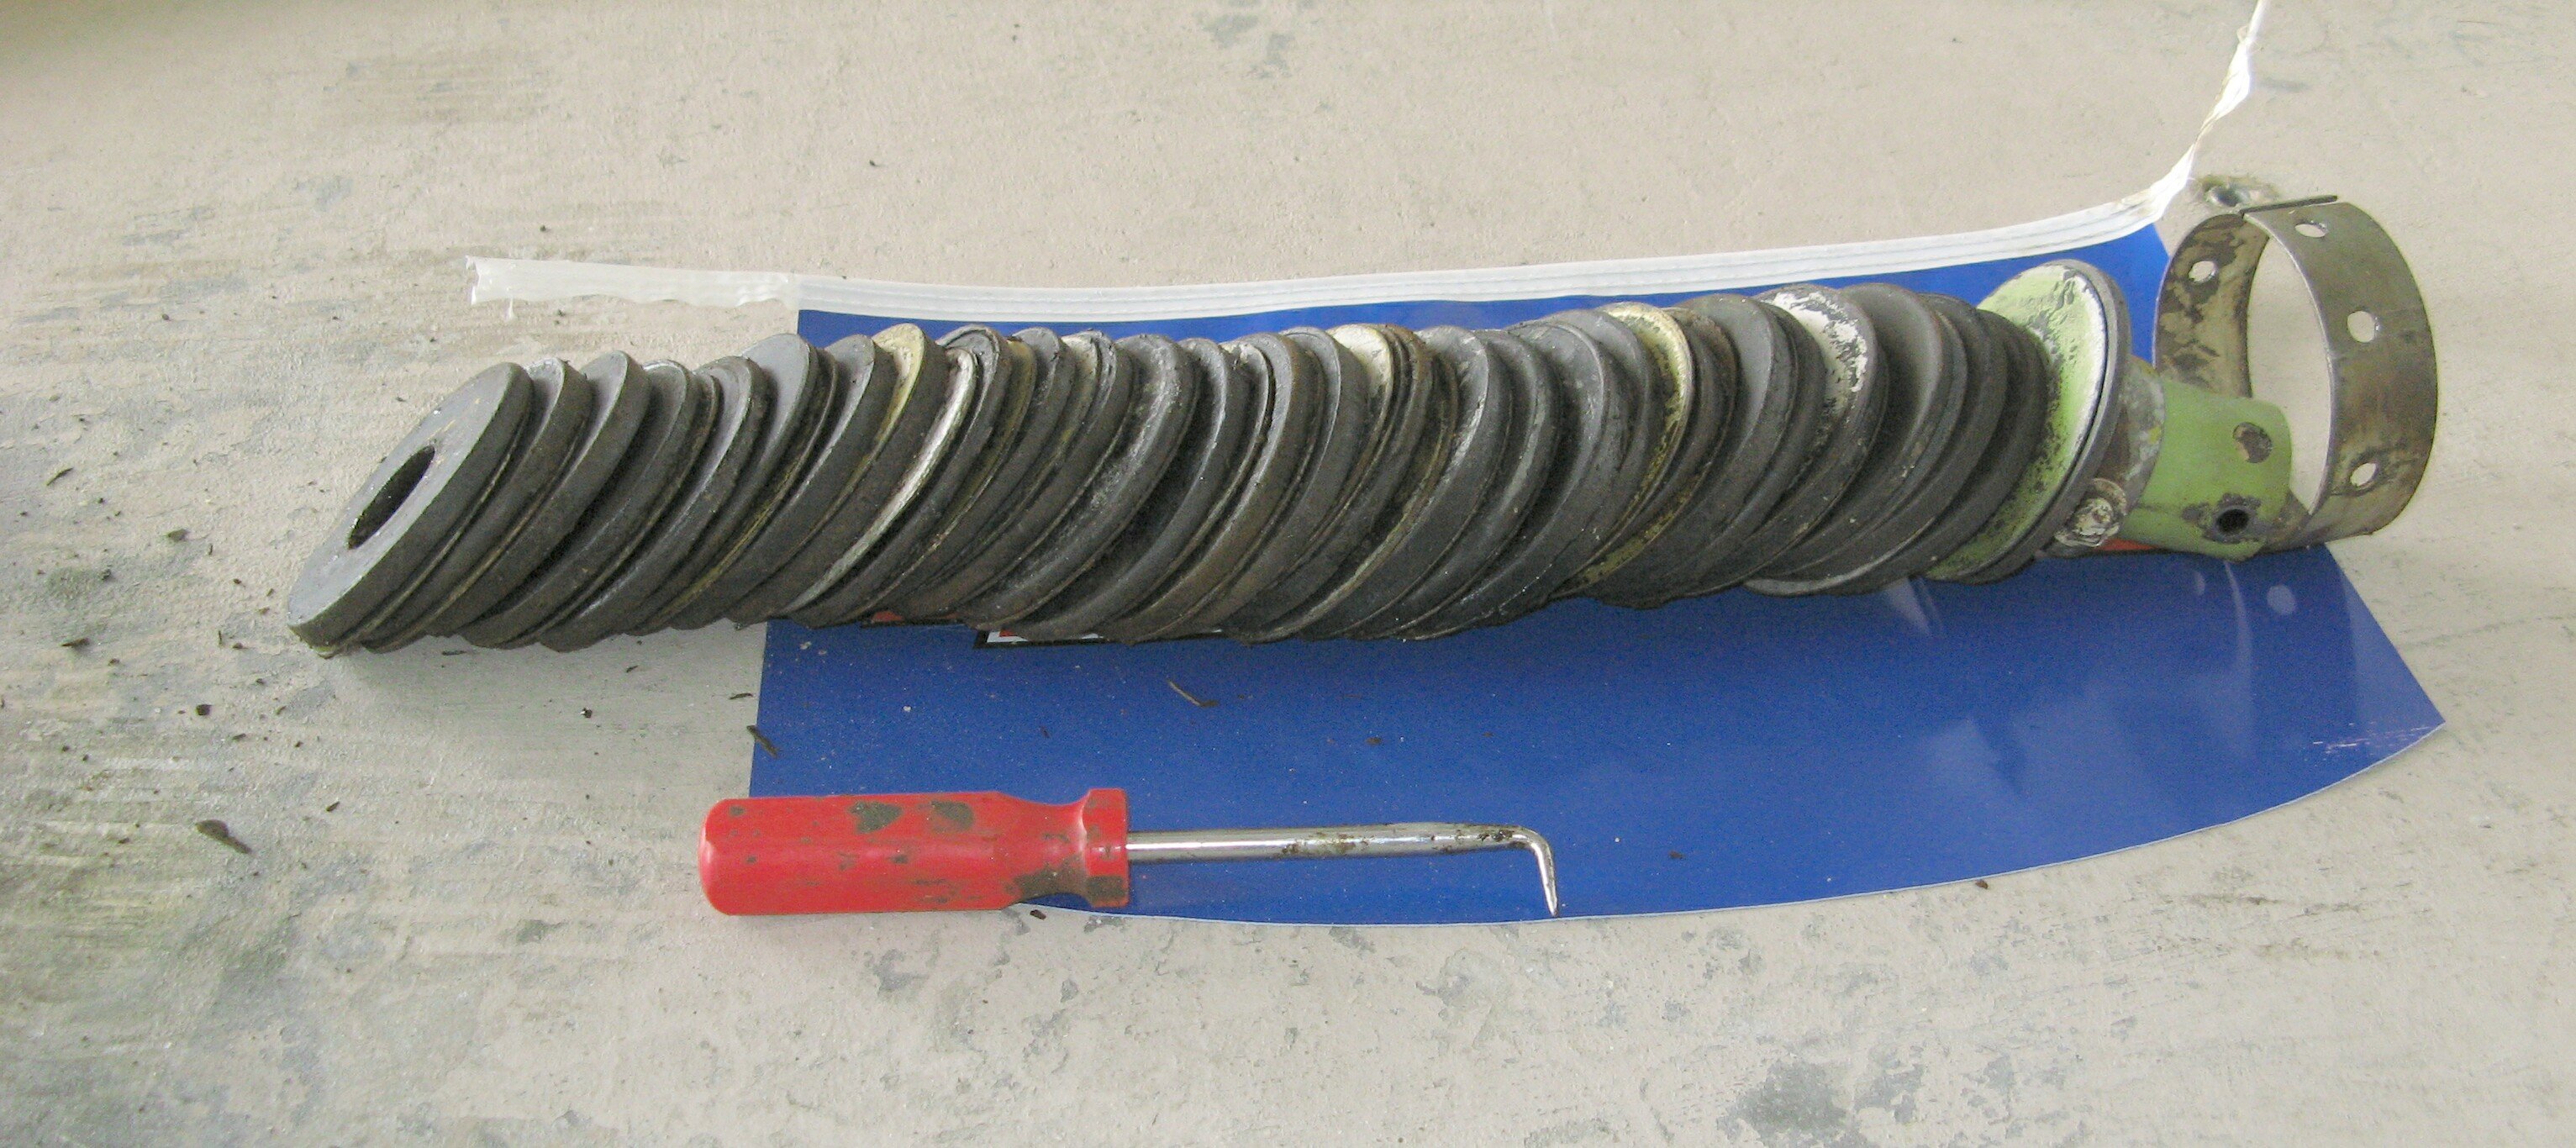 (Click on image for larger view) |
||||||||
| Make a hull stand... Member Pete Norman has forwarded the following hull stand. It appears to be very solid and will allow you to do just about anything on your Seabee! There are two PDF files you need to download; Bill of Materials and the Plans. It looks like a day of welding is all it takes to get these done (maybe I'm optimistic). This would be a good first time welding project, with proper supervision of course. Also, as you will see below, it makes a great static display at airshows. Pete says, "Most people didn't know what it was!". Thanks Pete (and Bruce Hinds) for the fine addtion to the "Tips and Tricks" page. 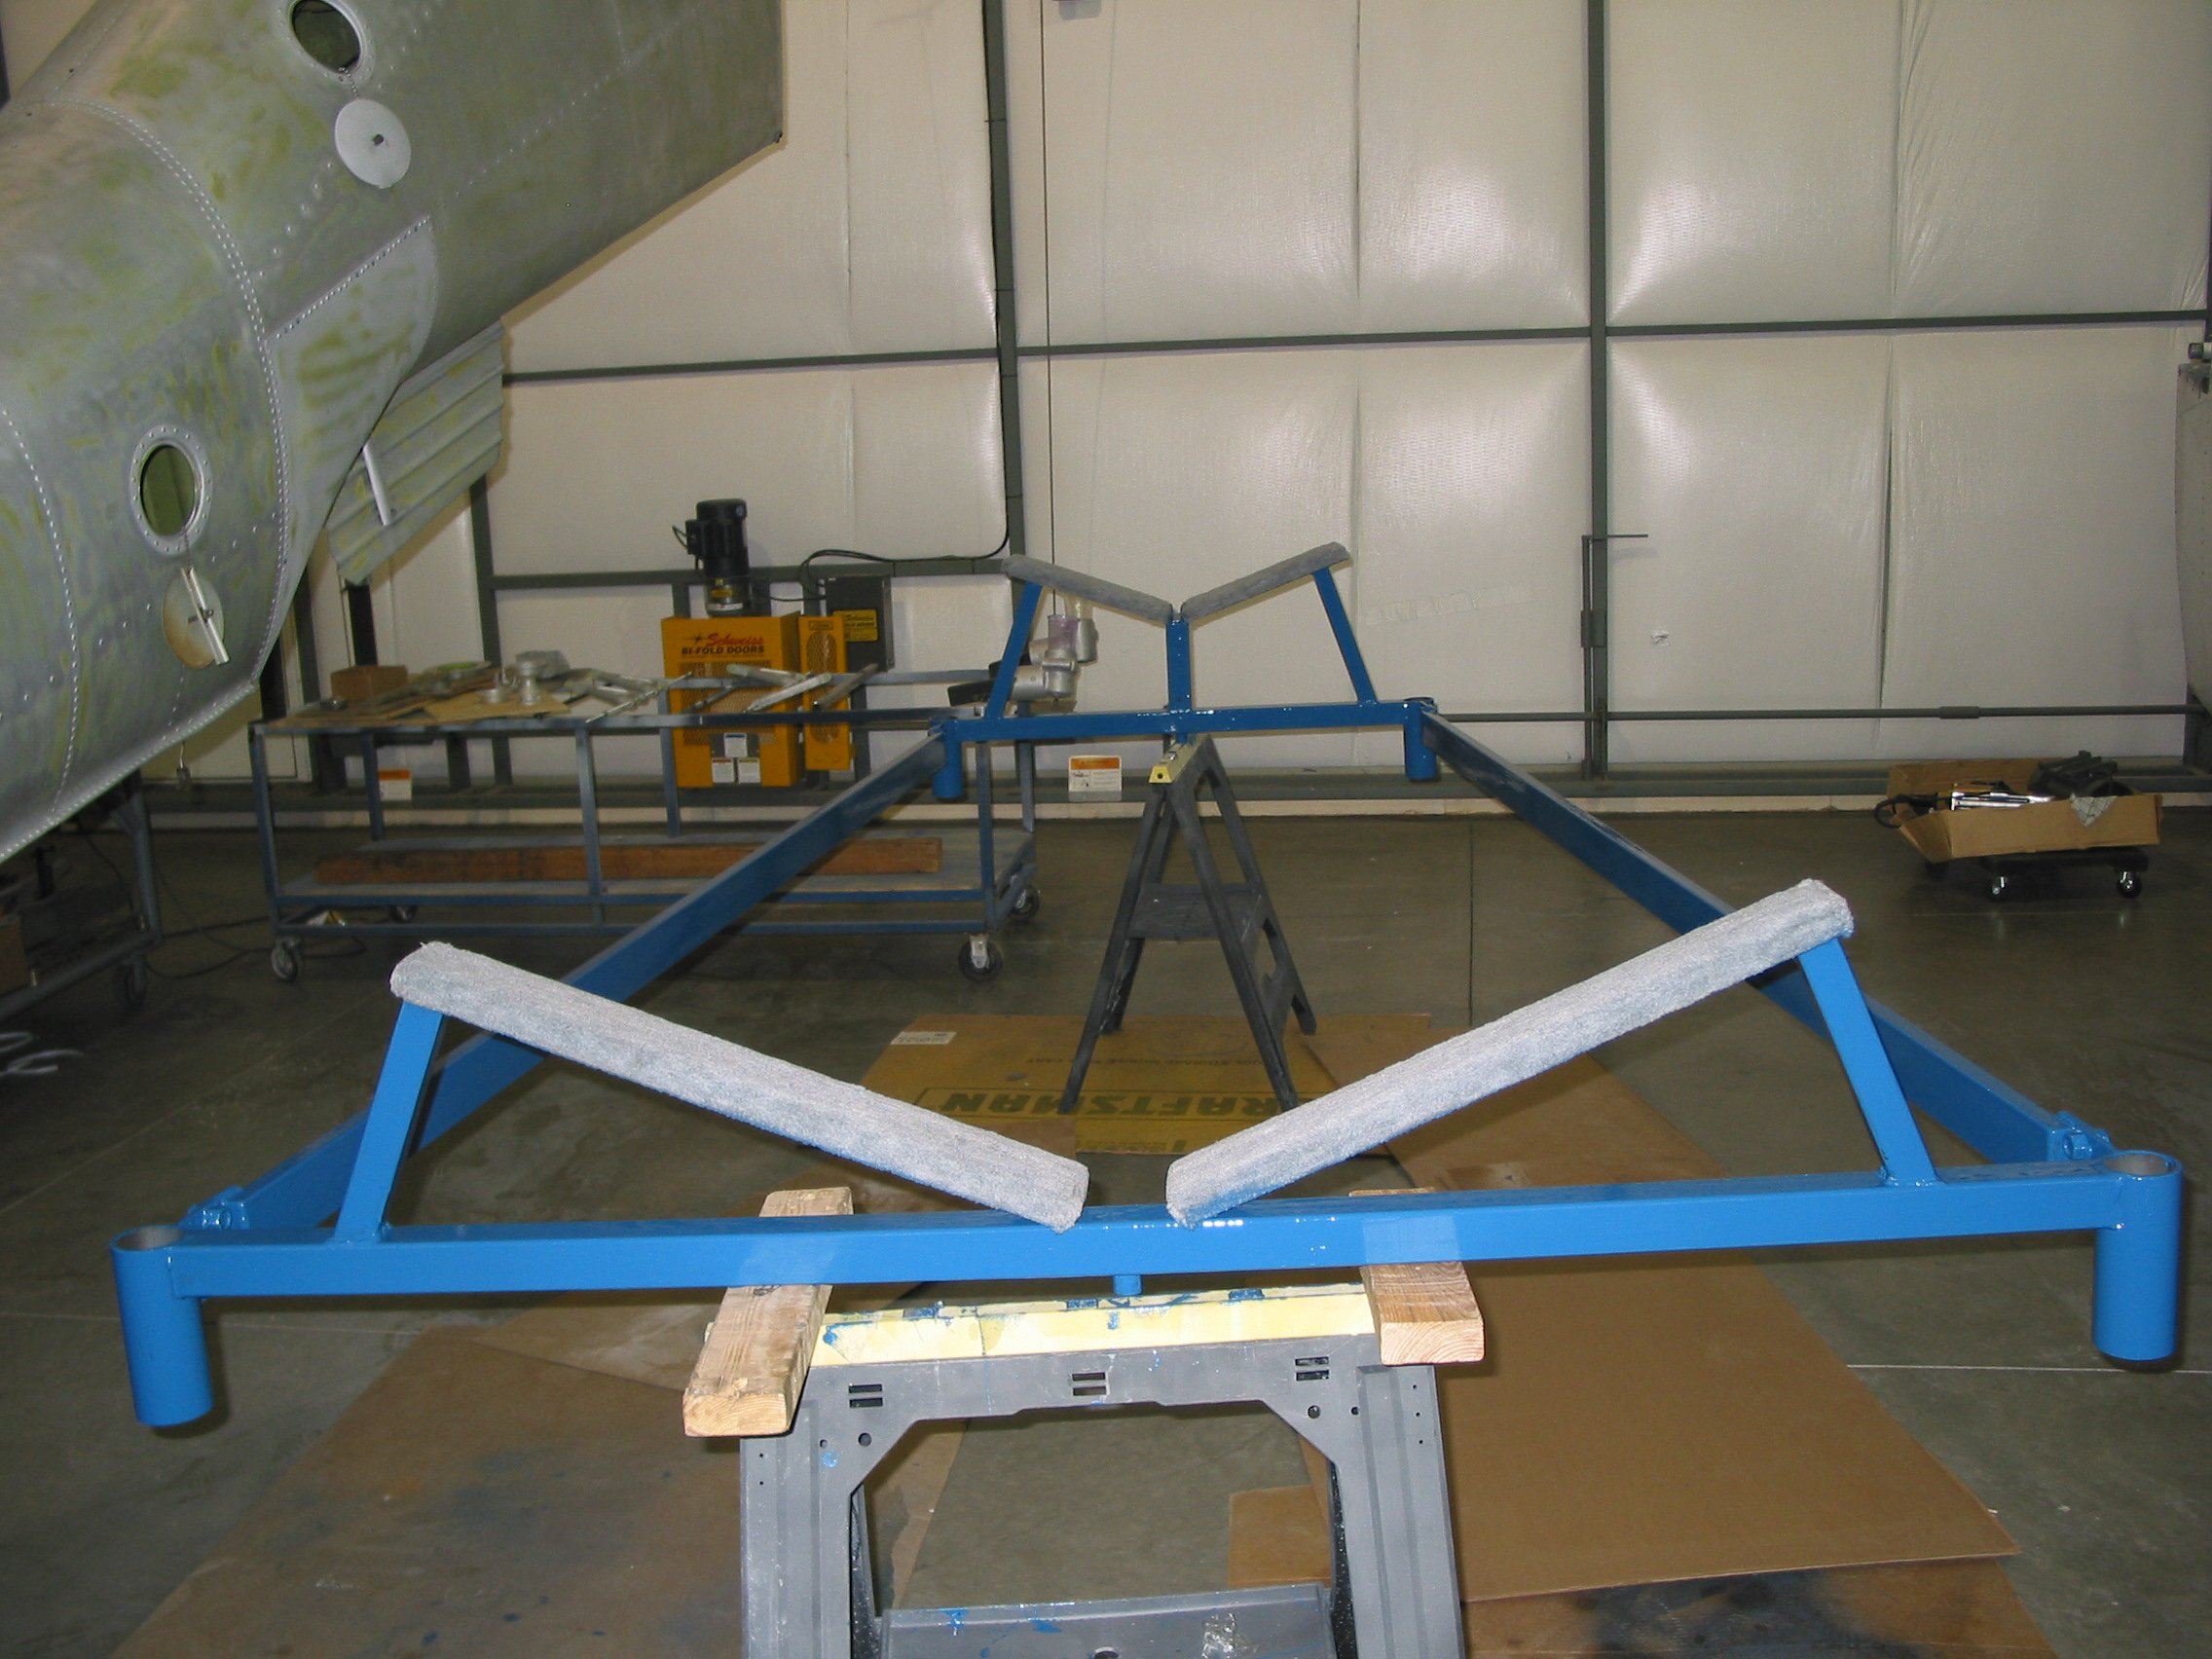
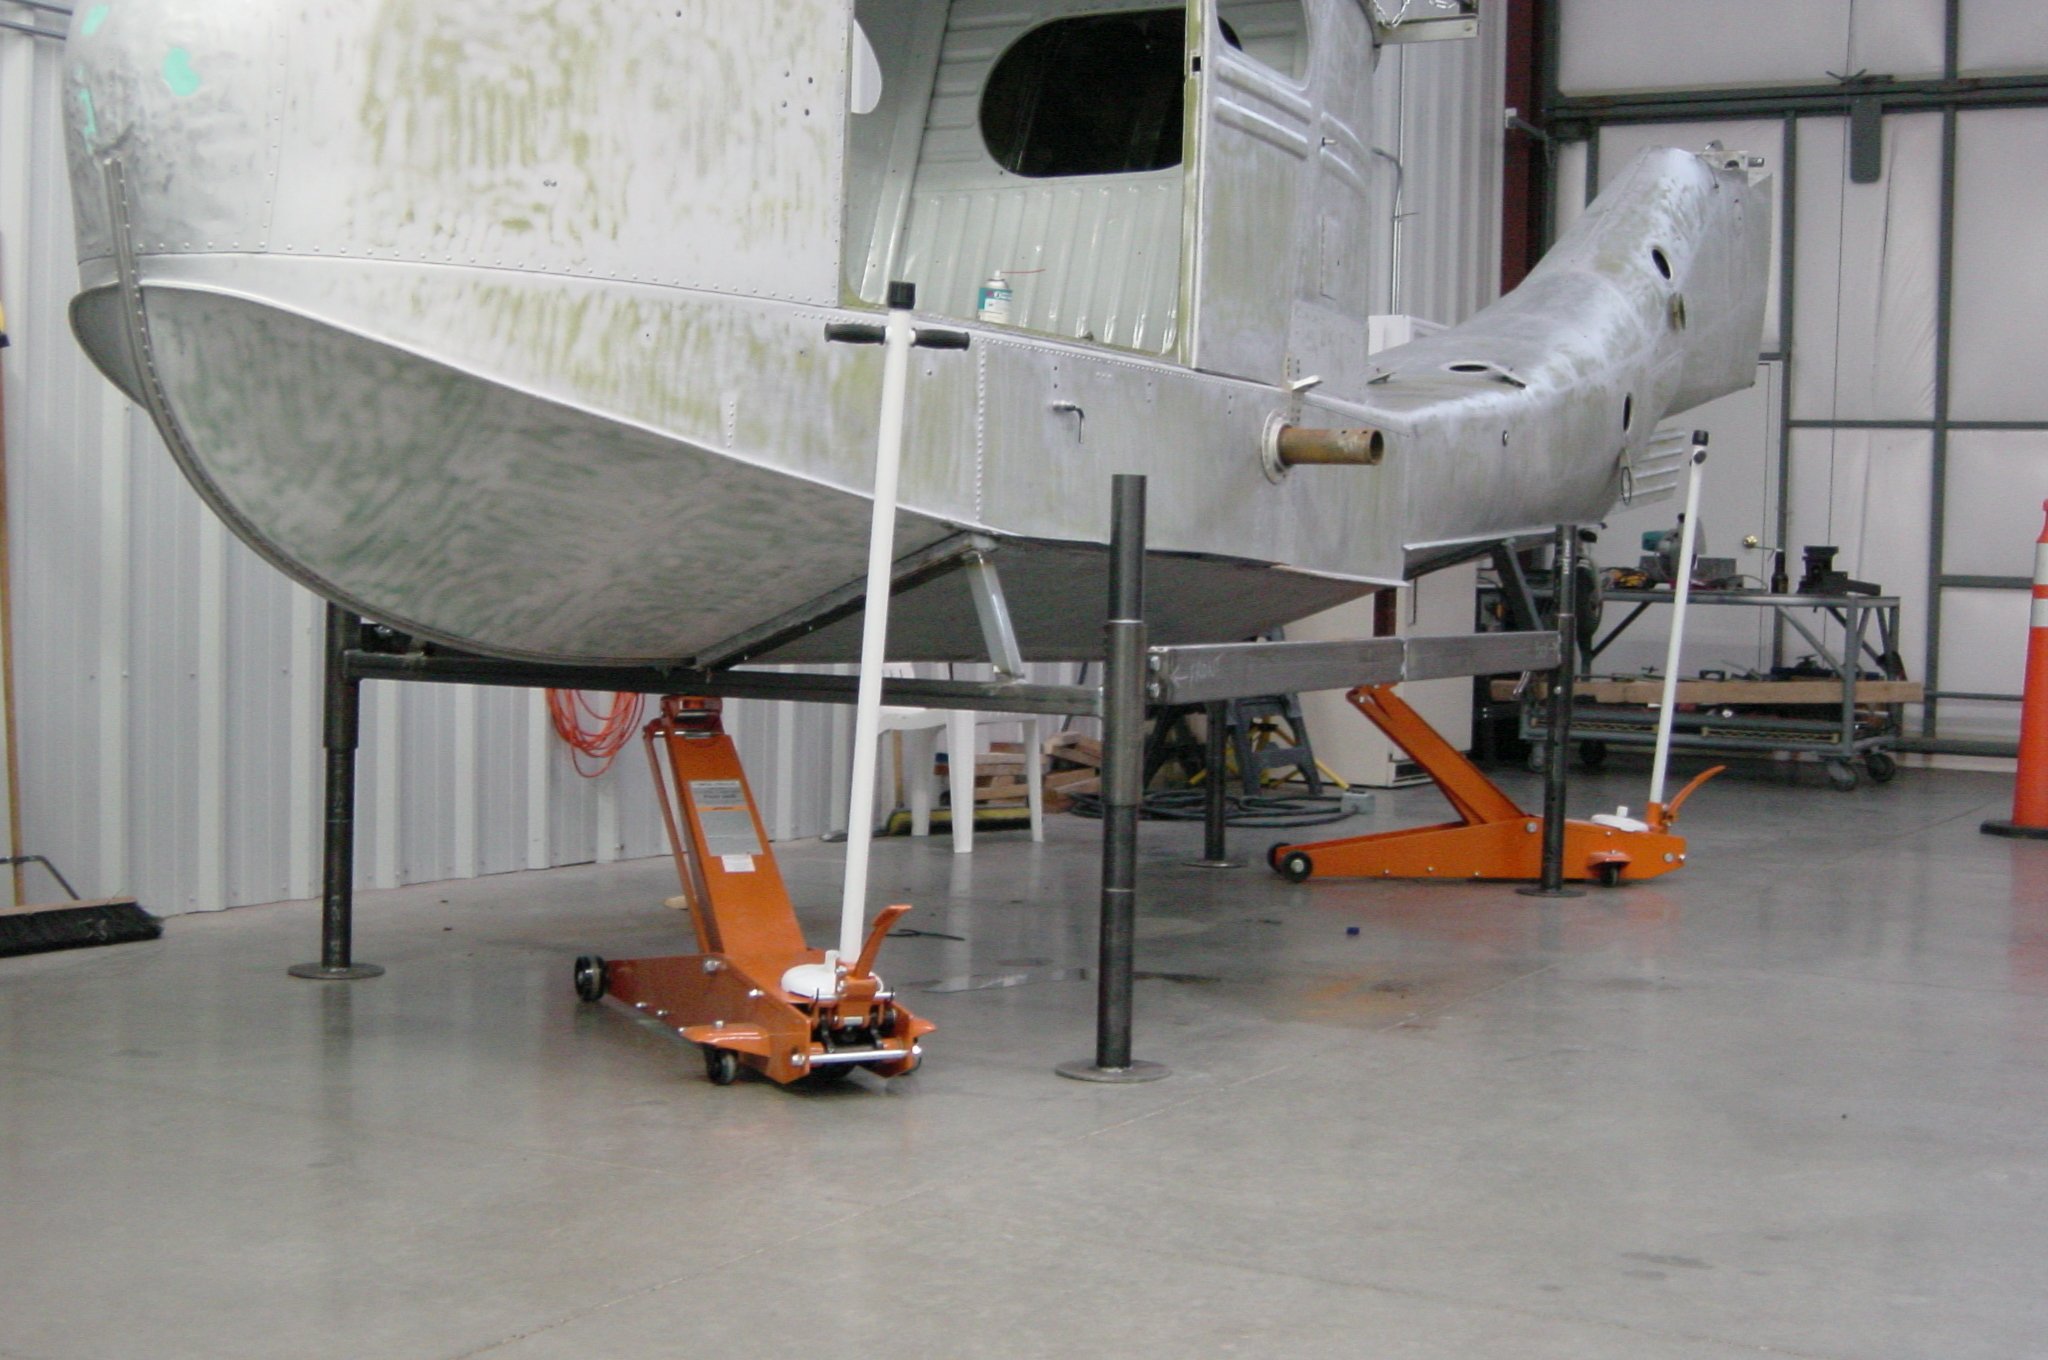 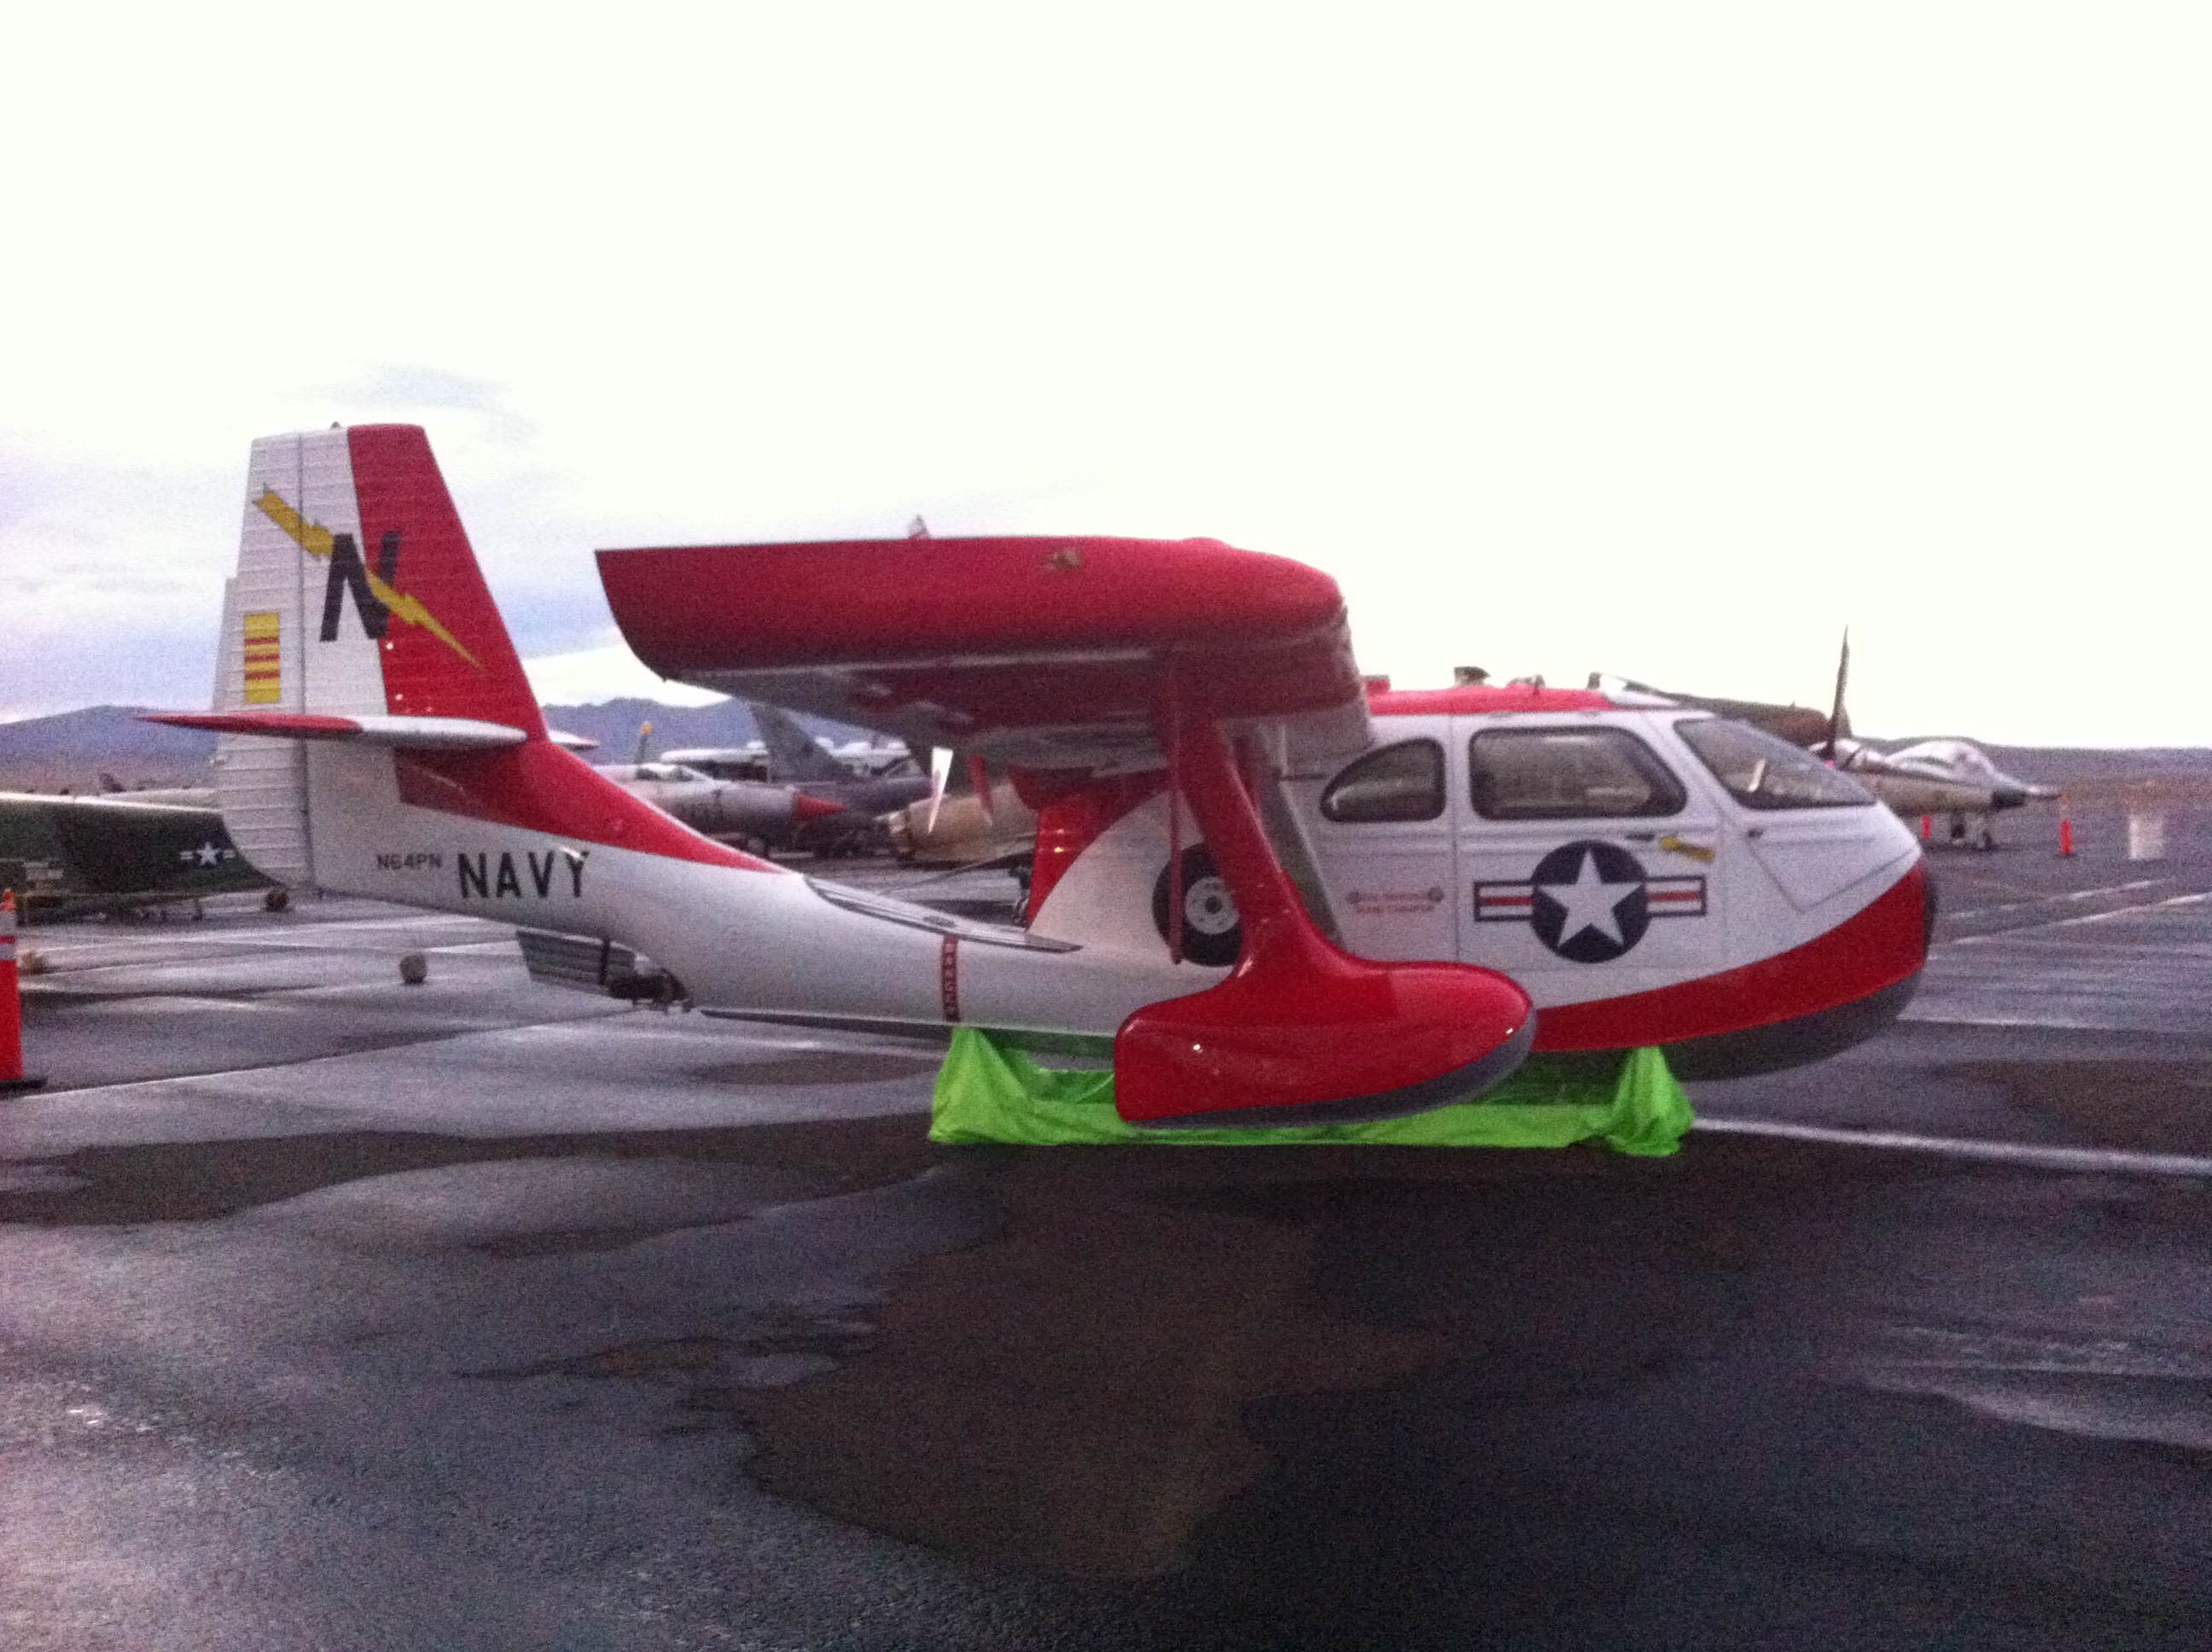
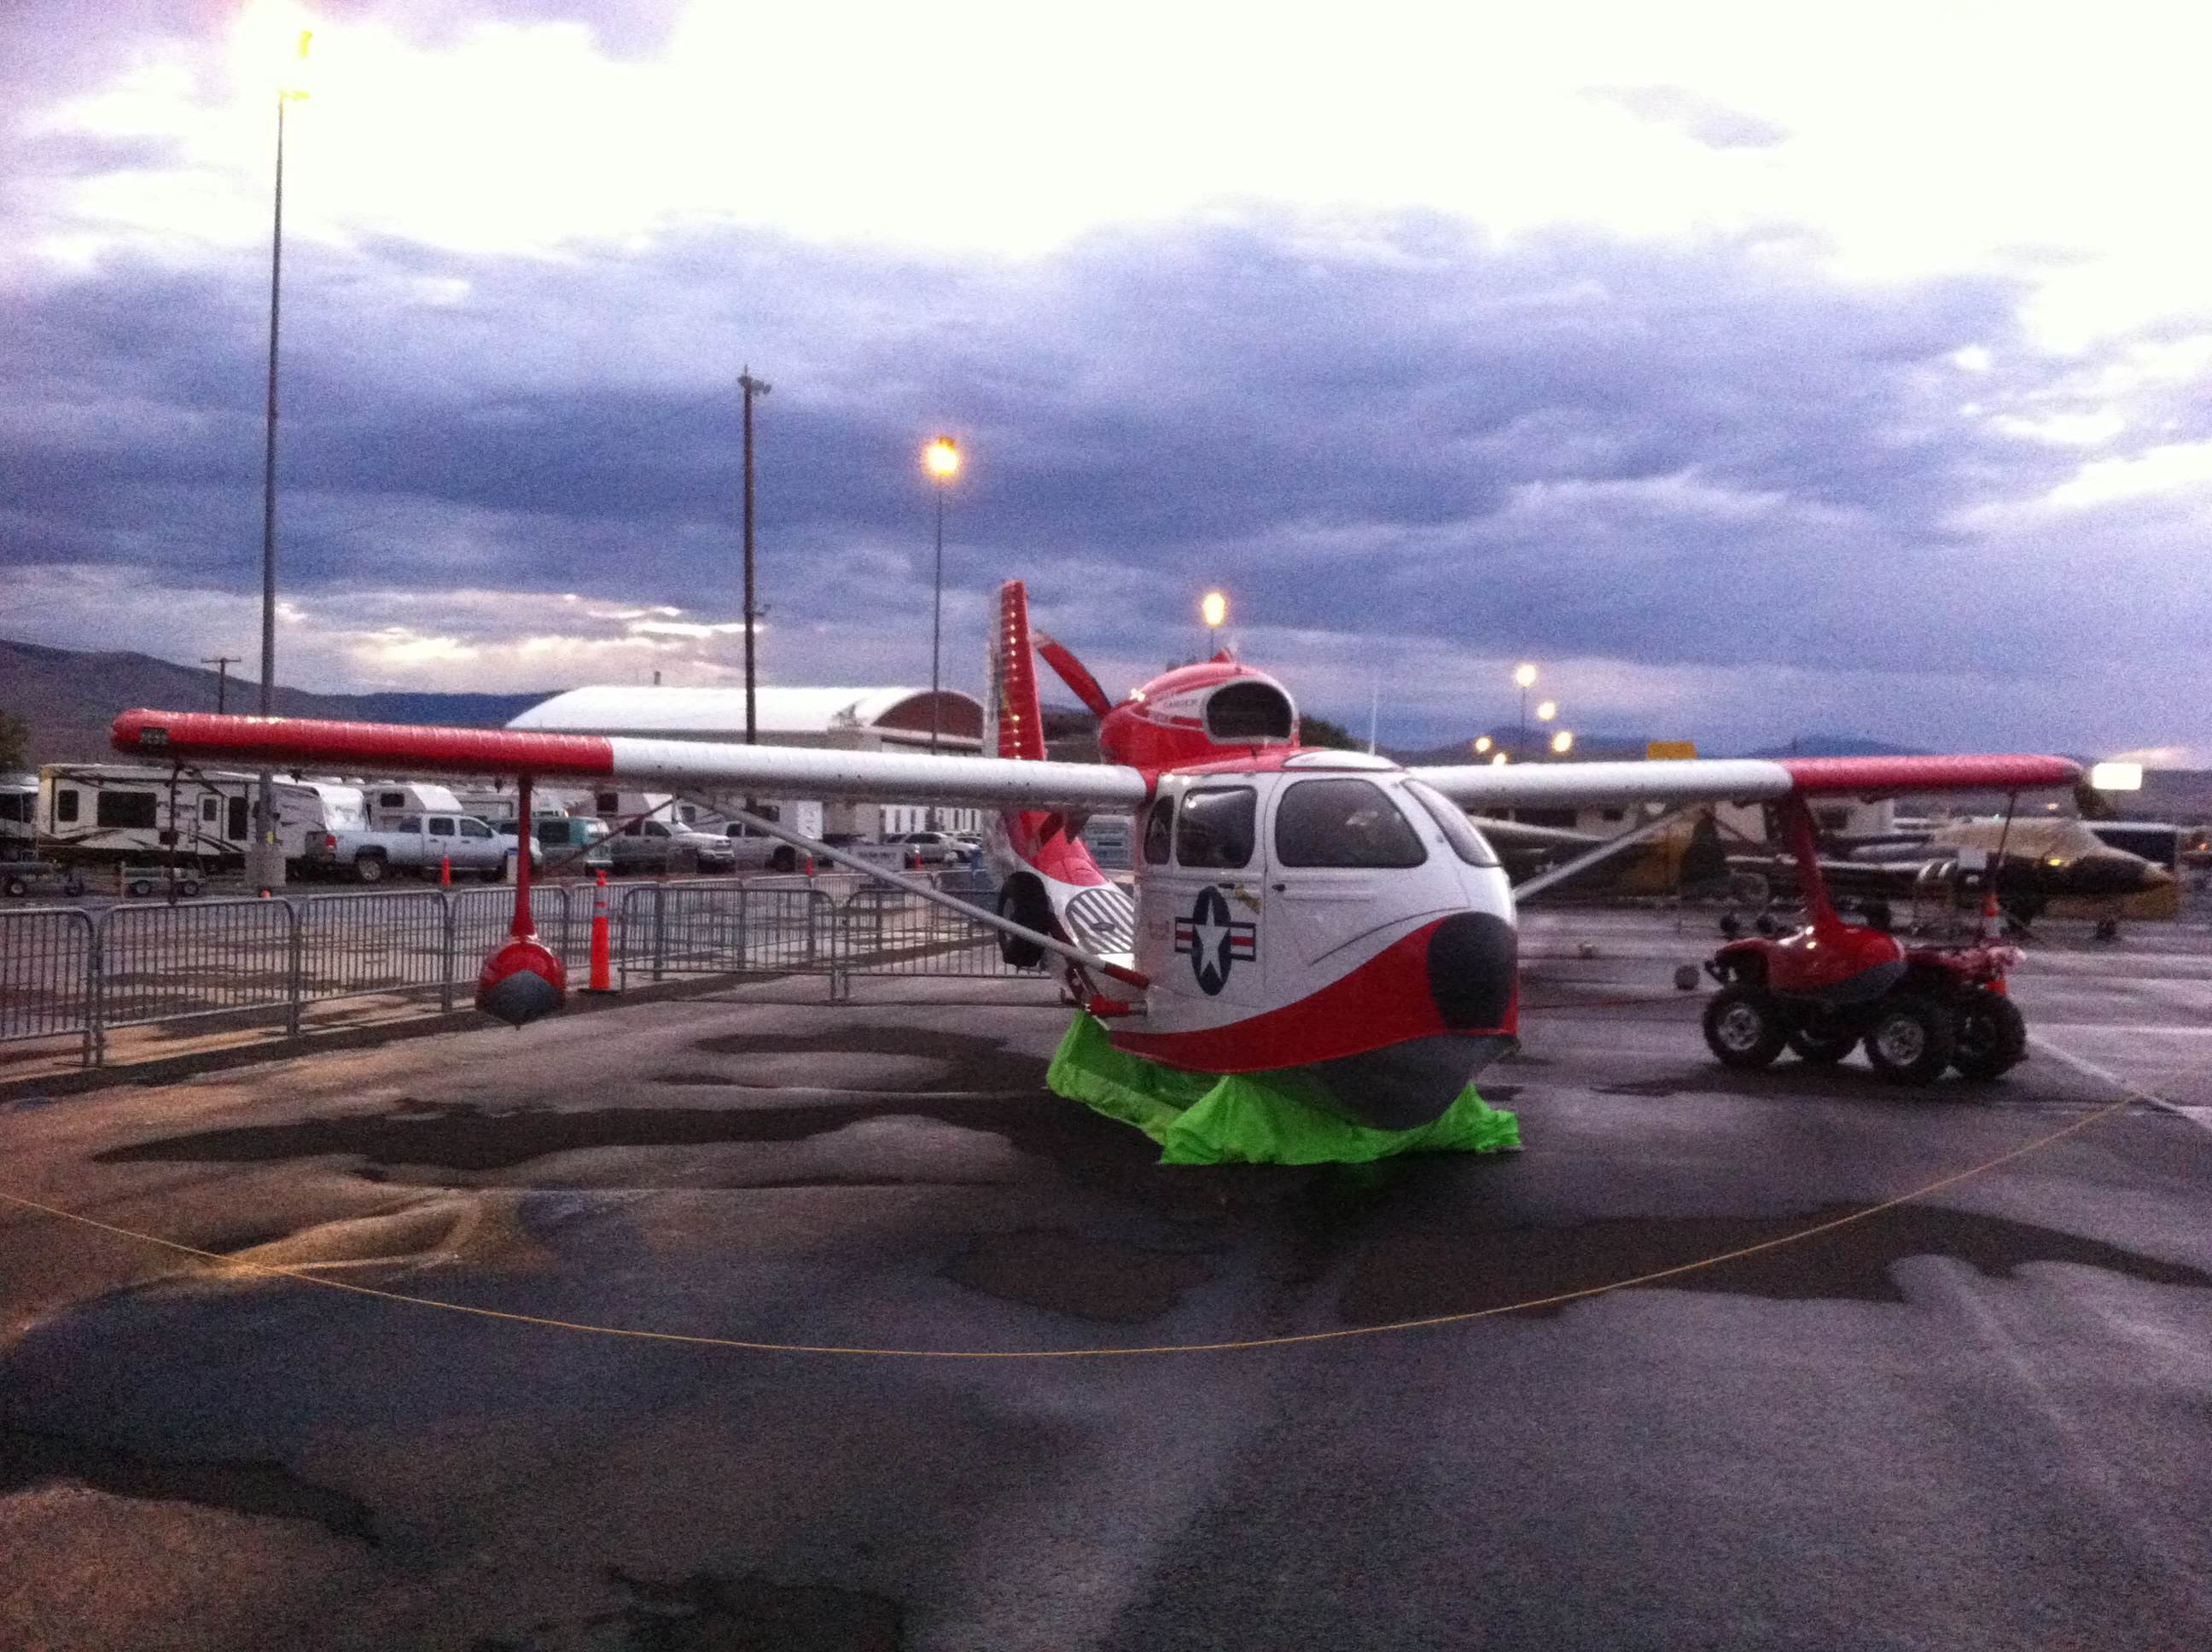 Click on photos for full size view
|
||||||||
| Make some hull stands... This tip is a modification of the Hull Stands seen in one of the Republic Service Letters. The late Seabee owner Marty Bennett changed the plans slightly to acccommodate the slightly different hull shape. Below is a sketch I made of Marty Bennett's design. You will most likely have to change your Hull Stands slightly to fit your hull. If you want to see the Republic Service News No. 3 version click here (see page 2 and 3). 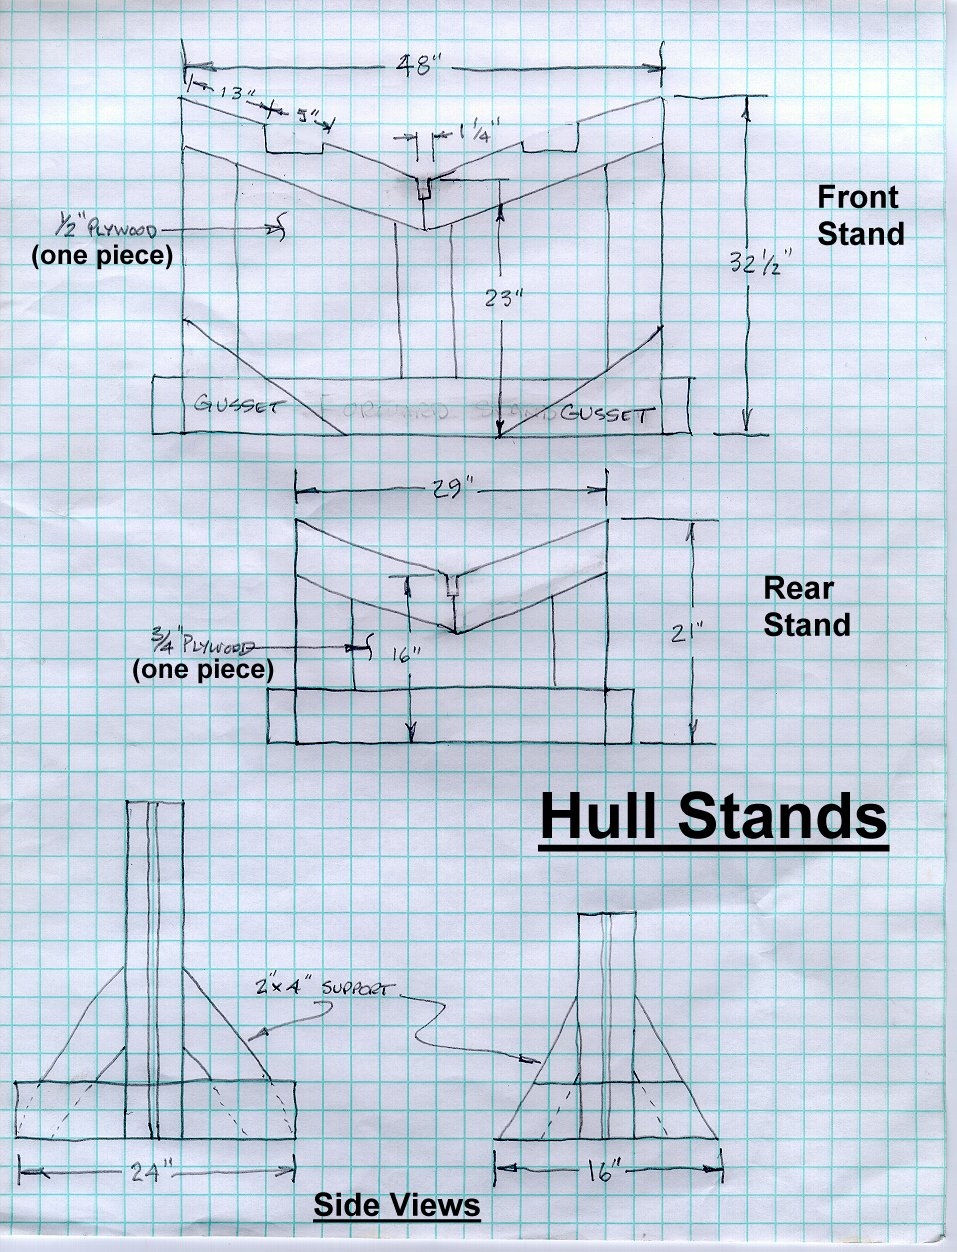 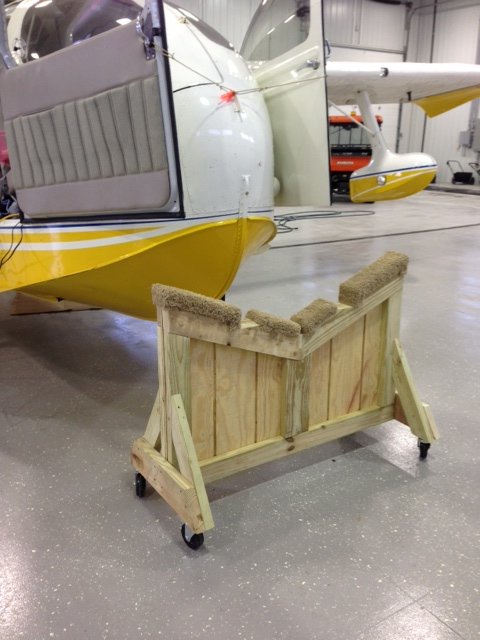 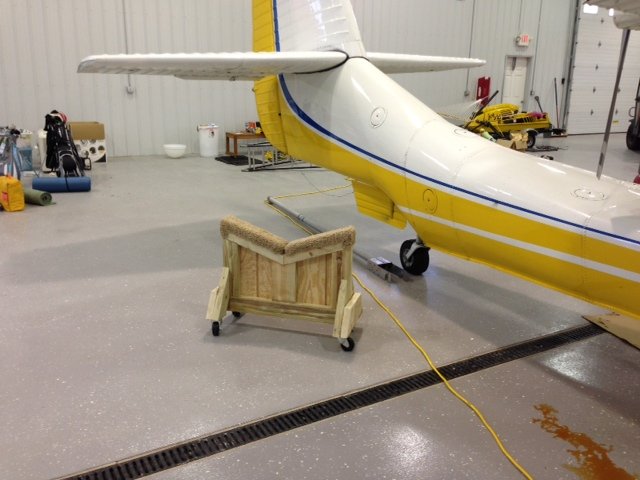 Click on the photos above for full size view. Note: The wheels on the stands are optional and locking wheel brakes for the hull stands are highly recommended. Note the liberal use of shag carpet for padding between the hull and the wooden frame. |
||||||||
| Picking up a passenger on the water... This tip comes from Henry Ruzakowski (thanks Henry!): If you ever need to pick someone up out of the water when away from shore, lower your landing gear and step on the brakes! Then have them step onto the right main gear and enter the Seabee normally (wheel-spray rail-cabin floor). The only caution is to get ready to shut the engine down as you approach the bobbing passenger if they are not intimately familiar with the Seabee. If they miss the Seabee as it passes, they could be in the propeller arc as the Seabee goes cruising by. Use caution! |
||||||||
Put a plug in it!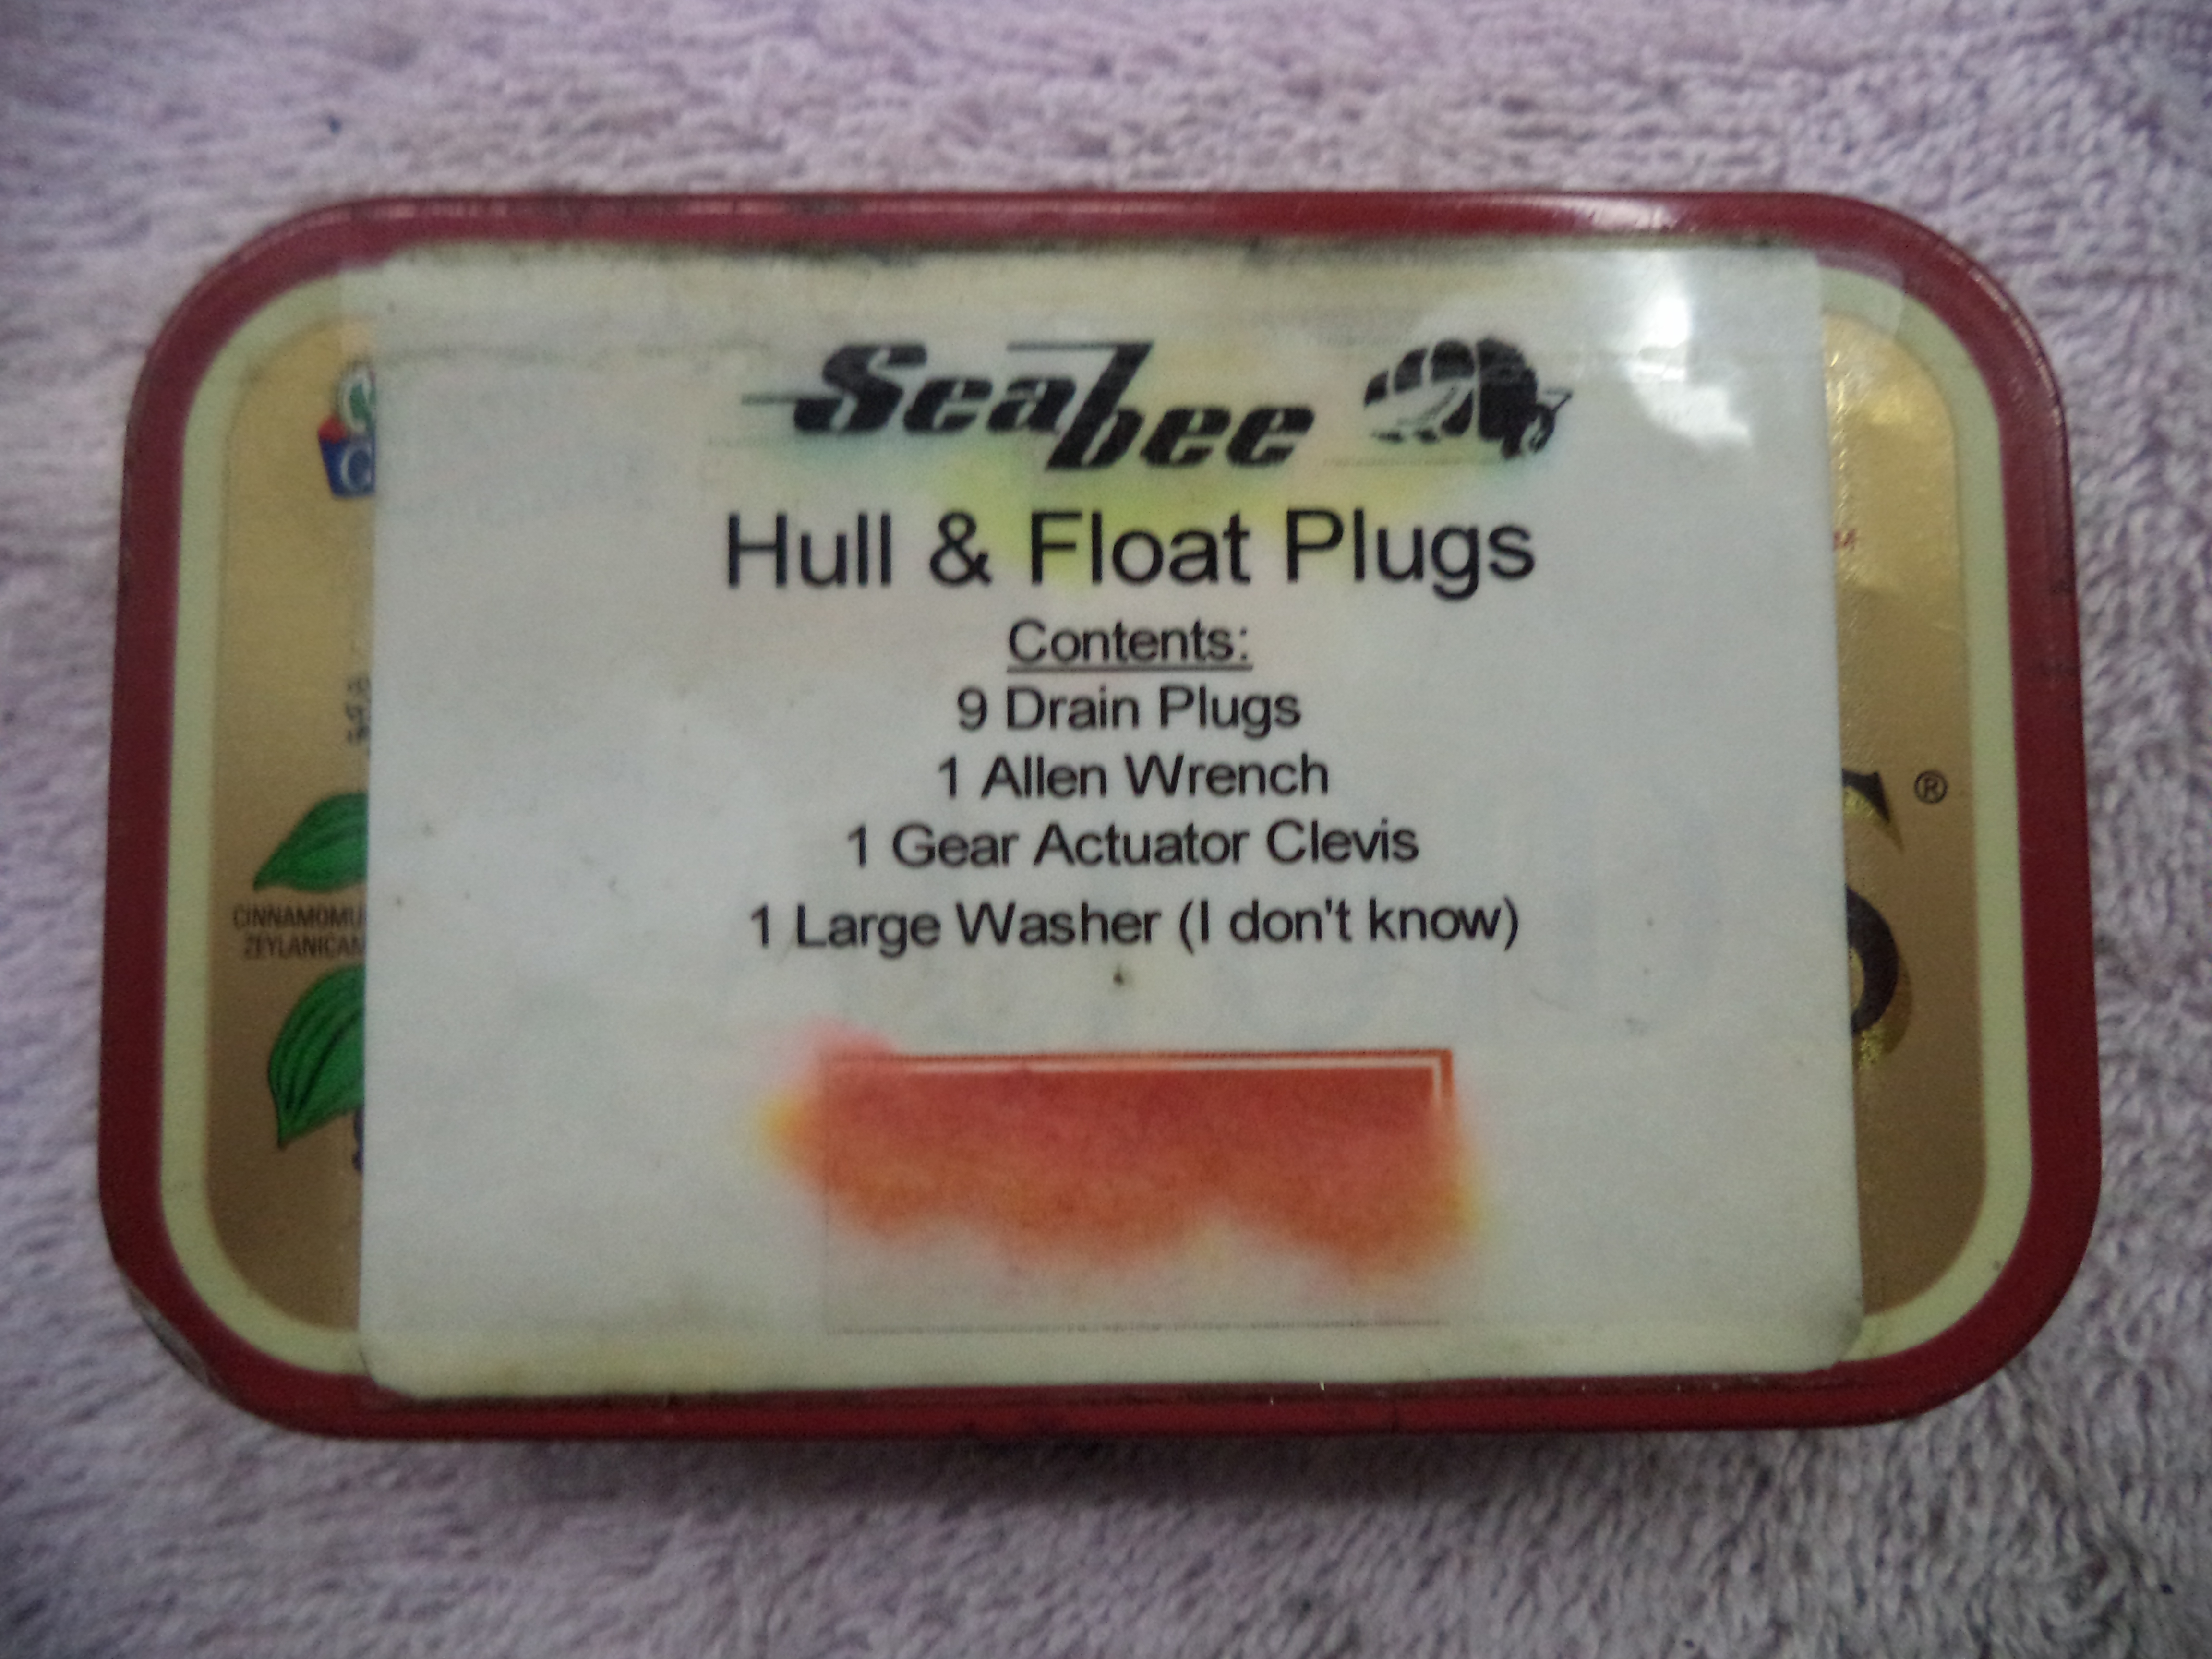  I
know that most of you probably have your own way of keeping track of
the Hull Plugs but here is my idea. I use an labeled "Altoids" can and
keep it on the floor in front of the pilot's seat as a reminder to put
them in before EVERY flight.
There is other stuff in the can as well. The contents are: 9 - Hull Plugs (two spares) 1 - 3/16" Allen Wrench (for the hull plugs) 1 - Schrader valve extension for th tail wheel tire 1 - Trim tab locking set (2 washers and a bolt and self-locking nut) 1 - 90 degree nylon elbow (used for the required IFR static check every two years. Yours may differ.) 2 - Landing gear clevis forks with clevis bolt and castle nut. (This can break if you hit something in the water while the gear is in transit thus causing the gear to become useless!) 1 - Circuit breaker collar (I never used it) 1 - ELT test light for the required test every year (Yours may differ.) 1 - Large washer. I forgot what that was used for but I kept it in the box anyway. |
||||||||
Make a Maintenance Board...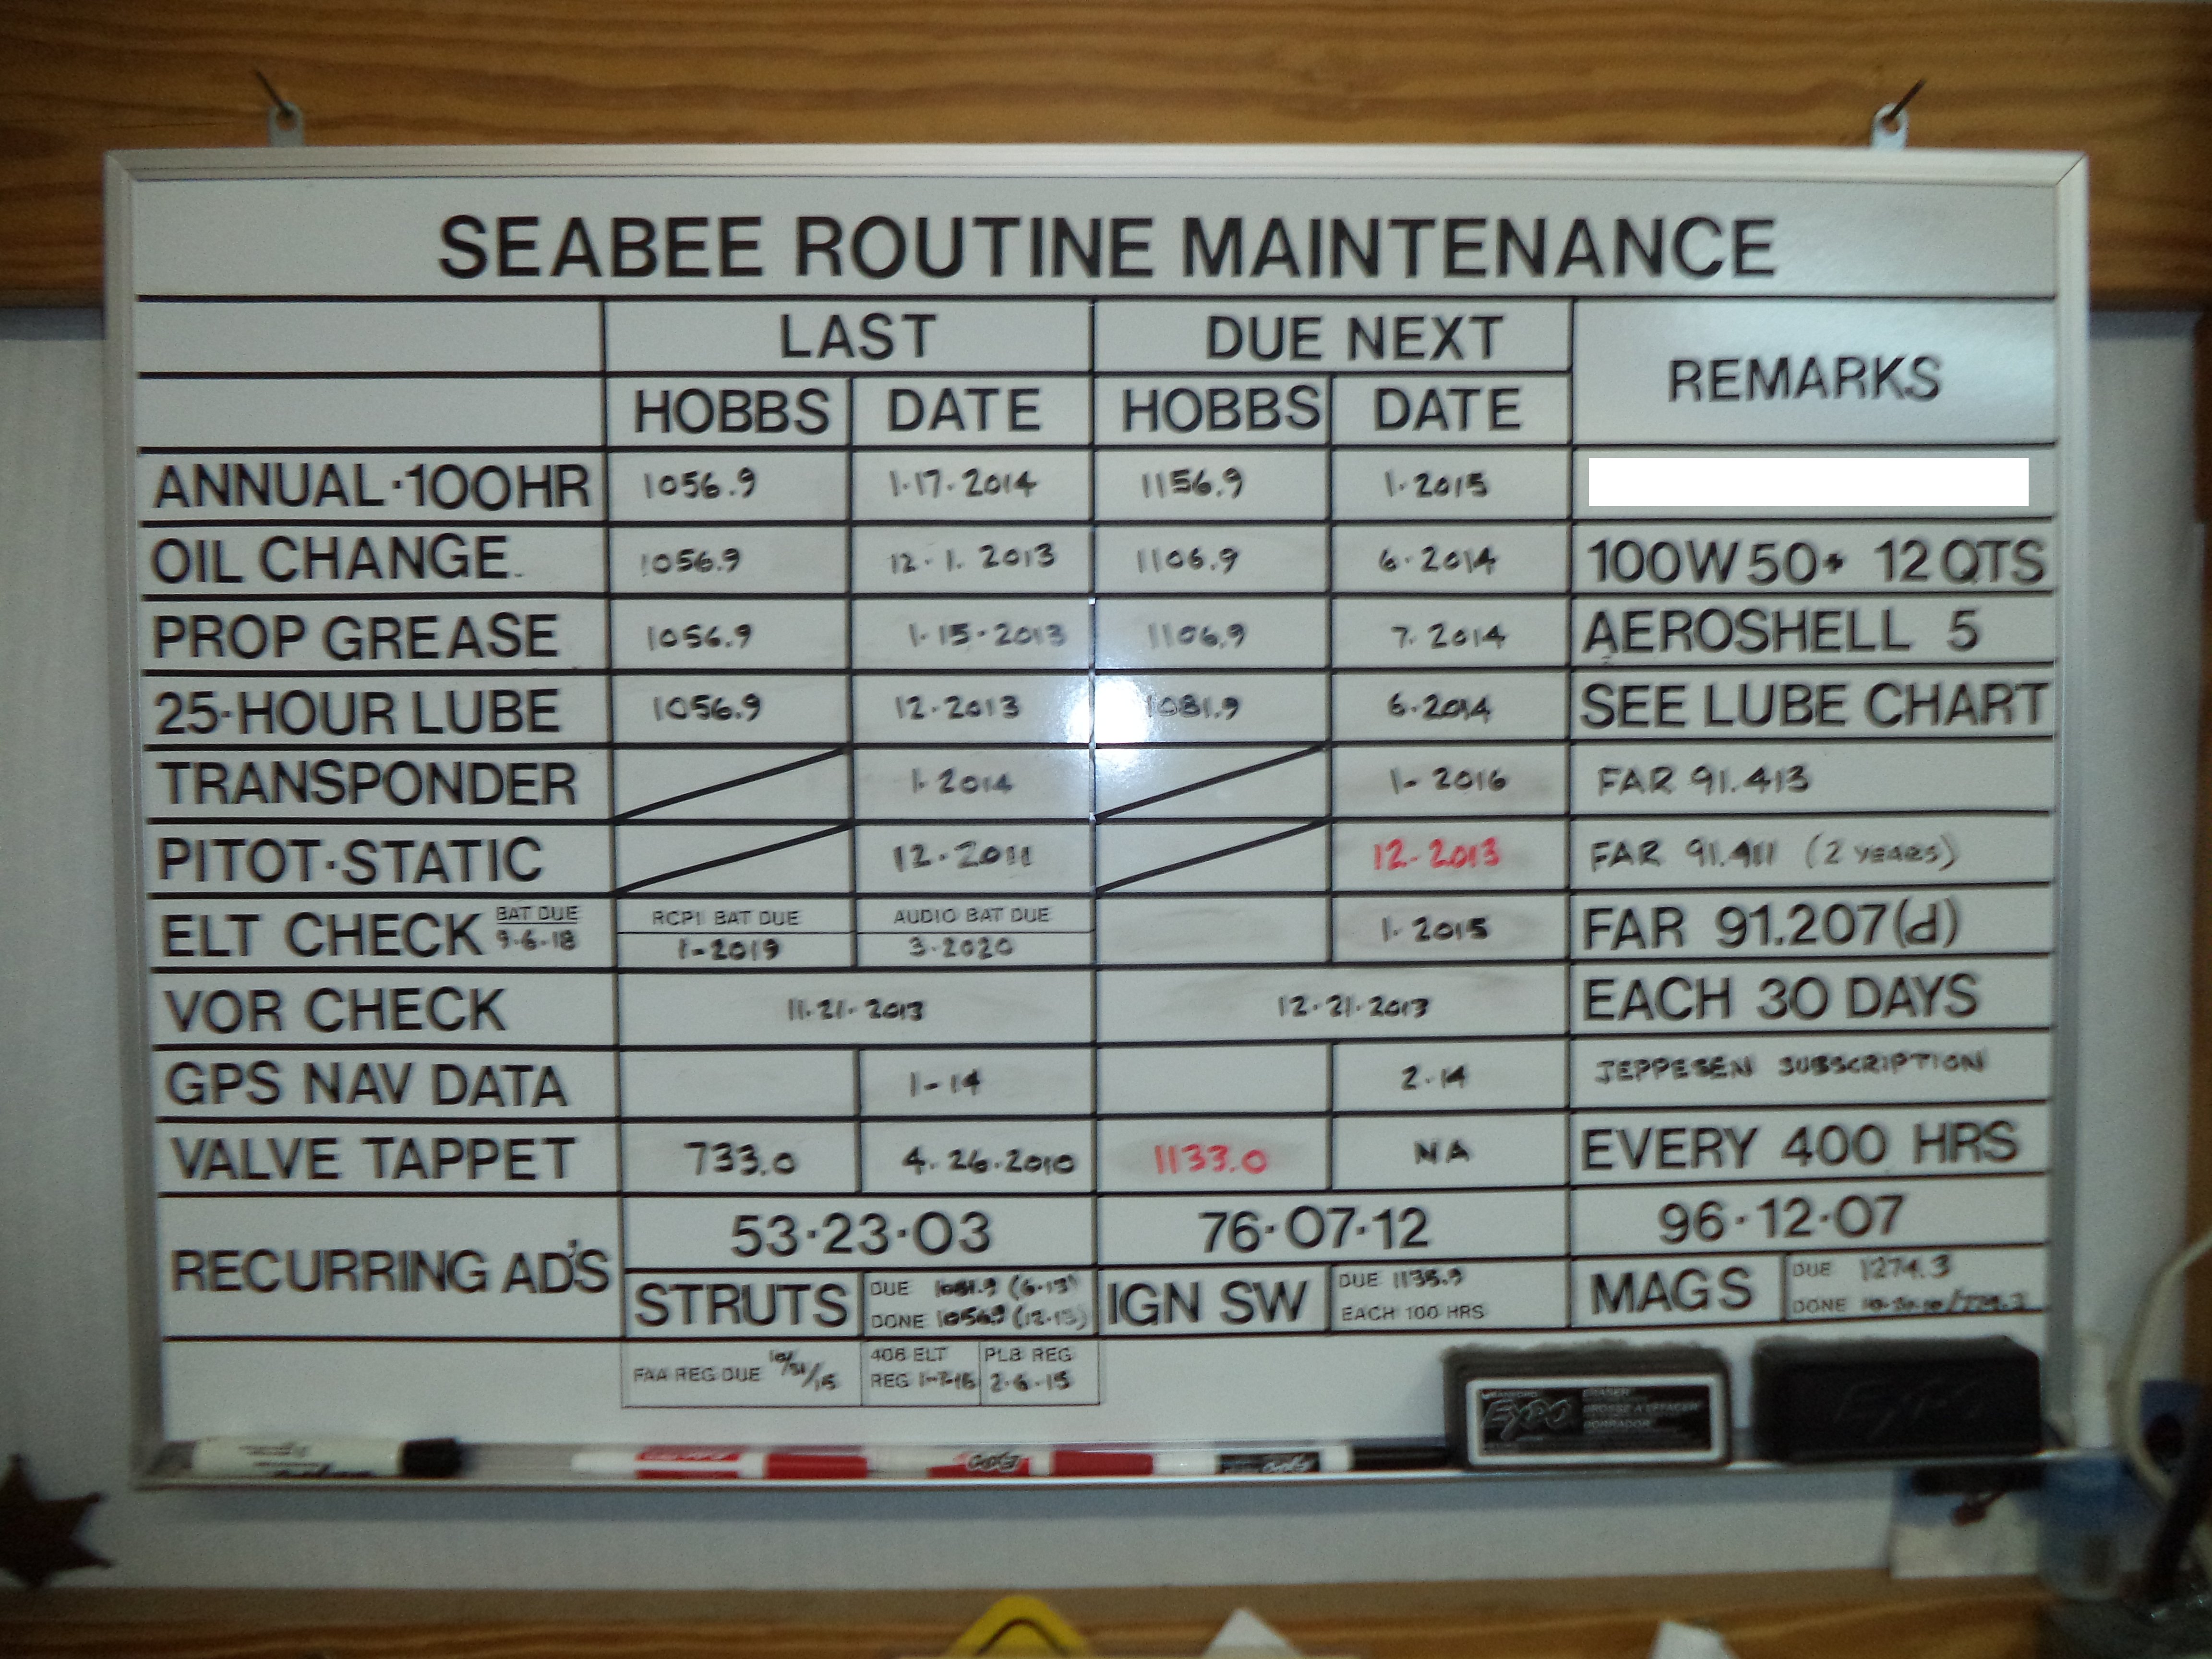 I
made this Maintenance Board after the first month of Seabee
ownership 14 years ago!. It will tell you at a glance what
maintenance issue is due next. I also included the recurring AD's and
ELT battery replacement date. I also included the manditory VOR check
and NAV data for IFR requirements. The board is an "Office Depot" dry
erase board approximately 3 feet by 4 feet. The lines are made from
florist tape (cheap!). The letter are 1 inch vinyl letters available at
Office Depot or any other office supply. It hangs on the wall with two
provided loops on the top. Two nails in the wall secure it. It is easy
to remove from the wall for updating.
Use only the dry erase markers. DO NOT USE PERMANENT MARKER; it doesn't come off very easily. I used red markers for the "next" maintenance event. Black for everything else. Obviousy you can modify yours to fit your needs. This really beats having to look in the logbooks every time something needs to be done. Hint: draw it out on paper first, then count all the letters you will need. This will determine how many sheets of vinyl letters you will need. The florist tape is available at any craft supply store. I think I bought five rolls (I had a bunch left over). Total cost? About $50. I found it well worth the investment. Steve for the IRSOC |
||||||||
|
Replacing your battery?...(Member Ken Thompson has the answer)
If you don't already know, the installation of a car battery in a Bee is considered a minor alteration--log book entry. Ref.--Mike Becker/Bill Kunder of the Reno, Nevada FSDO.
It just has to fall within the weights of the certificated
batteries.
Ken
(Ed note: I have used the Gelcell Marine battery from Westmarine for years. It won't leak and is very powerful.-Steve) |
||||||||
| Check your Electrol Powerpac suction screen!... (click on image for larger view) 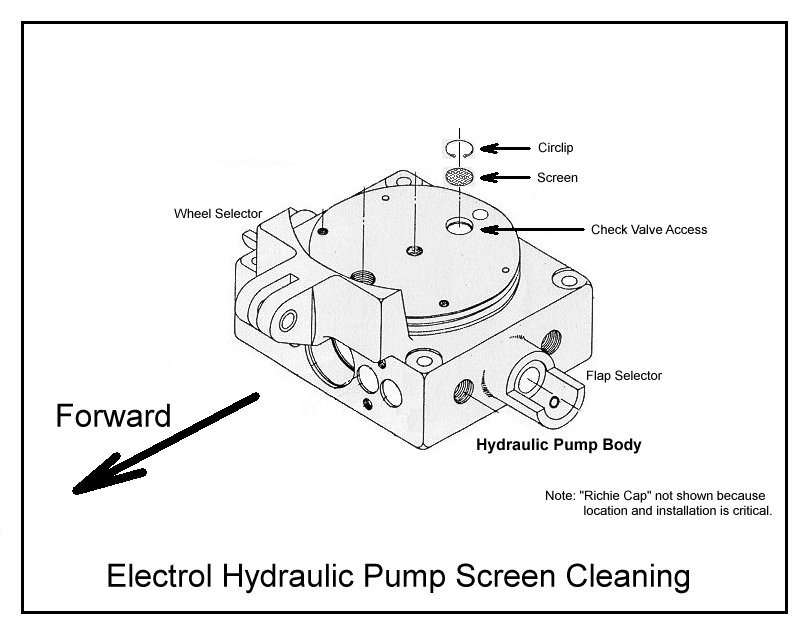 A
recent anomaly has reared its ugly head! At a recent splash-in, I
landed on the water (full flaps and gear up) and proceeded to try to
bring the flaps up and the Electrol Powerpac (manual hydraulic pump)
didn't
work! I tried the gear and it didn't work either. The electric pump was
useless as well. The manual pump handle didn't have the resistance when
pumping that it normally had. It felt as if there was no hydraulic
fluid in the reservoir (there was). After checking for leaks and
determining that none were evident, I tried the flaps and the gear
again and it worked! After a fun day of splashing-in I returned home (2
miles away, fortunately) and the flaps and the gear would not work
again. What the?? The pump seemed to work intermittently at best and
finally I was able to get the flaps up and the gear down. Once in the
hangar I proceeded to tear into the "monster". No leaks, no loose
fittings, full of hydraulic fluid. What the heck was going on? I then
proceeded to call the hydraulic expert, Richie Brumm, and he mentioned
that in the past some people were experiencing a check valve failure.
The check valve is located inside the reservoir at the rear portion of
the pump body base. This check valve allows the fluid to move in both
directions with the manul pump. If it has failed or has "popped out"
the result is exactly what I was experiencing; no pump pressure either
with the manual pump handle or the electric pump. Richie has a fix for
this. He puts a cap over the inlet screen with a hole in the center so
the fluid can pass through but the check valve cannot pop out because
two screws hold the cap intact. Call Richie for details or if you want
him to fix yours.
A
recent anomaly has reared its ugly head! At a recent splash-in, I
landed on the water (full flaps and gear up) and proceeded to try to
bring the flaps up and the Electrol Powerpac (manual hydraulic pump)
didn't
work! I tried the gear and it didn't work either. The electric pump was
useless as well. The manual pump handle didn't have the resistance when
pumping that it normally had. It felt as if there was no hydraulic
fluid in the reservoir (there was). After checking for leaks and
determining that none were evident, I tried the flaps and the gear
again and it worked! After a fun day of splashing-in I returned home (2
miles away, fortunately) and the flaps and the gear would not work
again. What the?? The pump seemed to work intermittently at best and
finally I was able to get the flaps up and the gear down. Once in the
hangar I proceeded to tear into the "monster". No leaks, no loose
fittings, full of hydraulic fluid. What the heck was going on? I then
proceeded to call the hydraulic expert, Richie Brumm, and he mentioned
that in the past some people were experiencing a check valve failure.
The check valve is located inside the reservoir at the rear portion of
the pump body base. This check valve allows the fluid to move in both
directions with the manul pump. If it has failed or has "popped out"
the result is exactly what I was experiencing; no pump pressure either
with the manual pump handle or the electric pump. Richie has a fix for
this. He puts a cap over the inlet screen with a hole in the center so
the fluid can pass through but the check valve cannot pop out because
two screws hold the cap intact. Call Richie for details or if you want
him to fix yours. Richie passed along a story of a Seabee owner that had called him on
the phone from the airplane. WIth the Franklin engine screeming in the background the Seabee owner
was relaying the same situation I had just encountered. He was in
considerably worse shape, however, inflight and NO hydraulics. The
check valve circlip had popped out disabling the hydraulic system.
Richie kept him on the phone while explaining the procedure for slowing
the Seabee way down, about 65 MPH, and grabbing the gear with a boat
hook (a long , looped rope would work). Pulling the gear forward with the boat
hook to the "clunk" detent and landing uneventfully. (Keep your seatbelt on when doing this!!) The tailwheel
wasn't down but this caused minor damage. A little tail wheel damage is a
small price to pay for sage advice.
My problem was a little bit different however. After removing the
reservoir, I noticed that my pump did, in fact, have Richie's
modification and the check valve was intact. What! What the heck!
Everything looked fine until I took the "Richie cap" off and took the
small mesh screen out and looked at it under a magnifying glass. I
almost fell down at what I saw. It looked as if someone (not me) had
"painted" varnish over the screen! There was also a small amount of
fuzz blocking the screen. Evidently, in my splash-in situation, the
blockage was not completely covering the screen so after a few minutes
of sitting, the hydraulic fluid would seep its way into the pump and
the flaps and gear would work fine for one cycle each. After
thoroughly cleaning the screen, filling the reservoir and bleeding the
system everything works fine. In fact, the symtoms of a failed
hydraulic system had been so incidious that I hadn't noticed the
gradual slowing down of the systems until I cleaned that darn screen!
It is faster and more reliable now than it has ever been.
PROCEDURE:
If you don't feel comfortable working on the powerpac, call Richie
Brumm or get your trusty mechanic to check it out. Extreme care must be
used when removing the screen as it is a fine mesh and VERY fragile.You
can do this check without opening the system. Just remove the fluid
from the reservoir (I suck it out with a suction gun through the reservoir center hold-down bolt. Kind of like a
grease gun that sucks). Remove the center reservior bolt and remove the
reservoir. You will have to spread the control cables apart above the
reservoir but very little strain is required. Once the reservoir is
removed, remove the "Richie cap" or circlip (original) and with a
needle or a pair
of fine tweezers, carefully remove the screen. There is a check ball
under it
so be very careful not to get any foreign objects in there. Clean the
screen and replace everything. I did a retraction test ten times just to be sure
everything was working right. Replace the hydraulic fluid with NEW
fluid. Never reuse hydraulic fluid especially when you have had a
hydraulic problem. I change my reservoir fluid every annual ispection. Safe flying to you.
|
||||||||
| Trailing Edge Bumpers... Have you ever cut your head on the trailing edge or the hinge supports of your Seabee? This quick and easy fix will save your head or more importantly, the head of your friends or visitors to your hangar. They are made from foam tubes available at Wal-Mart or other department stores under the name "Wacky Noodles" or "Crazy Noodles". Kids use them in the pool or lake as floatation or just to hit each other without harm. You will need about 10 or 12 of them to cover all the trailing edges. I split the tubes length-wise so they can be pushed onto the trailing edge of all the surfaces. I use smaller ones on the aileron and flap hinge supports. The trailing edge of the elevator bumpers will need to be modified for the trim linkage. These moodifications are made easily with a razor blade or sharp knife. These have saved my head more than a few times. They also prevent most "hangar rash" that occurs when foreign objects are weilded hap-hazardly in the proximity of the airplane (yikes!). I would like to take credit for these, but I can't. The late, former member, Jim Poel was the one who "invented" them. Thanks Jim! 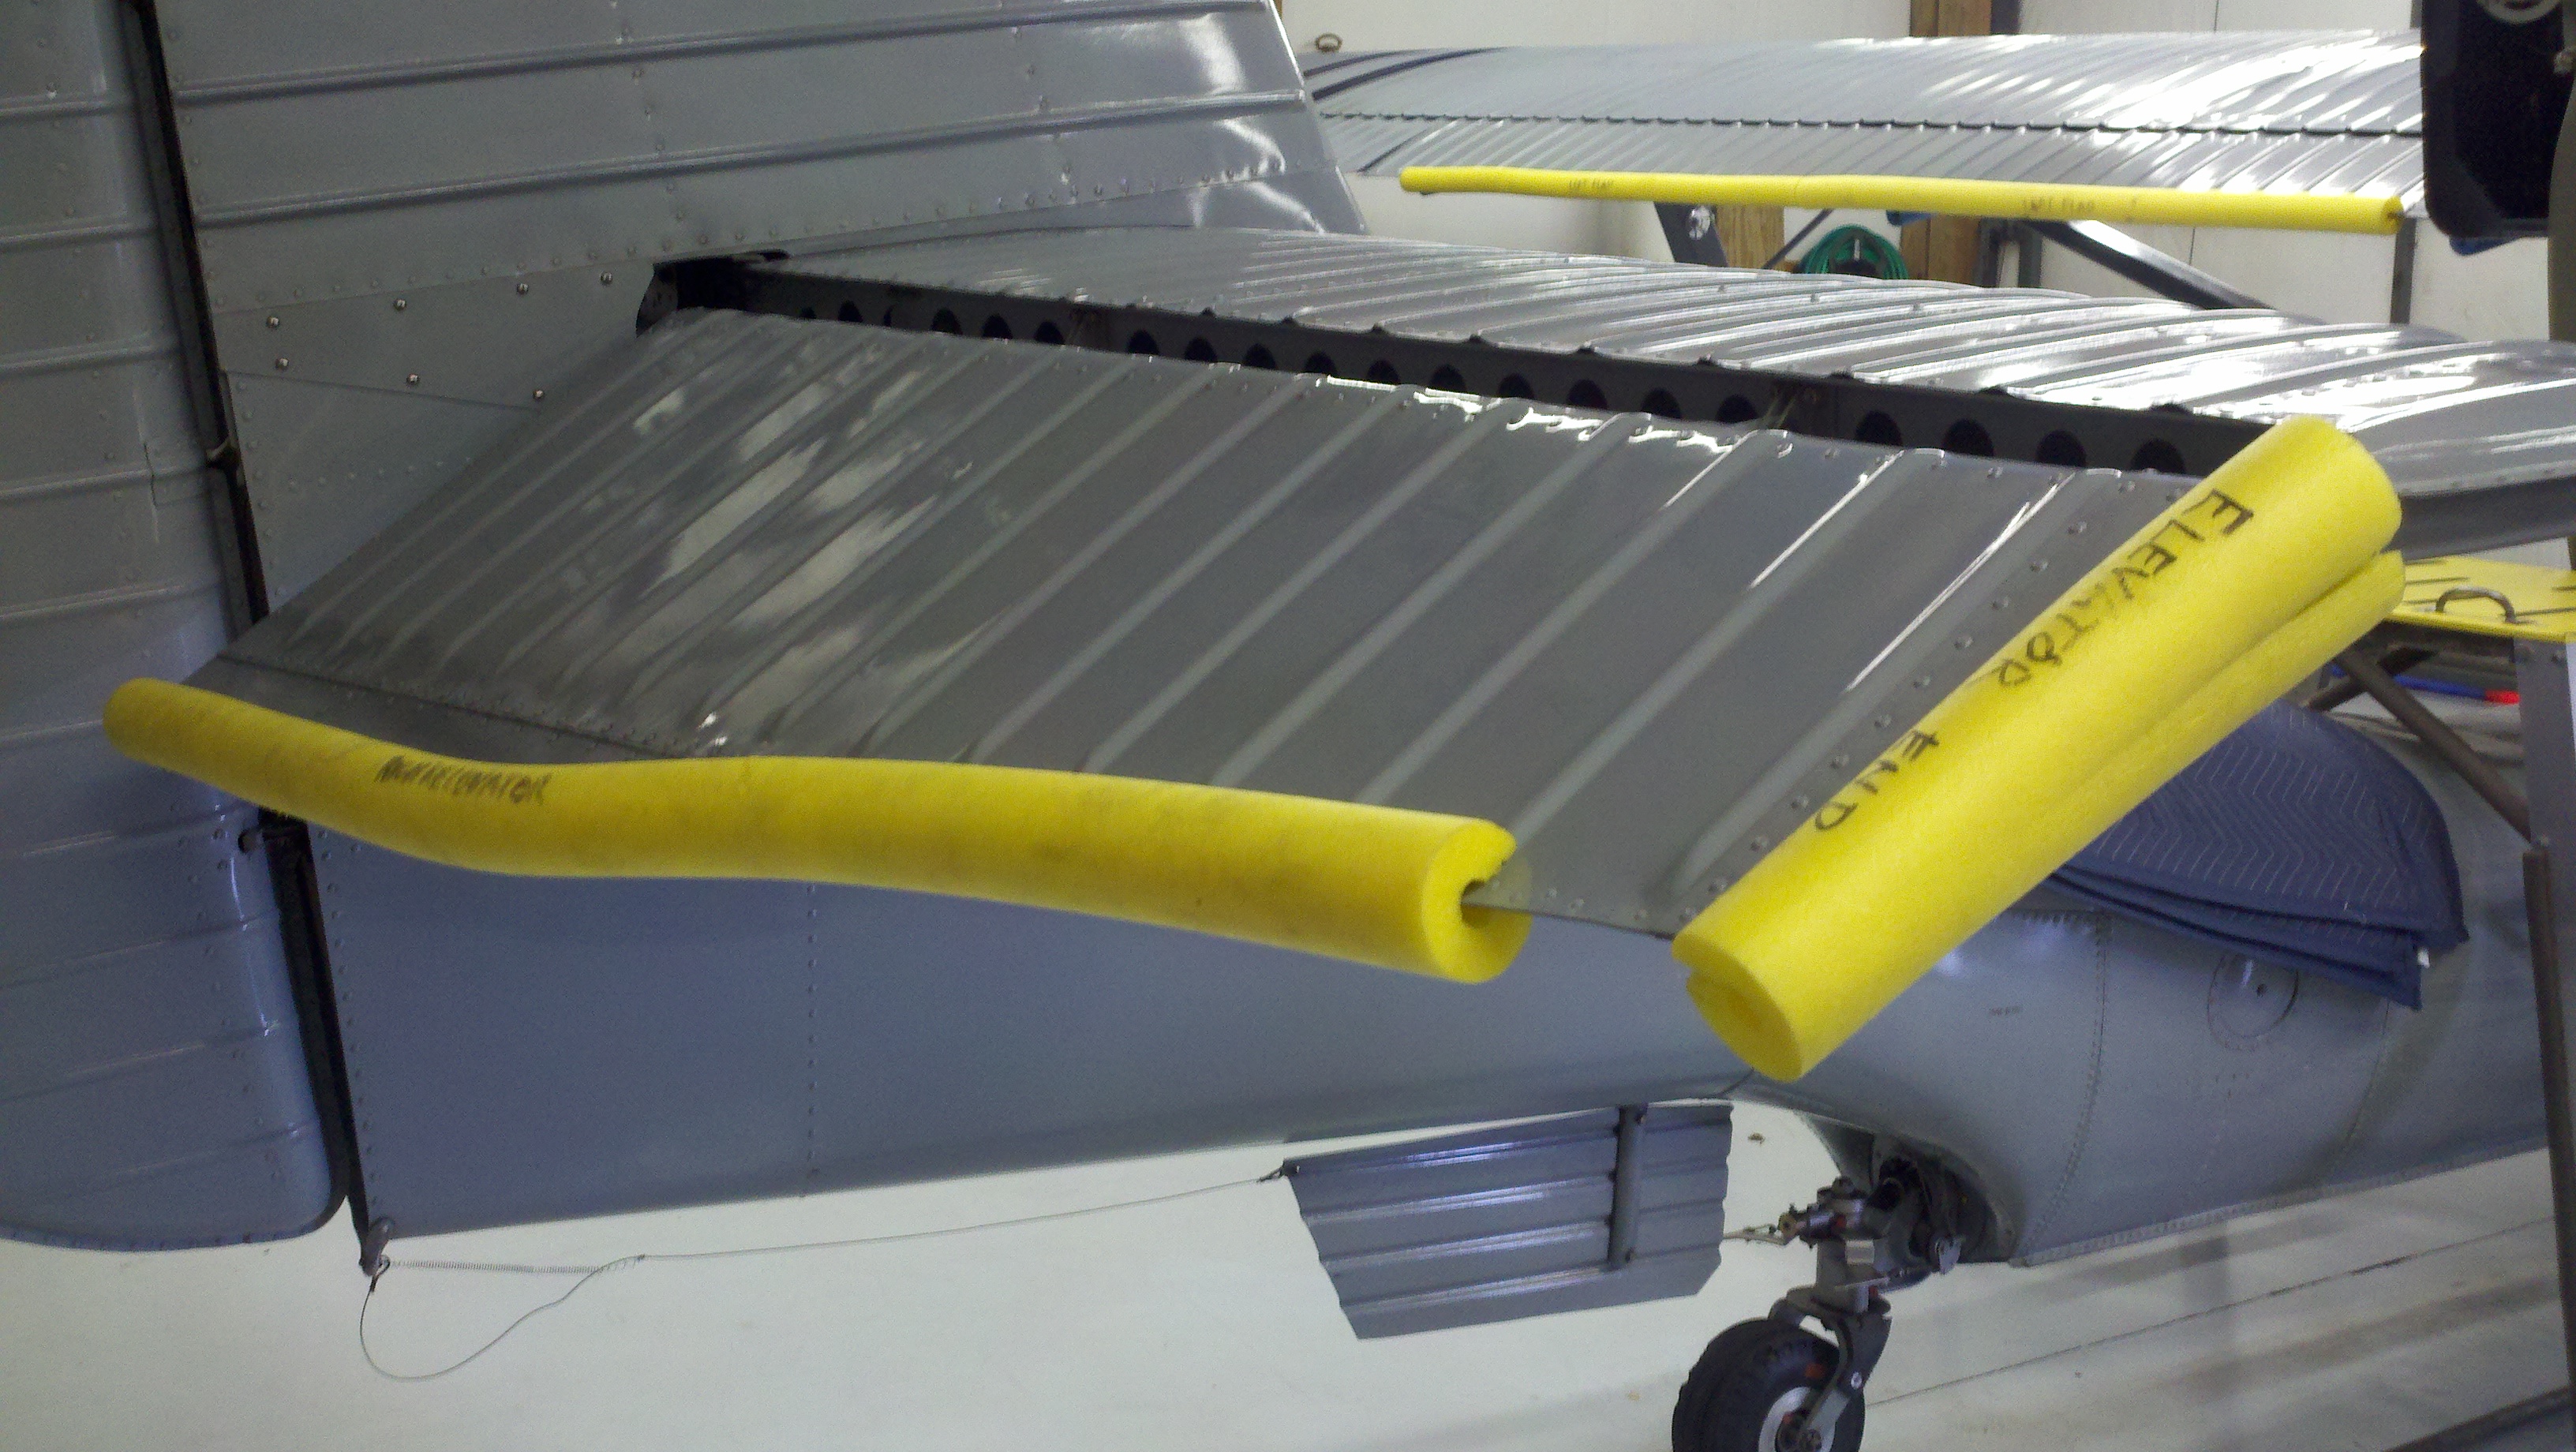 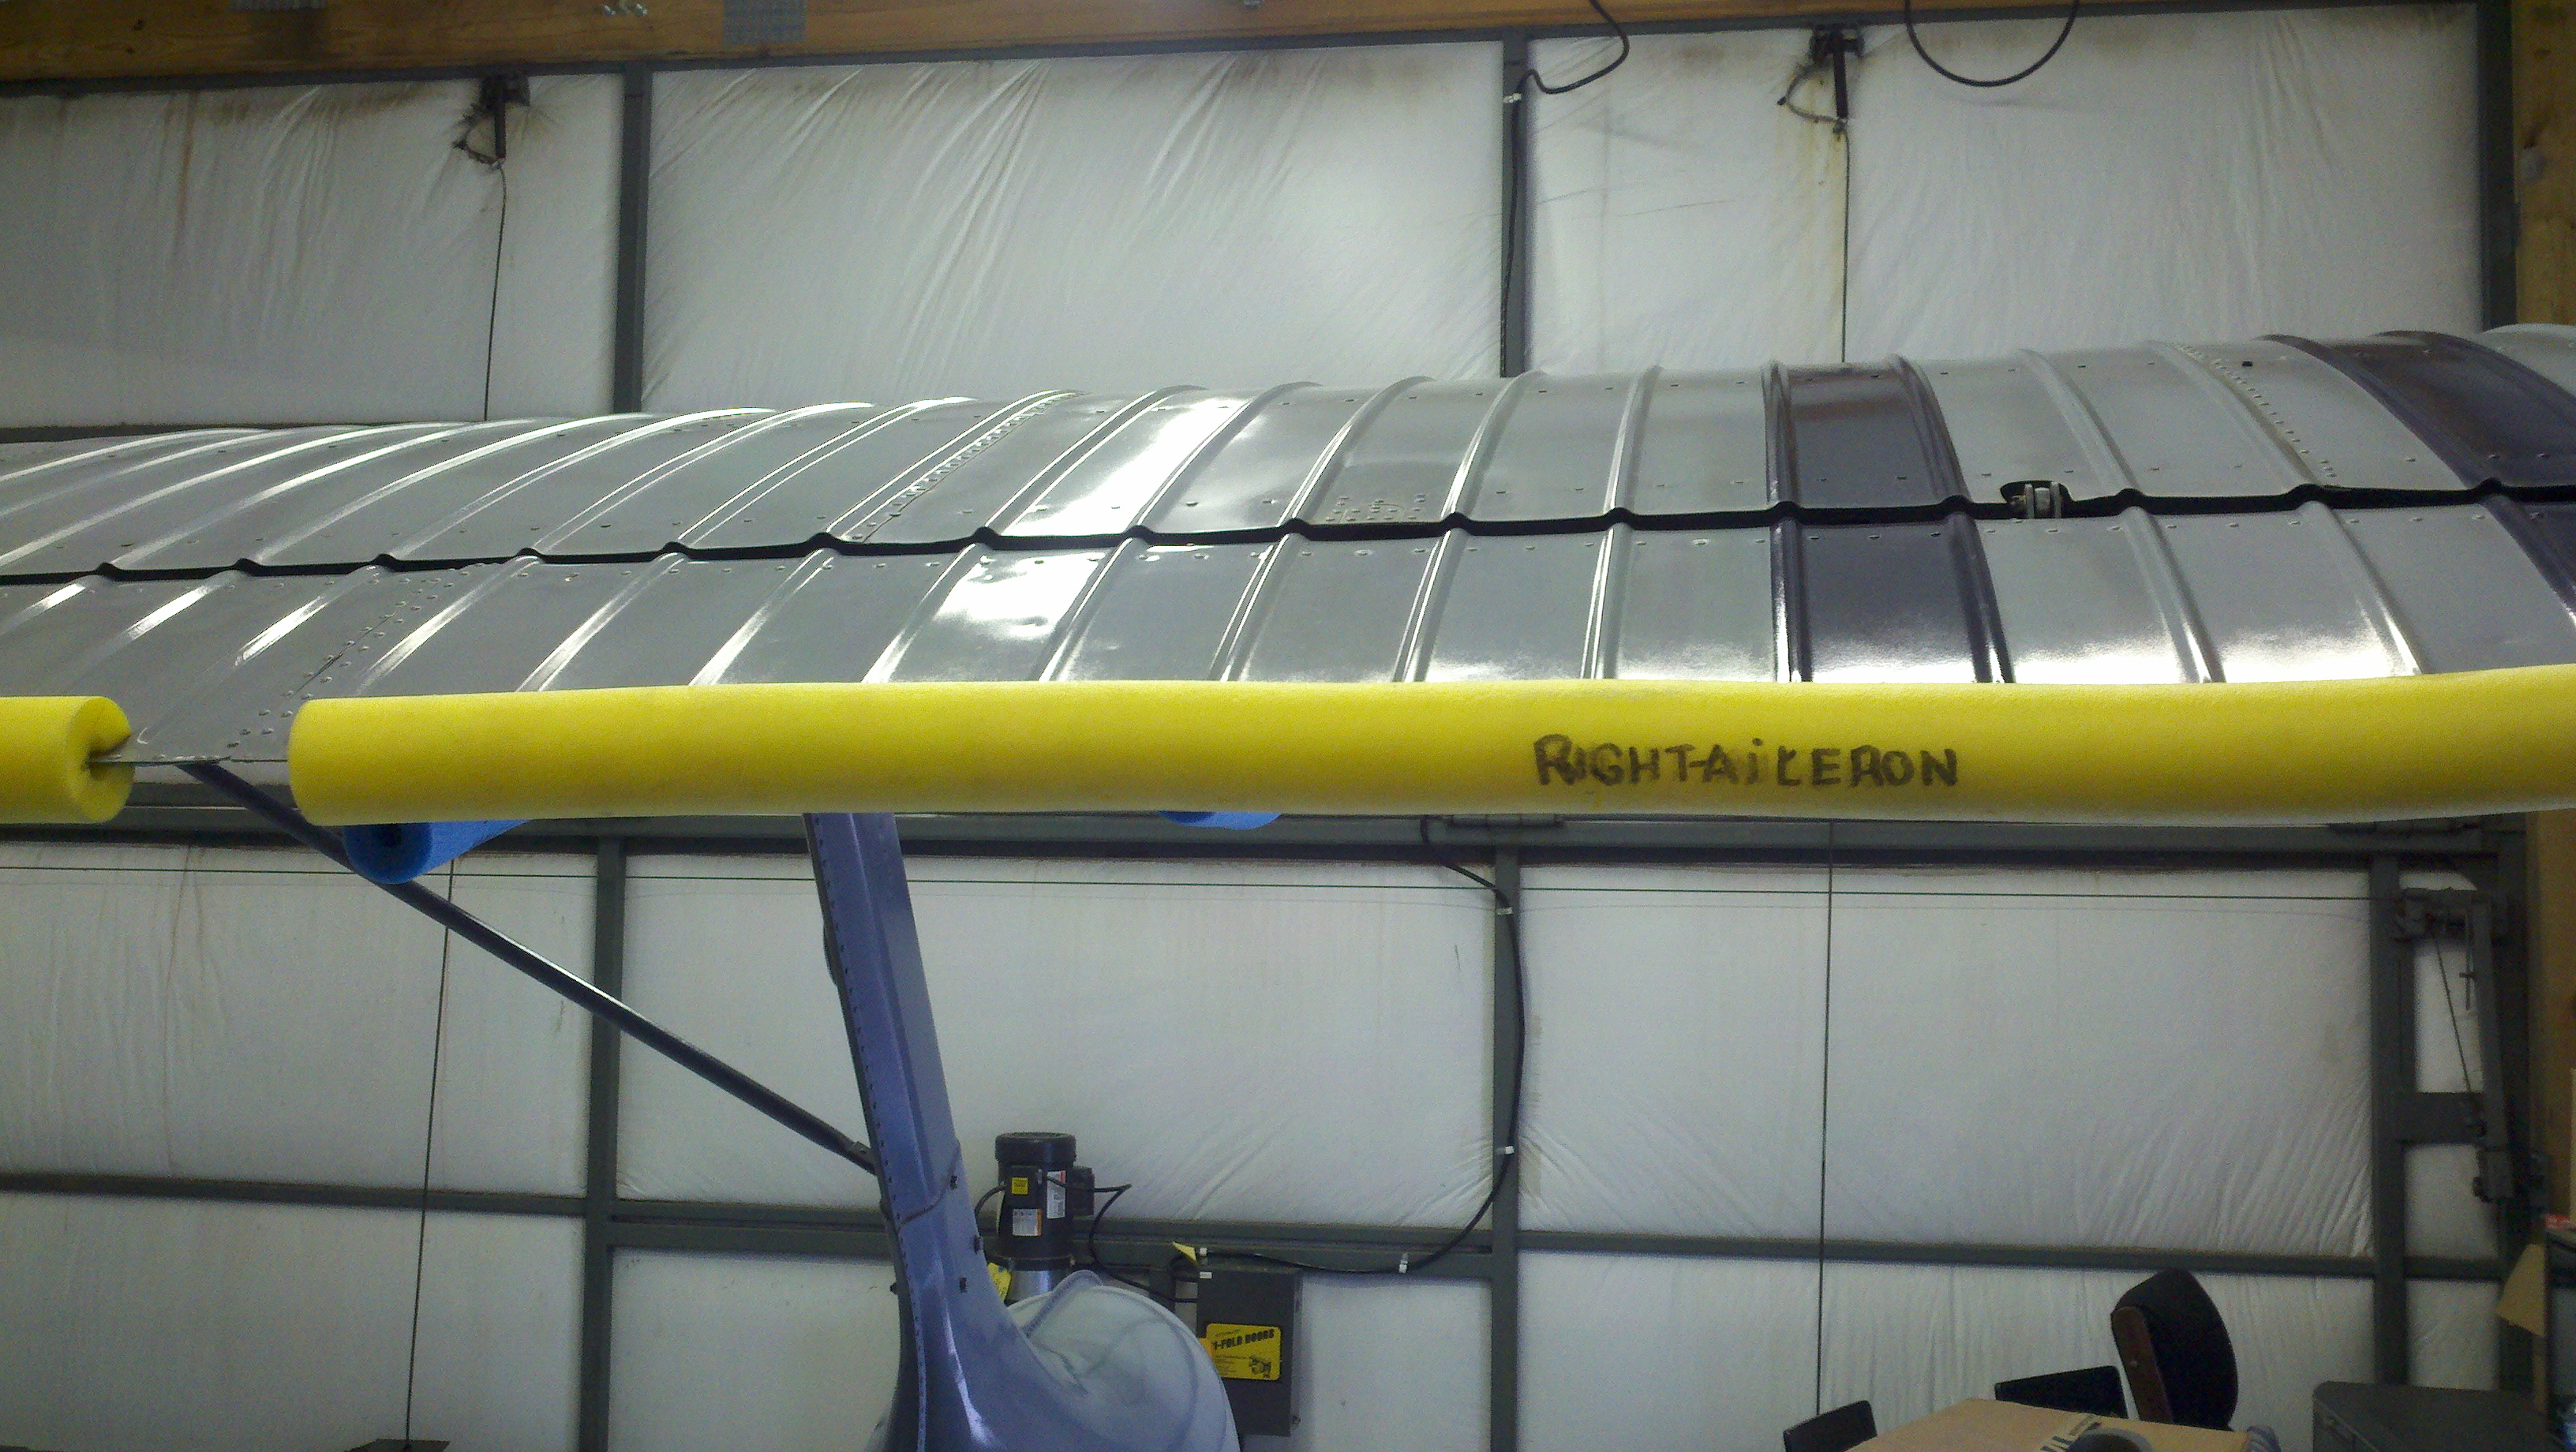 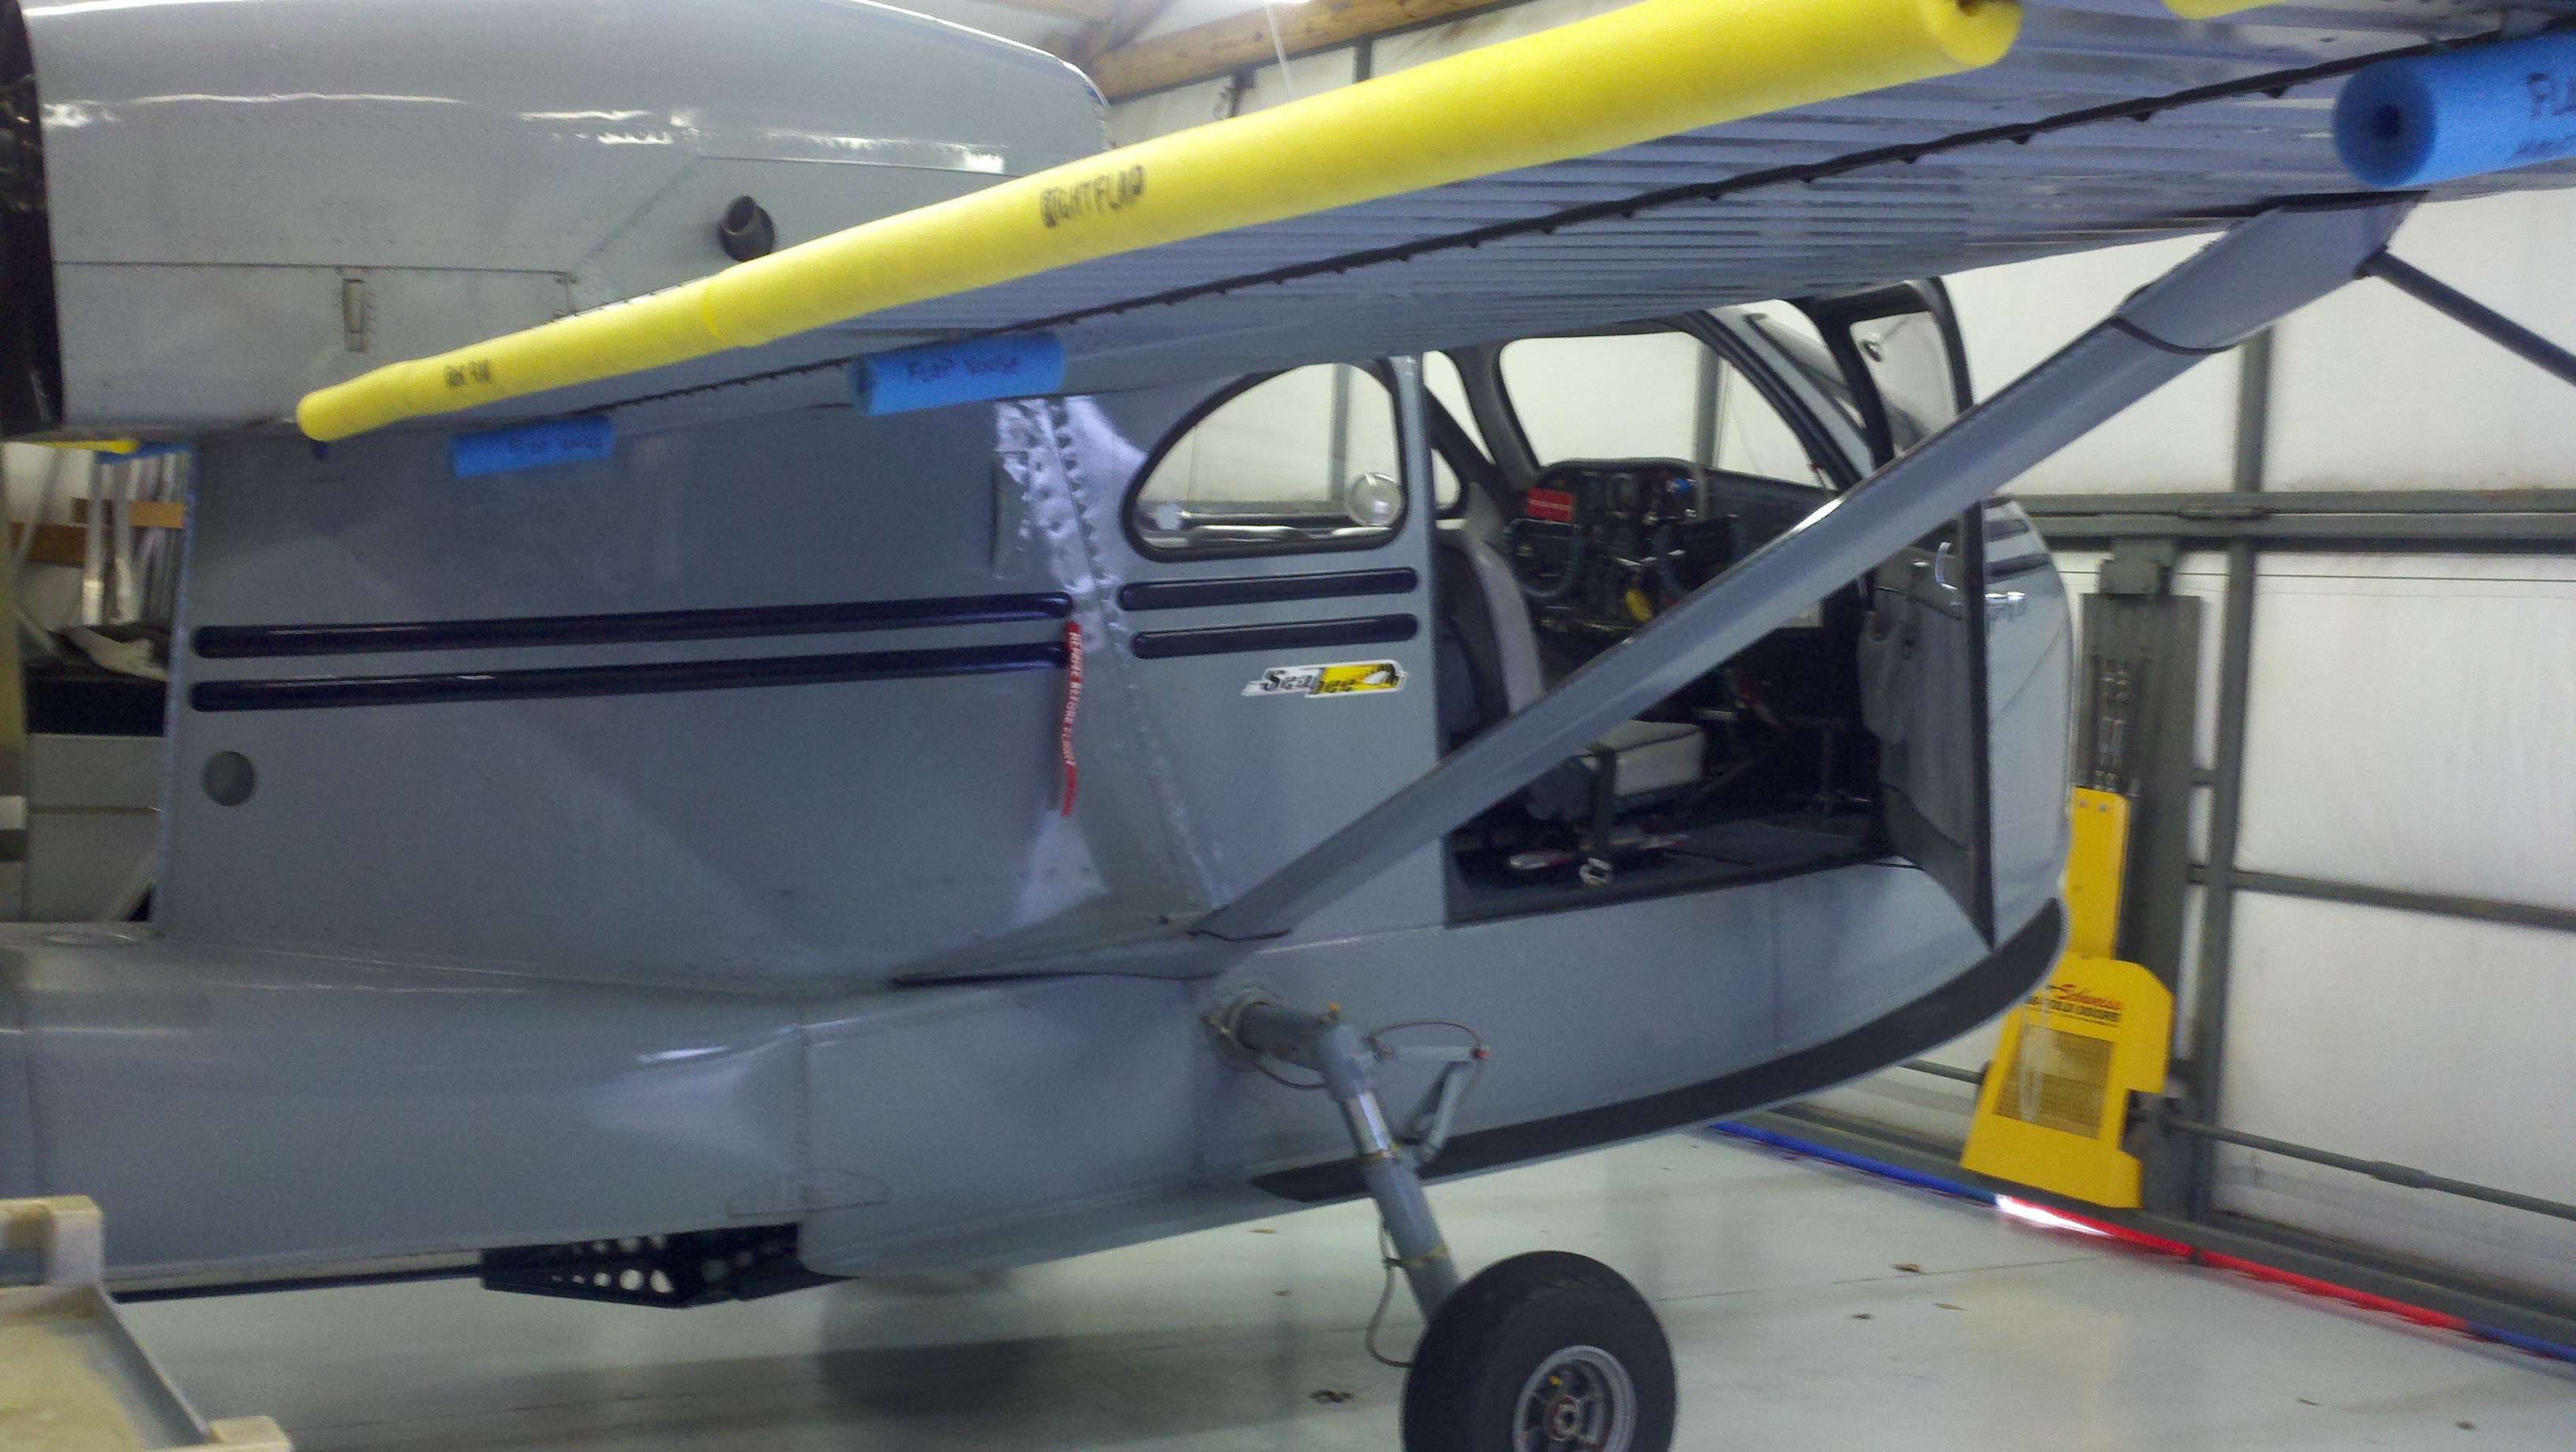 Click on the photos for larger view |
||||||||
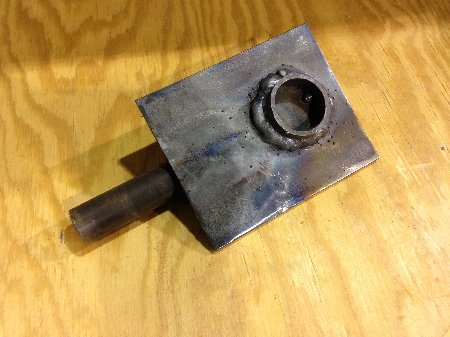
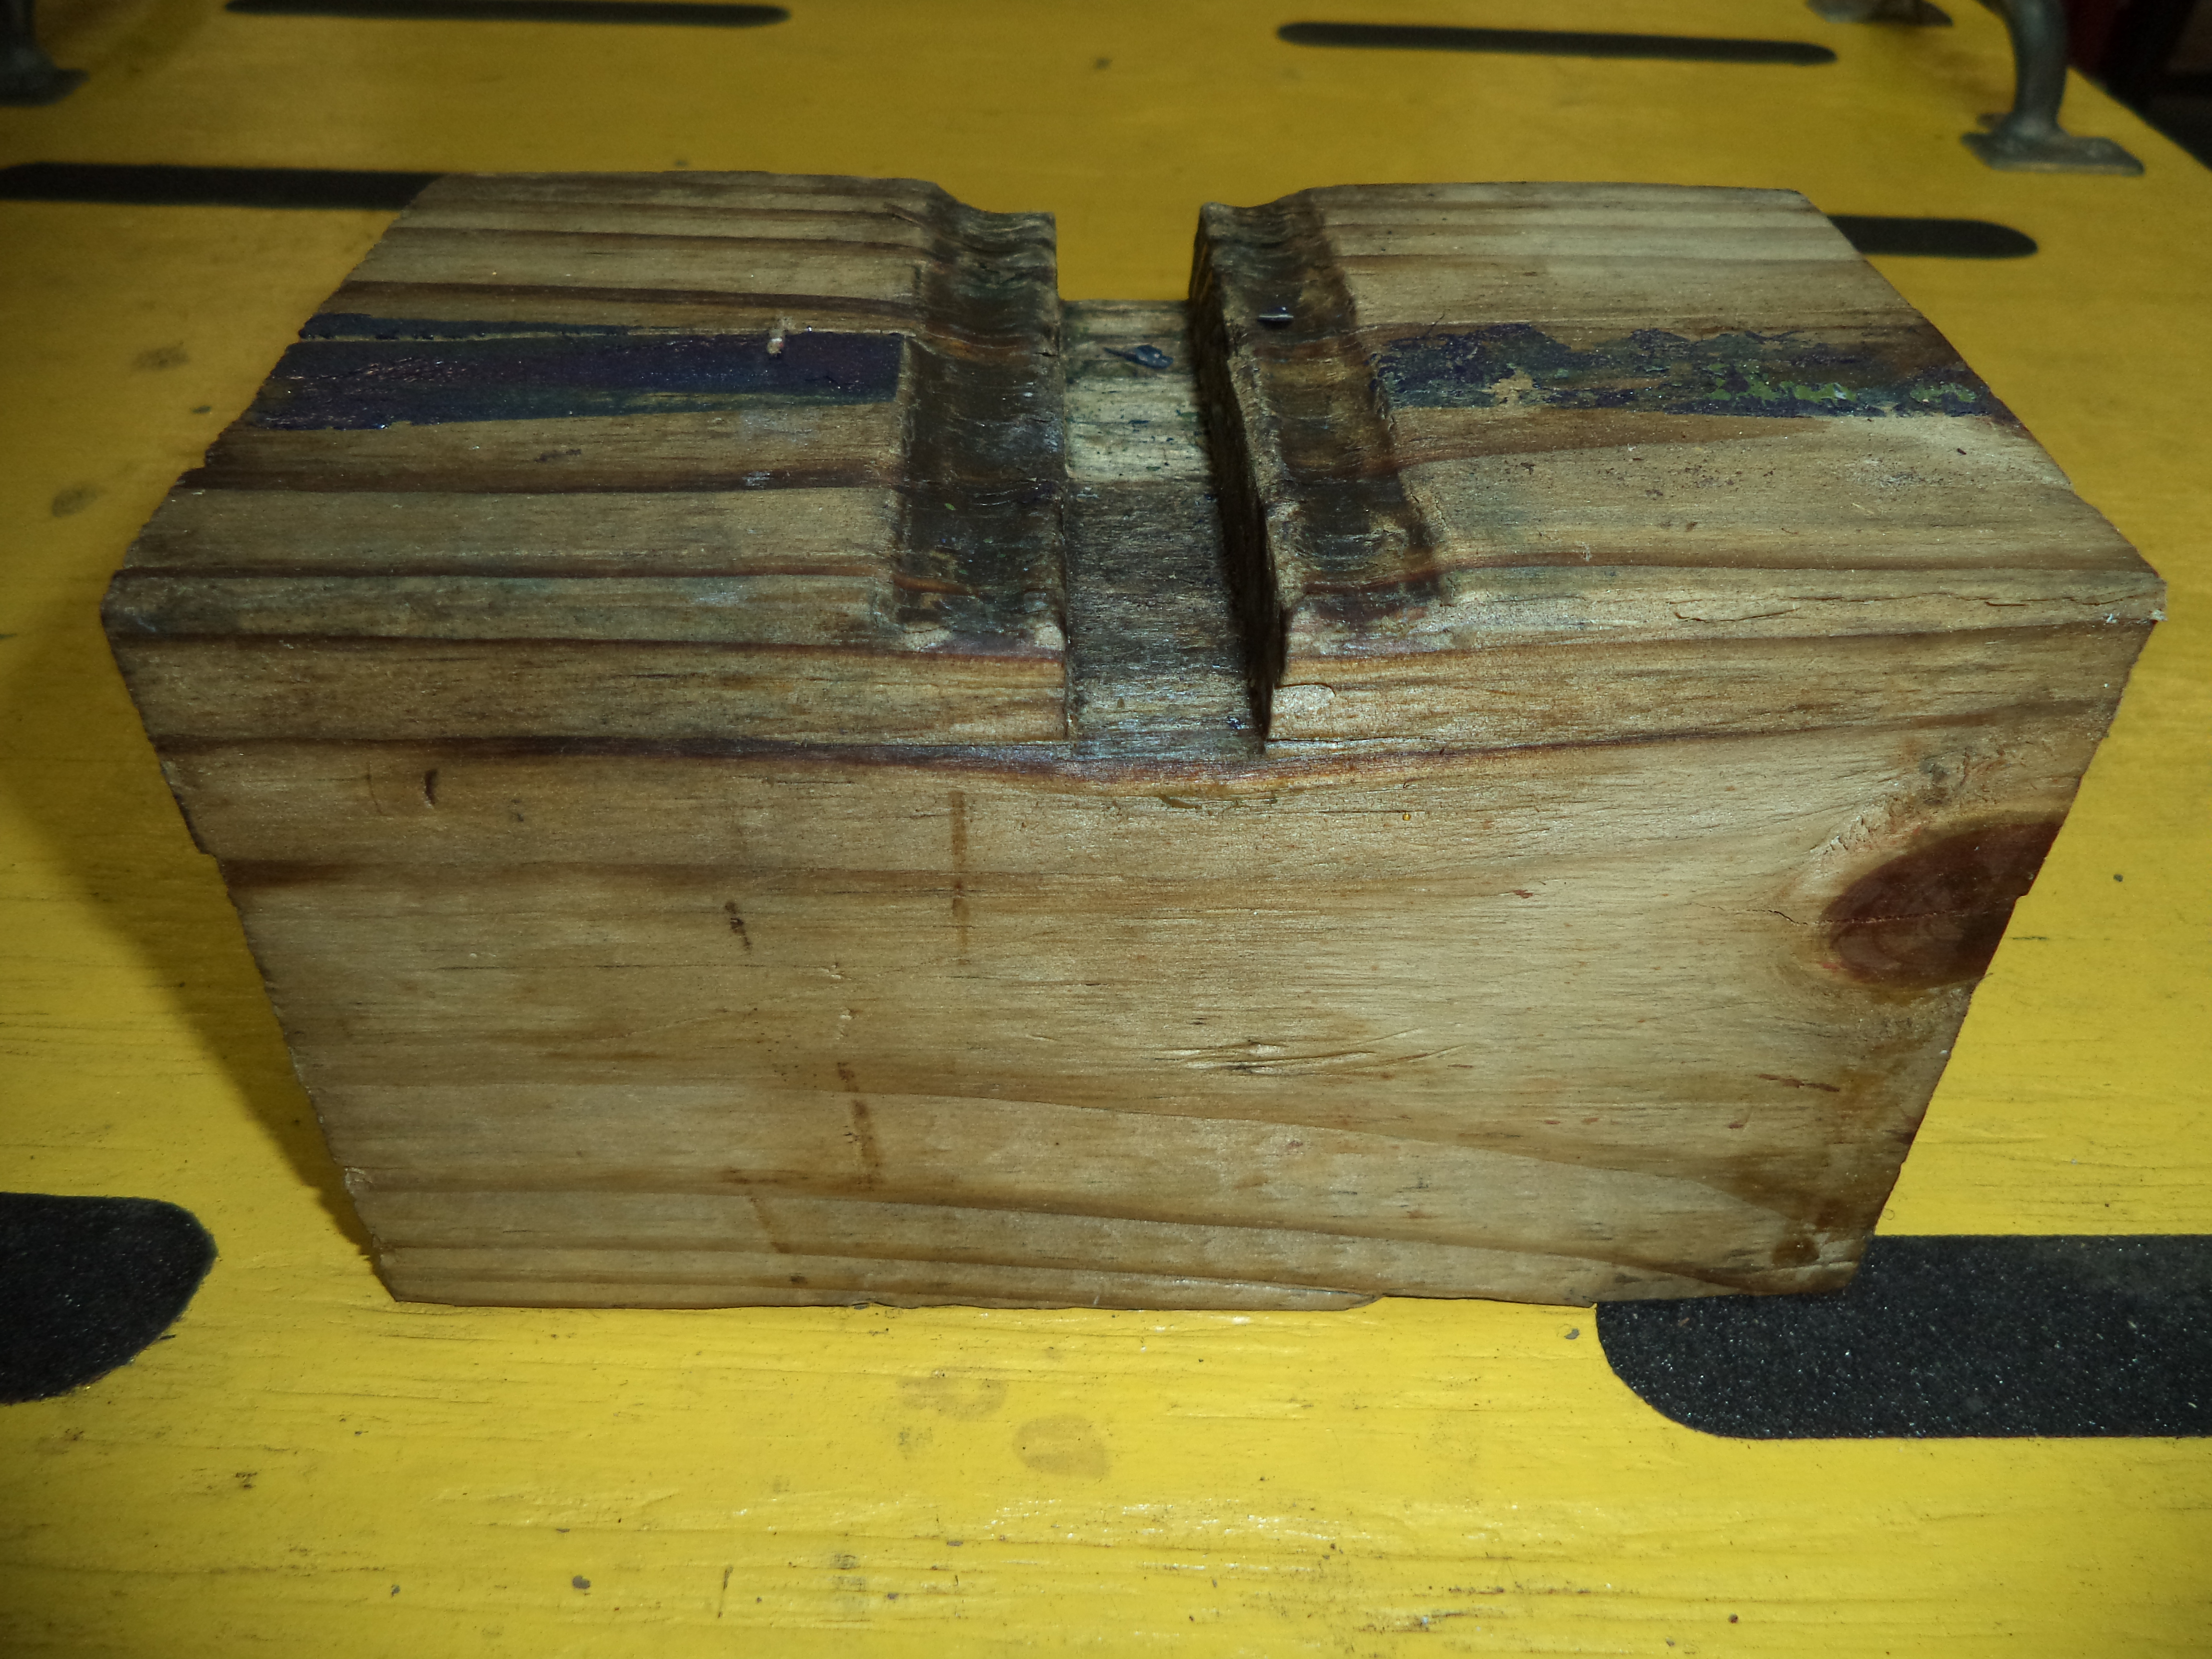
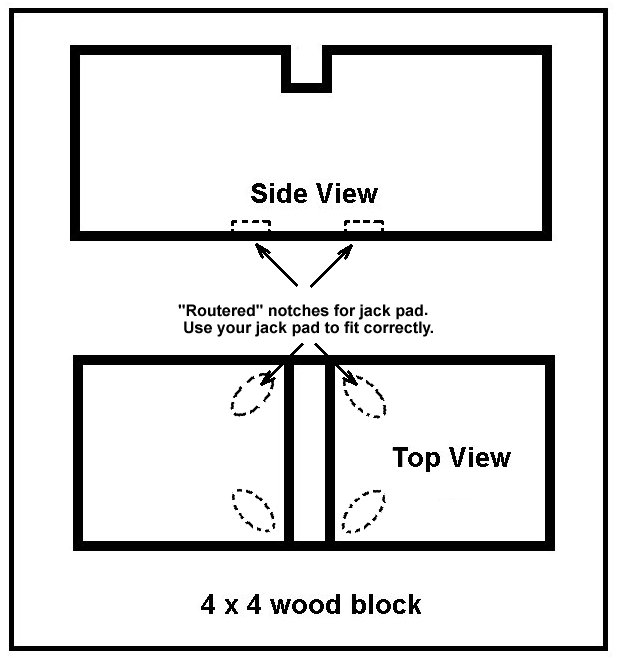
| Tail boom block... Use this on your jack pad to prevent the unthinkable. The notch fits into the keel strip just forward of the tail wheel. Modify your 4x4 block on the opposite side of the notch to accept what ever jack pad you have. Some have a four-tooth jack pad that can be imprinted on the bottom of the wooden block and "routered out" to allow the four jack jaws to fit in so there will be no slippage. |
||||||||
| Finally, and answer to your Franklin Fuel Pump problems... Memeber J.R. Ranney has the solution to your Franklin Fuel Pumps. His excellent write-up is here as well as information on Bruce Hind's December 2011 newsletter. You can contact JR at jwranny8@aol.com. I'm sure all your Franklin guys are happy to see this! Thanks JR! UPDATE! A few addiional
notes on the Franklin fuel pump thing:
It was Walter
Windus who discovered (or rediscovered) the source of the repair kits, not
me.
I've just been on
the phone with Rich Brumm. He said he's used these repair kits before and had
bad luck with them. In one case the end of the diaphragm plunger broke off, and
most of them start to leak after 100 hours or so. The kits he used did not have
the "-A" on the part number, so they might or might not be improved.
J. R.
Ranney
(Ed note: As with anything after-market, use these kits at your own risk and please let me know how they work out so I can pass on the good or bad news.) 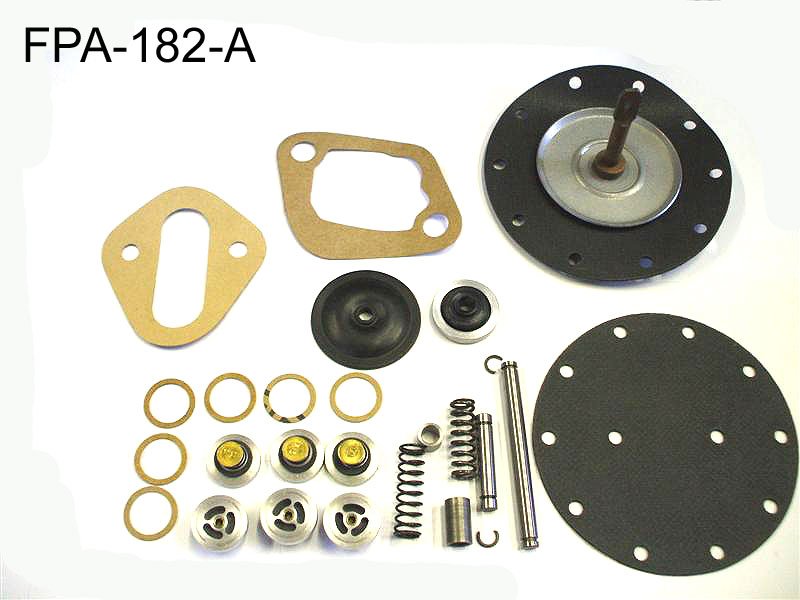 See a photo of the kit here. |
||||||||
| Control-Column-Holder-Backer... Use this PVC pipe to hold your control column back to make it easier to work on the elevator trim tabs or instrument panel items. It never ceases to amaze me the uses we find for PVC pipe. This small section of 1-1/2" pipe is smoothed out on both ends with one end having a curved cutout to fit the control column. I use this at least every annual inspection and usually a few times in between! A hole is drilled in one end to allow hanging on the wall (like a broom handle). Cost? about 10 cents! 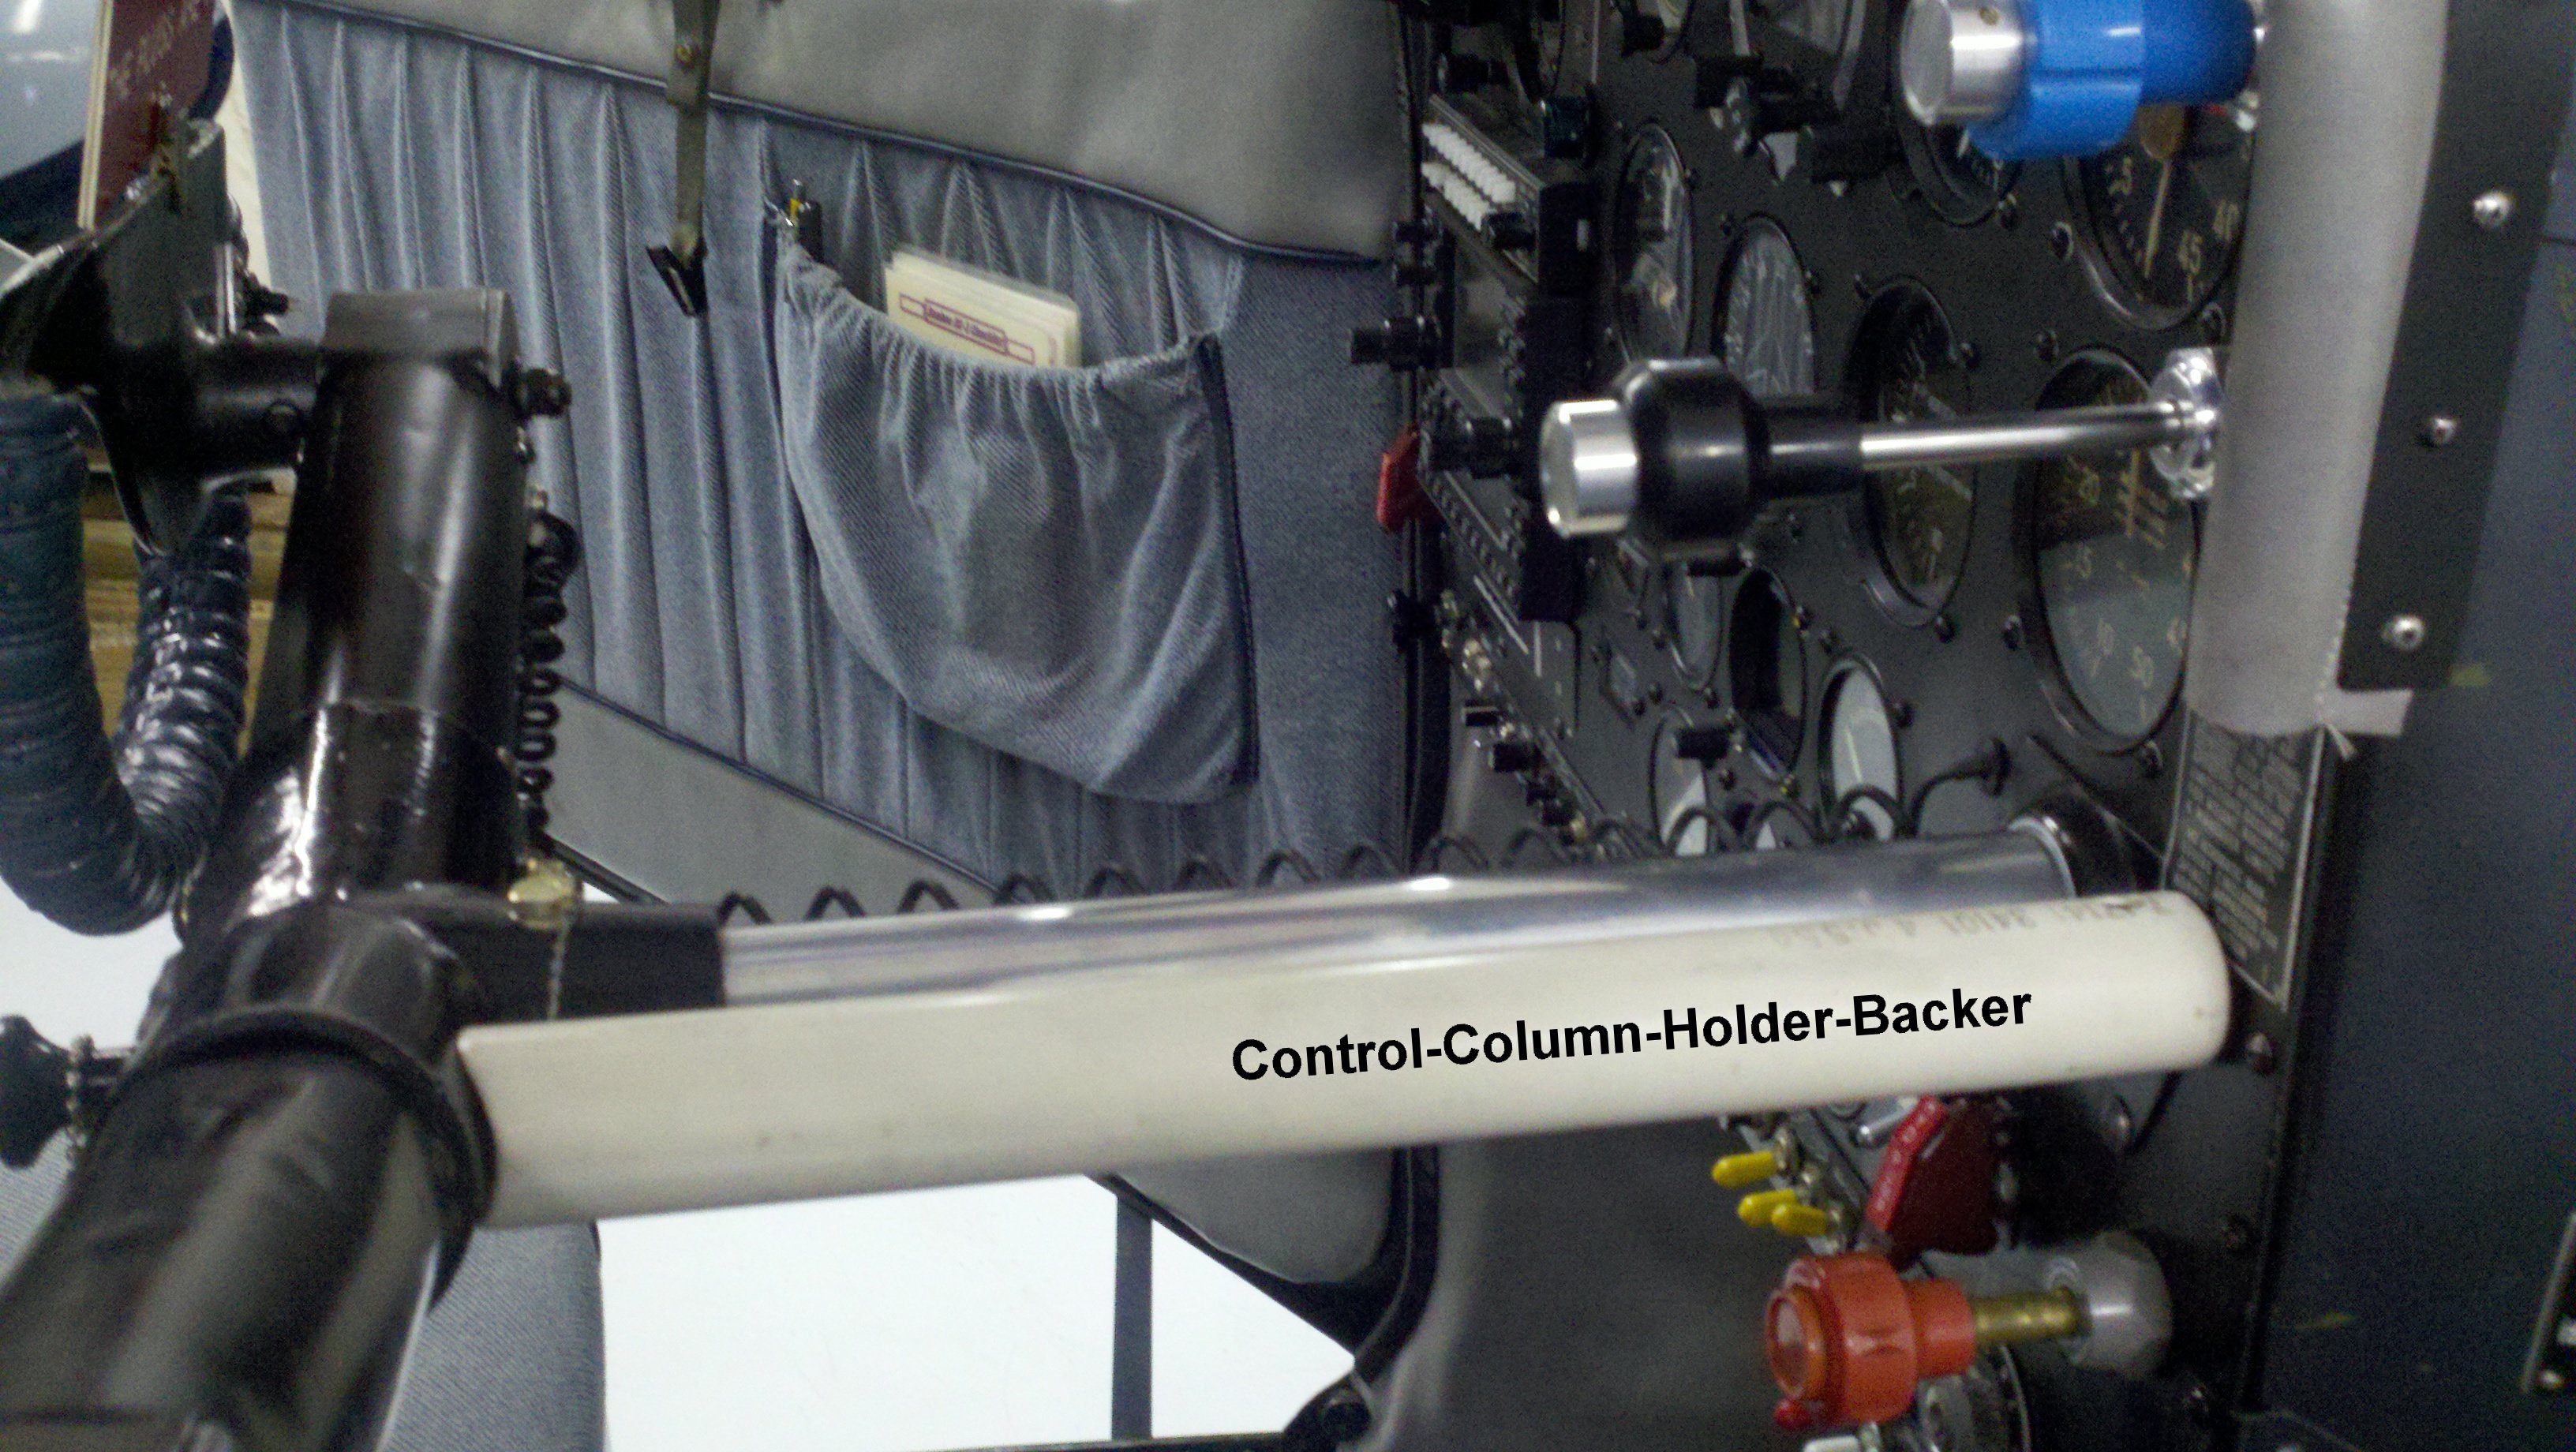 (Click on picture for full size) |
||||||||
| Keep an eye
on the aft compartment! This tool makes it easy to dry out the aft
compartment after a day on the water.... Have you ever tried to get that water out of the last hull compartment? You know, just above the tailwheel. Two little areas on either side of the tailwheel never drain completely and if left outside or in a less than adequate hangar the water just sits there, waiting patiently for corrosion to begin. A tool I found helpful is nothing more than a four or five foot piece of PVC pipe cut off at an angle (about 30 degrees to the longitudinal axis of the pipe) and used as a paper-towel-pusher-downer! I wad a paper towel into a loose ball and poke the PVC pipe down into the recesses. I then use a pair of mechanical fingers to retrieve the paper towel. Caution: DO NOT leave the paper towel in the compartment! 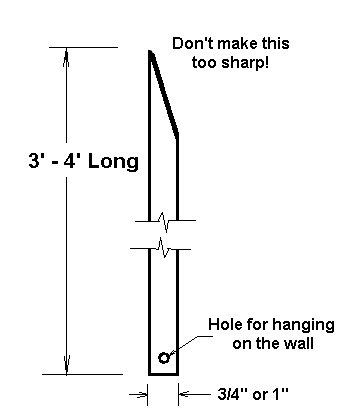 Open the aft access panels on each side forward of the horizintal stabilizer. Wad up two paper towels and throw one in each corner of the aft compartment. Poke with this tool to get all the water absorbed then use a pair of "mechanical fingers" to retrieve the wet towels. This keeps your aft compartment dry as a bone. I use corrosion-X or LPS 3 liberally after the aft compartment is dry. |
||||||||
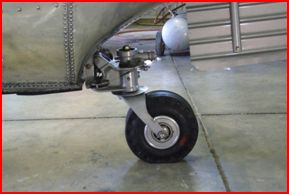
| Are your
strut scissor links installed correctly?... Below is an excerpt from Captain Dick Saunders' newsletter from around 1988. The lower scissor link on each strut should be to the OUTSIDE. See the illustration below: The illustration shows the WRONG way to install the scissor. I don't claim to know why Republic felt this was necessary except it allows for toe-out adjustment to tame unruly ground handling. Your guess is as good as mine! 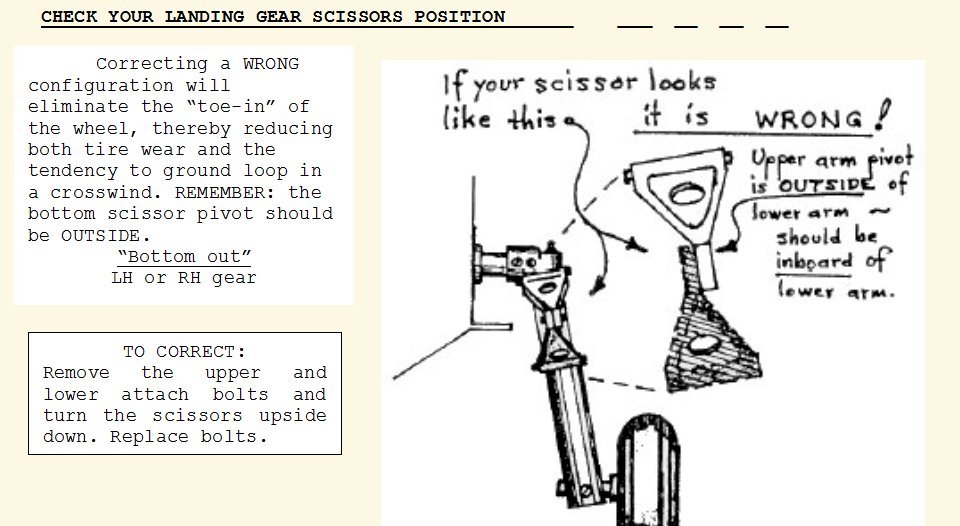 Click on image for full size view WARNING!!
If your scissors are wrong, before you try to change them, jack up your Seabee so the gear is off the ground. Depressurize the strut and take the schrader valve out of the top of the strut and then and ONLY then change the scissors. Trying to change the scissors with the gear on the ground and fully serviced can cause damage to the airplane and injury to you or worse! BE CAREFUL! See the Owner's Manual page 40-41 for complete instructions re-servicing instructions. |
||||||||
| Landing
Gear Struts Leaking?... Here are instructions for changing your Sturt O-rings. Please get the assistance of a qualified FAA Mechanic when you change these as it is a requirement to make a logbook entry. Need o-rings? Get them here. (NOT FAA Approved, NOT PMA'd.) |
||||||||
| Door
Handles replacements... Tip (from member Rob den Hartog) If you are interested in new door handles, this may do the trick. They may not be EXACTLY like the originals but they are close and very resonable in price. The company is Austin Hardware. They have almost everything! check them at www.austinhardware.com. A data sheet for the handles is located here. The only modification required is to cut the square shaft to length, drill and tap the shaft for the inside handle. I believe Austin also has inside handles as well. 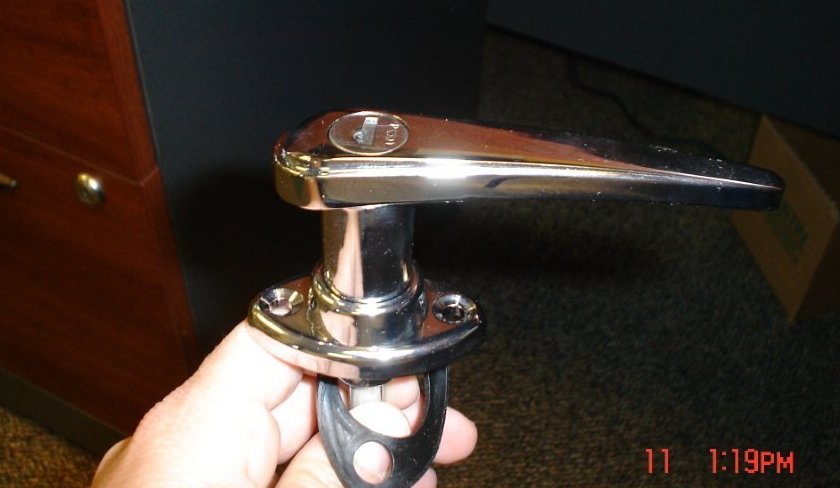
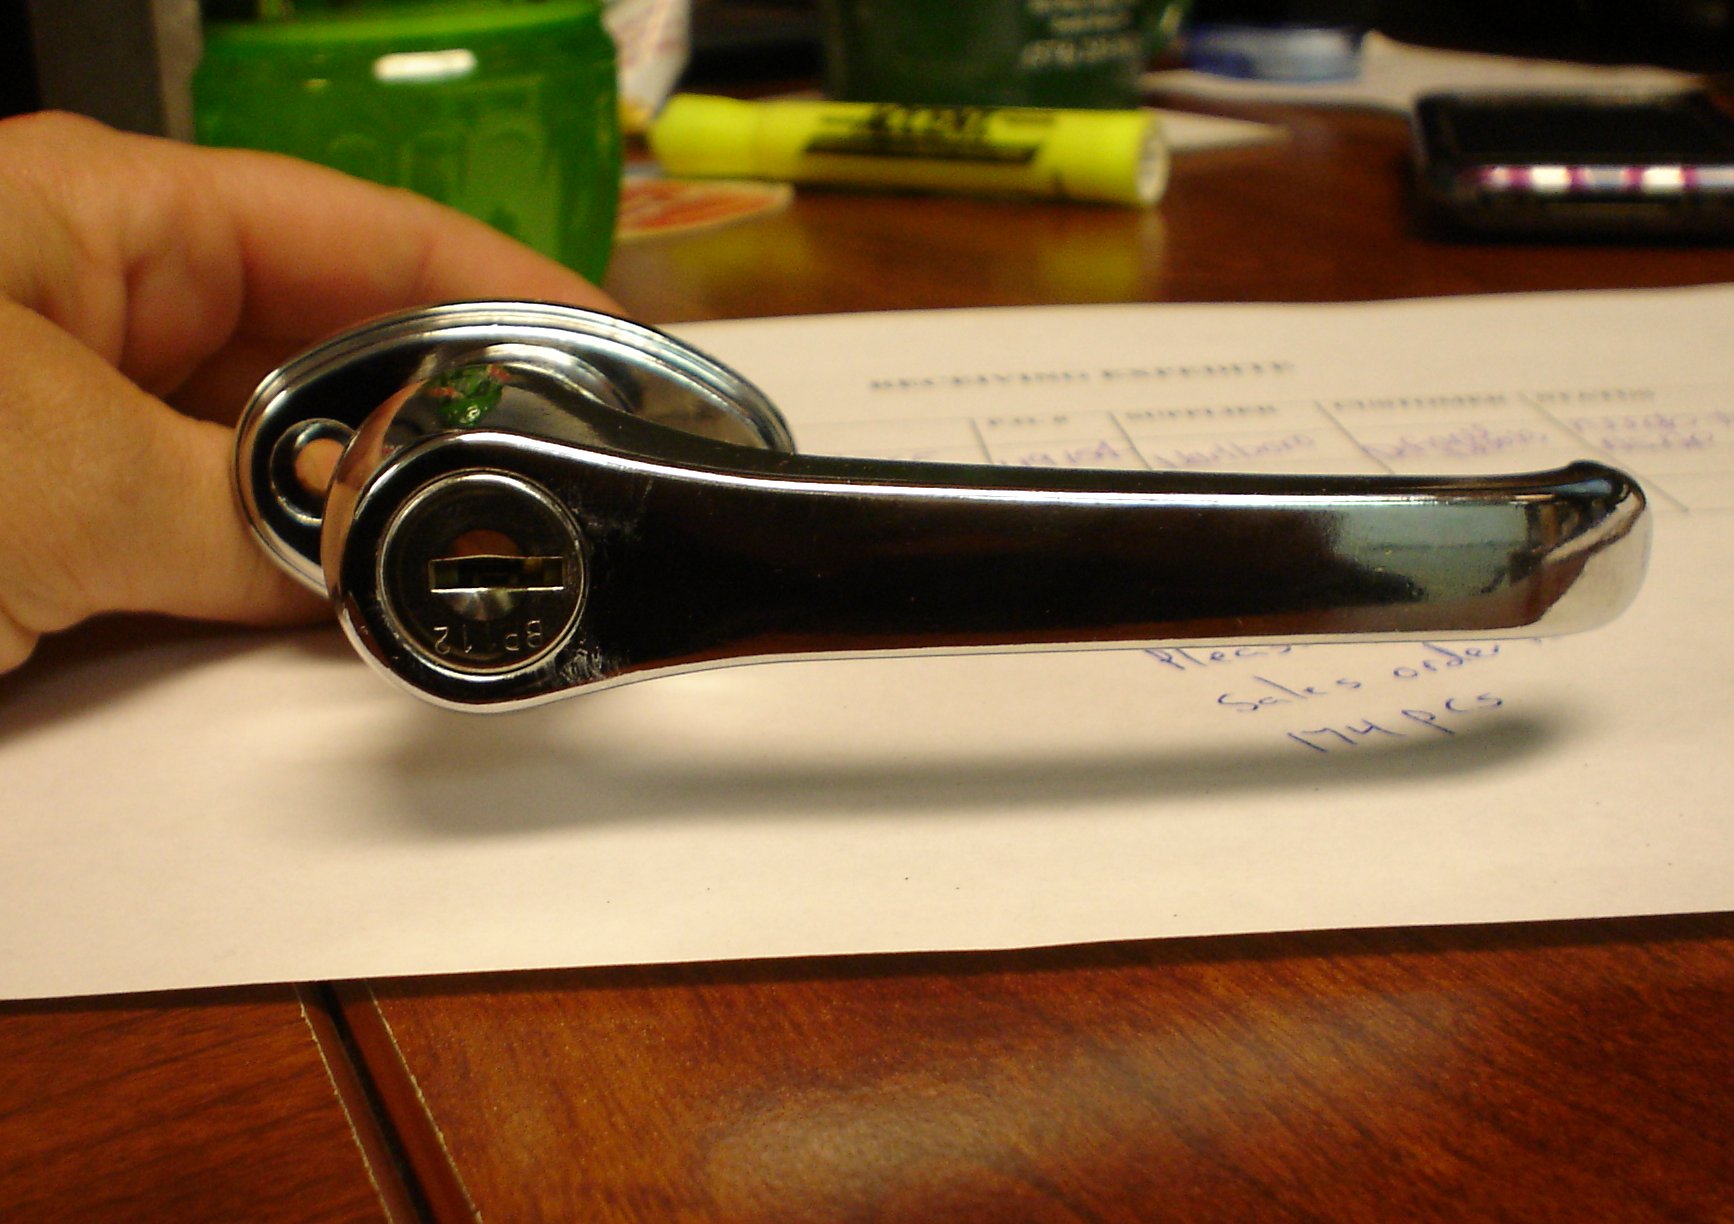
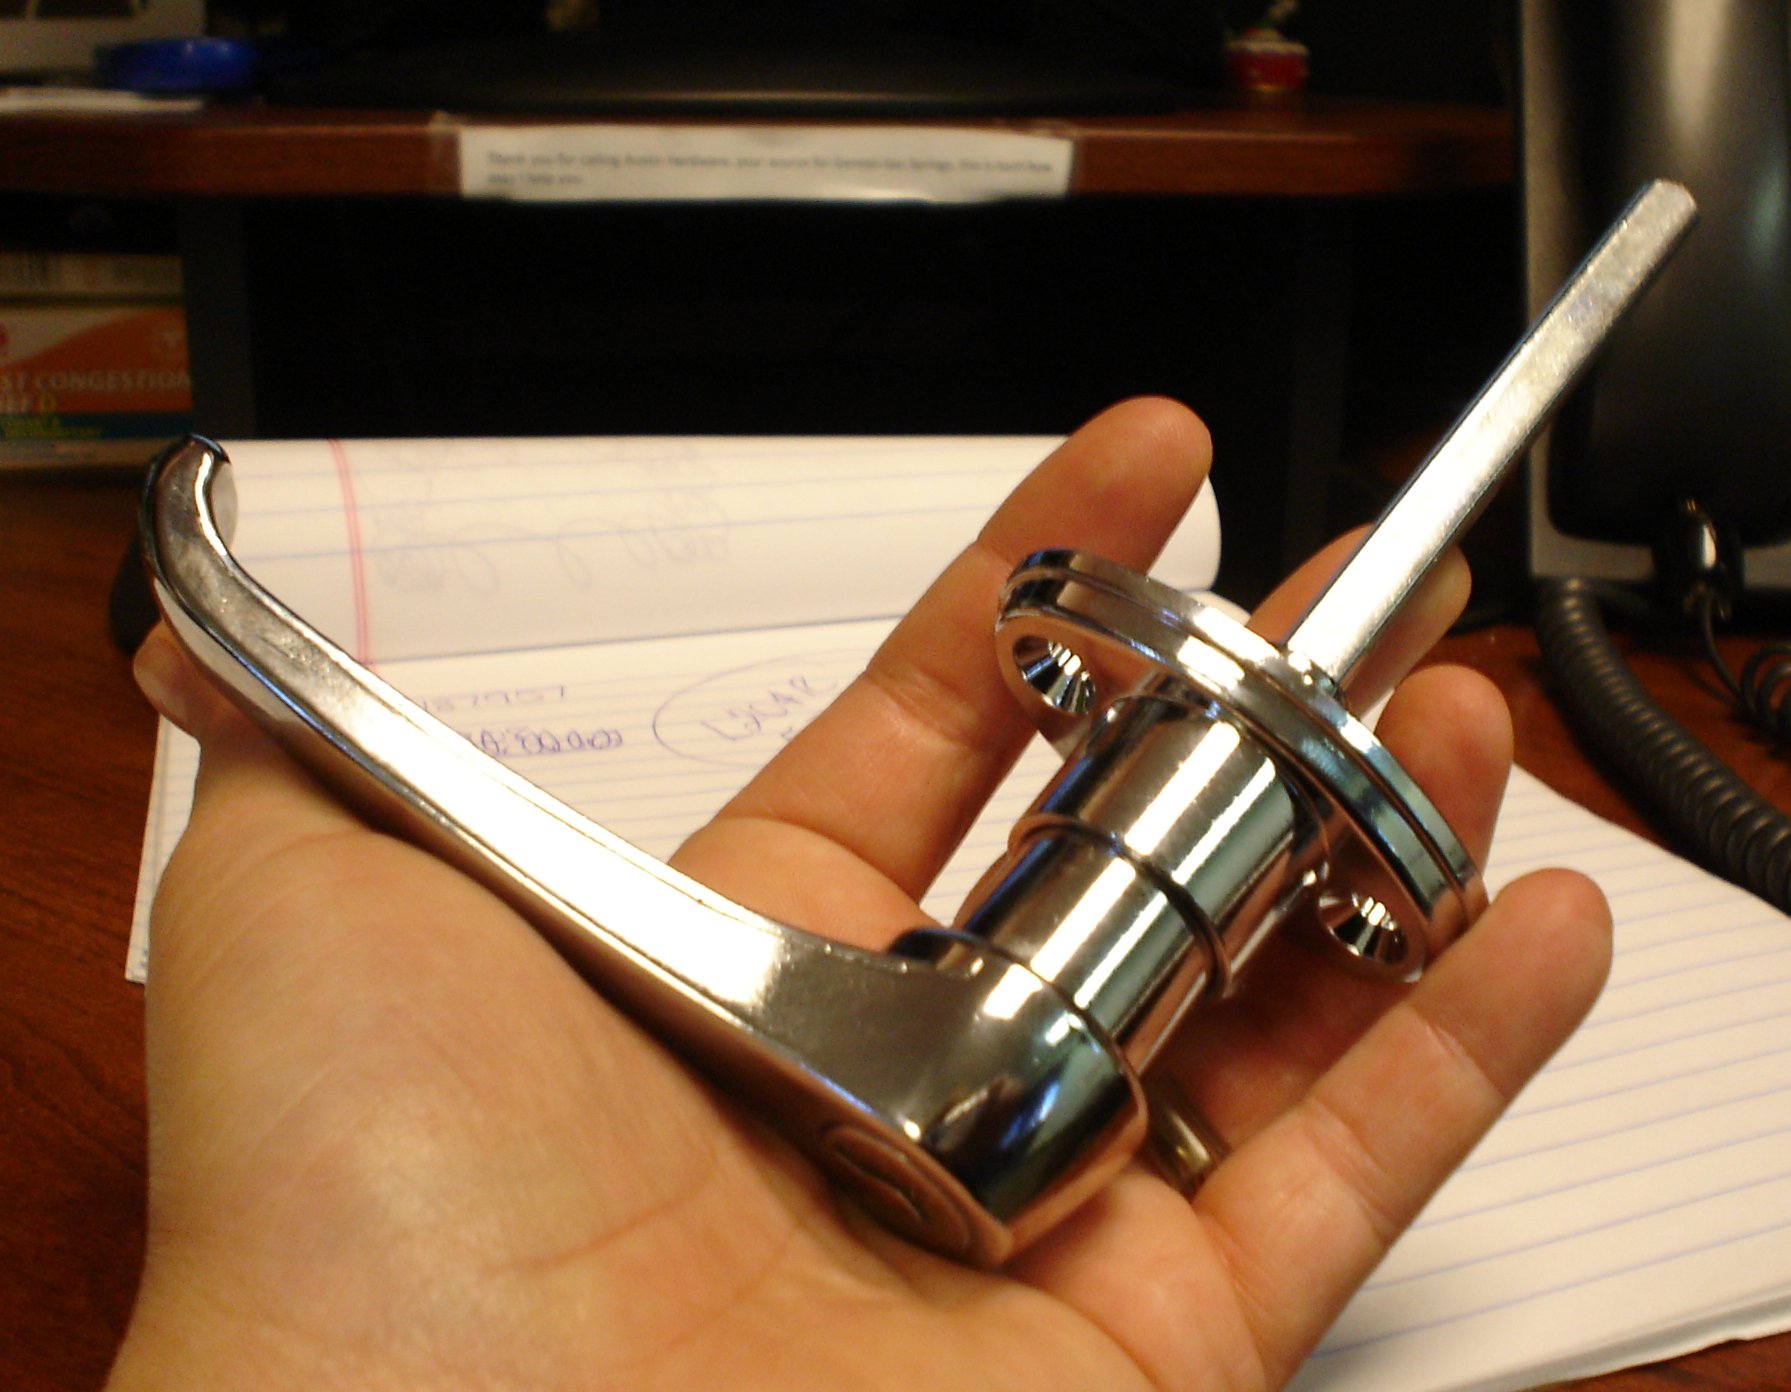 Thanks Robert! |
||||||||
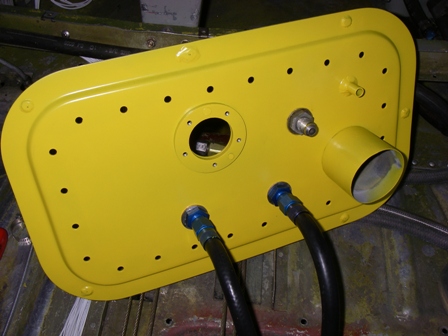
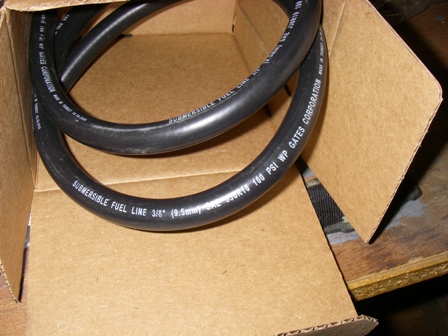
| Fuel tank
submersible fuel hose and large connector hose... Tip...
(from member Neil Kennedy in Canada)
"I'm
not sure what everybody else would find in their fuel tank, but when I
was doing a small repair to the tank lid, I found that MIL6000D rubber
hose had been used from the pick-up screens to the AN bulkhead fitting
in the steel lid. Checking the specification for that hose,
it can swell up to 85% when submerged in fuel..This swelling was
obvious at both ends of the hose when I took off the
Aeroquip hose fitting (top end) and the hose
clamp (bottom end). I've replaced those hoses with 3/8 ID
submersible fuel line hose by Gates sourced from the local auto parts
shop. Gates sells a 10 foot length in a box (Product
# 27081) for not much more than $20. With a bit of
determination, and lubrication, an Aeroquip 471 hose fitting will go on
the end of the hose. I found that the OD varied slightly
along the length of the hose, so I picked a thinner section for the
hose end to get the Aeroquip fitting on."
 Fuel
filling hose, you know, the large one!: While the tank lid
was off, I also decided that the 2.5" ID rubber hose coupling between
the fill tube and the tank lid needed replacing. There are
similar couplings available in silicone, used in automotive induction
systems, but they aren't recommended for use with fuel.
Goodyear makes fuel fill hoses in many sizes (including 2.5" ID);
however, but I had to buy a 4 foot length. This stuff wasn't
cheap - trade price was $100 plus tax. It's good heavy duty
fuel hose, though. Not permeable at all. For those
who want to replace their old coupling hose with a piece of new
Goodyear hose, I'll cut and send a 5" length (lots more than you need)
for $25, including postage. E-mail to cghqu@aol.com if
interested.
Check the "Parts for Sale" also. |
||||||||
| Flight
Control bushing removal and installation tool... If you
find the need to remove or install the hinge bushings in your Seabee,
you can make this tool in about ten minutes (not counting epoxy drying
time) that will make the removal and installation a breeze! I have used
it a dozen times or more and it works flawlessly. Download the
instructions here.
Also a ball-bearing replacement for all the Seabee bushings are available from www.BearingsDirect.com (part number: FR168-ZZ for the flanged bearing and R168-ZZ for the straight bearing). Specification sheet here. This is a really neat fix for a heavily worn part of our Seabees. CAUTION: Be sure your hinge-line on the rudder and flaps (three hinges) are in alignment! These bearings are very strong but alignemnt is critical. The ailerons are not a problem because there is only two hinges. Use this tip at your own risk. |
||||||||
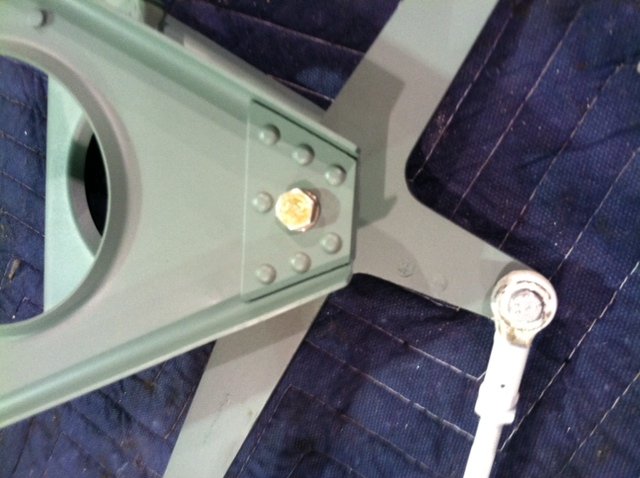
| Quick fix
for elevator trim hinge pins slipping out... I
was flying back from Hammondsport, NY and noticed a high frequency
vibration in the control wheel and in the seat of my pants. Looking out
at the wings and in the wing float mirrors I didn't notice anything
unusual. I thought a flap or aileron was flapping in the wind. It
wasn't. Changing airspeed had little effect on the magnitude of the
vibration. I had no choice but to wait until I landed to check it out.
After landing I did a thorough walk-around and didn't notice
anything until I raised the elevator to the full up position. What I
saw made me light headed! The right elevator trim hinge pin
had come
out almost half way! I would not have seen it if I didn't lift the
elevator and looked underneath. The left hand side was fine
but when I got
home I drilled small holes in each end of the hinge and put a cotter
pin in on each end of the hinge to keep the hinge pin in place. I did
both sides of each hinge. I noticed that on other Seabees the hinges
had been
"crimped" to keep the pin form sliding out and upon closer inspection
mine had been crimped too! The pin just wore itself out and was sliding
sideways. CHECK YOUR HINGE PINS! This could be quite serious if allowed
to progress!! If you want more information contact me.
Steve Mestler (smestler@pbtcomm.net) |
||||||||
| Various
Plug solutions for the numerous holes in our Seabees... (Ed note: The following was received by member Bob Gould, Hawaii. I got a few free samples and they look great! I think they could work in quite a few areas on our Seabees) "Ken,
I went online looking for something to use to cap the fuel vent line to
keep water out when I wash down the airplane, and found FPT9430 Pull
Tab Vinyl Plastic Caps at MoCap http://www.mocap.com/plastic-caps-pull-tab.html.
I asked for samples of them in that size and the next size up, along
with several other types that seemed like possibilities, but the
FPT9430 work best. They fit fairly tightly on the vent tubes,
are long enough to work with (2.25") and to punch a hole through to
attach a "Remove Before Flight" ribbon, have a kind of handle, and seem
like the right answer. I asked for red and got black, but
that's OK.
They also have SHEET METAL FLUSH PLUGS for the access holes in the wings, etc., though I have gotten mine from Caplugs previously.
Both MoCap and Caplug sent me samples; MoCap 3 of each of several
types, and Caplug 10 3/8" ones for my wing leading edge holes at no
cost. Normally they want people to buy thousands at a time,
but I don't know if there are retailers or how small an order can be
made and at what prices.
I thought you guys might find them to be useful additions to your product line. Bob" |
||||||||
| That pesky
corrosion!!... Member Tim Sutter offers his take on corrosion. Fresh water seems to be no problem or at least not as much as salt water. "Steve I
thought I would add my two cents to the corrosion inspection (lift
struts especially) issue. After several years of doing the annual
inspection on Bob Gould's SeaBee in Hawaii's horrific salt water
environment I would recommend to never use a sharp object to compromise
the paint seal on any aluminum component. Even the smallest pin prick
will allow salt water to enter. Any corrosion is very easy to observe
by looking for the swelling in the paint. Even the most insignificant
corrosion will show up as a bubble in the paint. I use a strong light
and position it so that any sign of corrosion is seen in the reflection
of the light off of the surface.
On
my airplane, in a fresh water location in Alaska I have yet to see any
corrosion at all. Tom Eldridge's Seabee has minor corrosion on the rear
spar of the wings. That corrosion is due to salt water time in
Washington before Tom purchased it. The rib in one horizontal
stabilizer had to be replaced also due to corrosion.
I
have four hulls sitting outside, with mud inside the bottom of the hull
compartments. The mud can be scrapped away and the original primer is
still intact. I did look at one Seabee (N87549) in Wassilla Alaska few
years ago and it had some corrosion issues. The keel had exfoliation in
several locations. I don't know about its history other than it had sat
in a very damp outside location for about 30 years.
Thanks
Tim"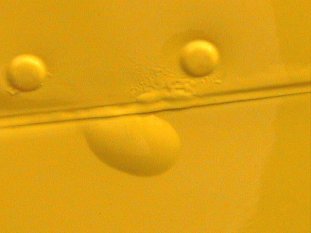
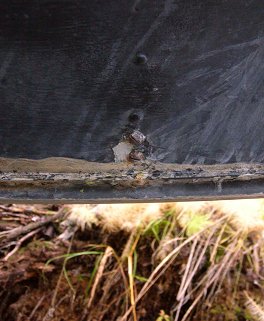 Bubble shows where corrosion hides underneath. Tim says don't poke paint with a pointy tool instead just keep looking for the bubbles. Other photo is of a hull Tim mentions above that has been sitting for years in a fresh water (rain and weather) for years. Not in bad shape considering. |
||||||||
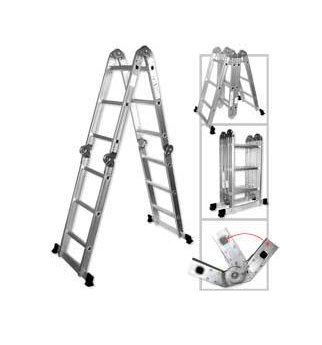
| An
easy hull stand for the Seabee... From member Robert de Hartog a simple and cheap (about $75) alternative to the complex hull stand listed in the Seabee Service News No. 4. Below is the ad from Robert (left) and a photo I found on Ebay (right) . The only thing I would add is a secure support on the top of the ladder to prevent slippage and make sure it can hold all the weight you would possibly have on it. Thanks Robert! 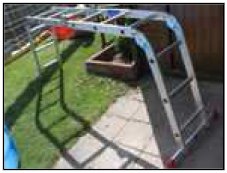
 |
||||||||
| Another
Rudder Gust Lock idea... From member J.R. Ranney N6748K; another idea for a rudder gust lock. Made of steel tubing with "J-bolts" as the locking devise. Thanks J. R. 
 (Click on
images for full size view)
|
||||||||
| One-Peice
Window Molding.... From member J.R. Ranney N6748K Attached is some information on C.R.Laurence (website: http://www.crlaurence.com/) AS1615 rubber molding that works well for Seabee windows. It's one-piece with an integral locking strip. 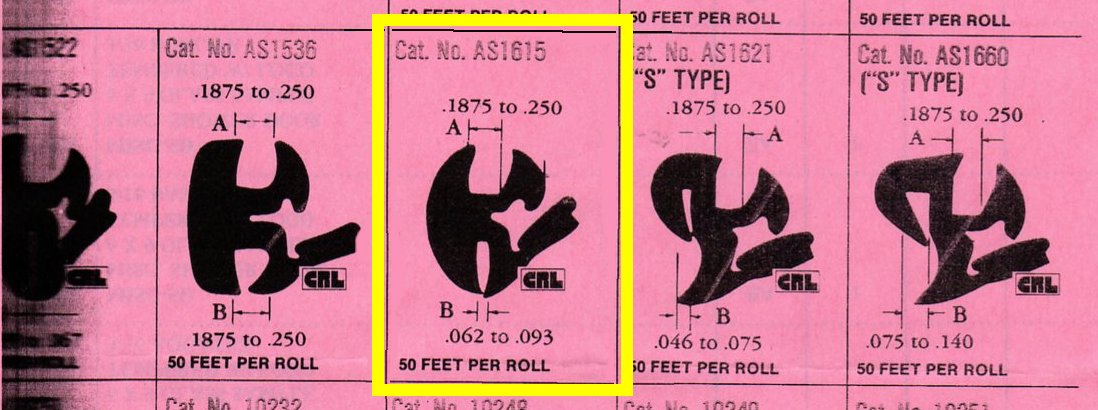 |
||||||||
| Fan
Belt for the Franklin.... From member J.R. Ranney: The Franklin generator drive belt part number is: Napa 25-22386, or Gates TR 22386. A slghtly shorter belt would probably be better. With this belt installed the generator adjustment is at maximum. |
||||||||
| Hull
Plugs, unpluged.... From member J.R. Ranney: Someone suggests oiling the hull drain plugs before installing them. A better way is to use Teflon pipe joint tape; it's less messy, it provides a perfect seal and makes them easy to remove. Pipe joint tape can be used on oil, fuel, and hydraulic fittings as well, but be careful to leave the first thread or two free so no tape gets into the systems. |
||||||||
| Anchor Bag
and Baggage Compartment Cover... Here is a real timely source. I purchased an interior kit for my Seabee from Airtex (http://www.airtexinteriors.com/) back in 1979. It came with an anchor bag and also the canvas baggage compartment curtain. I assume they can make you one. The snaps came with the kit, but were not installed, as you have to fit them. Bob Gould |
||||||||
| New Rudder
Pedal Gust Lock (You can make it yourself!)... (Ed Note: This tip is from "Master Seaplane Newsletter Writer" Bruce Hinds of the Northwest Seabee Club. He has a great solution for the rudder pedal gust lock! Thanks Bruce!) Bruce writes: "My aircraft at one
time had the rudder stops broken out
because the airplane was parked in a strong tail wind. The
mechanics had cut a hole into the rudder skin to do the
repair
and the finish has never been the same. Another bee this past
year on our field was in the shop for an extensive repair for the same
thing, except it was the former and plate on the vertical stabilizer
the hinge mounts to that was damaged. That was a very costly
repair. Locking tail wheel airplanes don't have anything
resisting rudder movement like the springs on the steerable tailwheels. Perhaps you
remember my rudder lock (see below). It's been a few years, but I used
someone else's idea of putting two "pins" on a wire and flag so they go
in the middle rudder hinge. I coated the carriage bolts in a
rubber stuff made for tool handles and drilled the carriage bolts for a
sprinkler marking wire. It's worked great all these
years. But....."
 First Rudder Lock "When I showed this to everyone, I received a story about how a problem that could arise should you forget to remove it! "Not a problem" you say? Well on land you can't taxi without noticing it, that's correct. But as the story goes, and I can see this happening, when parked on a beach, 9 times out of 10, especially on soft beaches you get the airplane in position to go down hill when you park it. So you forget, and power up straight into the water! Try to get that sucker out now! How are your sailing skills without a rudder? I've been looking for alternatives because even as well as this has worked, how do you get it in and out at a dock? And another flaw with my arrangement is when the wind is blowing from behind and the airplane is parked, you can still get some rudder banging unless you have someone hold the pedals while you pull the pins.... Yes it's not perfect and the other situations haven't been much of a problem, but my mind has been looking for a solution. Recently in reading the old newsletters I noticed a "U" shaped bracket they mounted to the battery box with a piece on each end that would attach to small bolts threaded into the inboard ends of the rudder pedals on the copilot's side. Great idea, but I didn't want to put the bracket under my carpet job and I didn't want to pull the pedals out to drill and tap in the bolts. Can't we make this easier? Yes!... 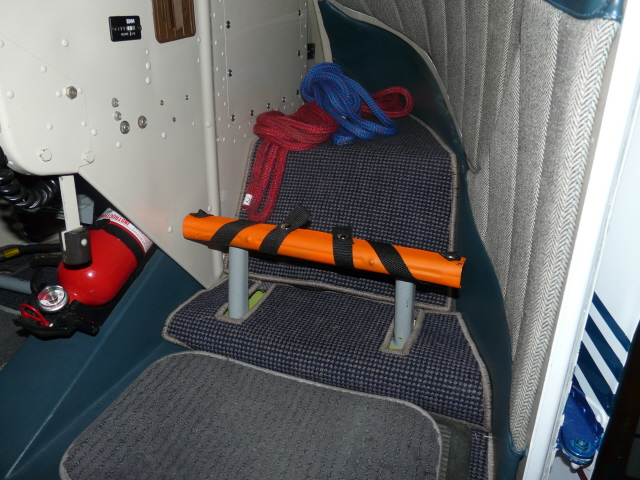 New Generation Rudder Lock "In it's former life this rudder lock (above) was a wardrobe box hanger bar (available from a U-Haul store). Now shortened and painted bright orange with web straps that wrap around the back of the pedals, pop riveted on the ends and snaps in the middle. Can't miss it! Even if you do and you find yourself 'underway' on the bounding mane, you can pop the snaps and you're home free. The only drawback on this is there will be just a little rudder movement, but it can't move much!" |
||||||||
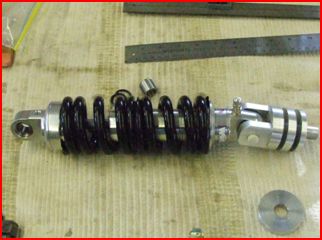
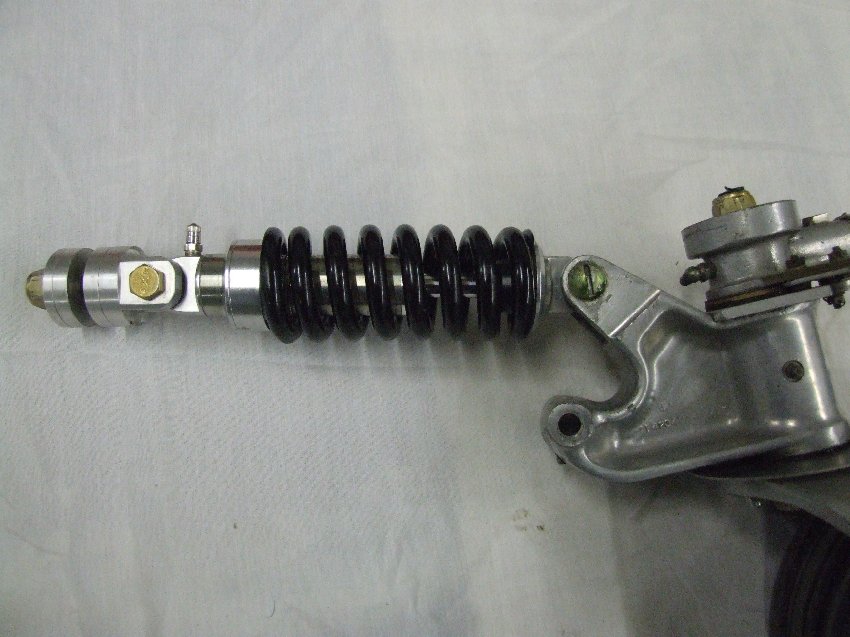
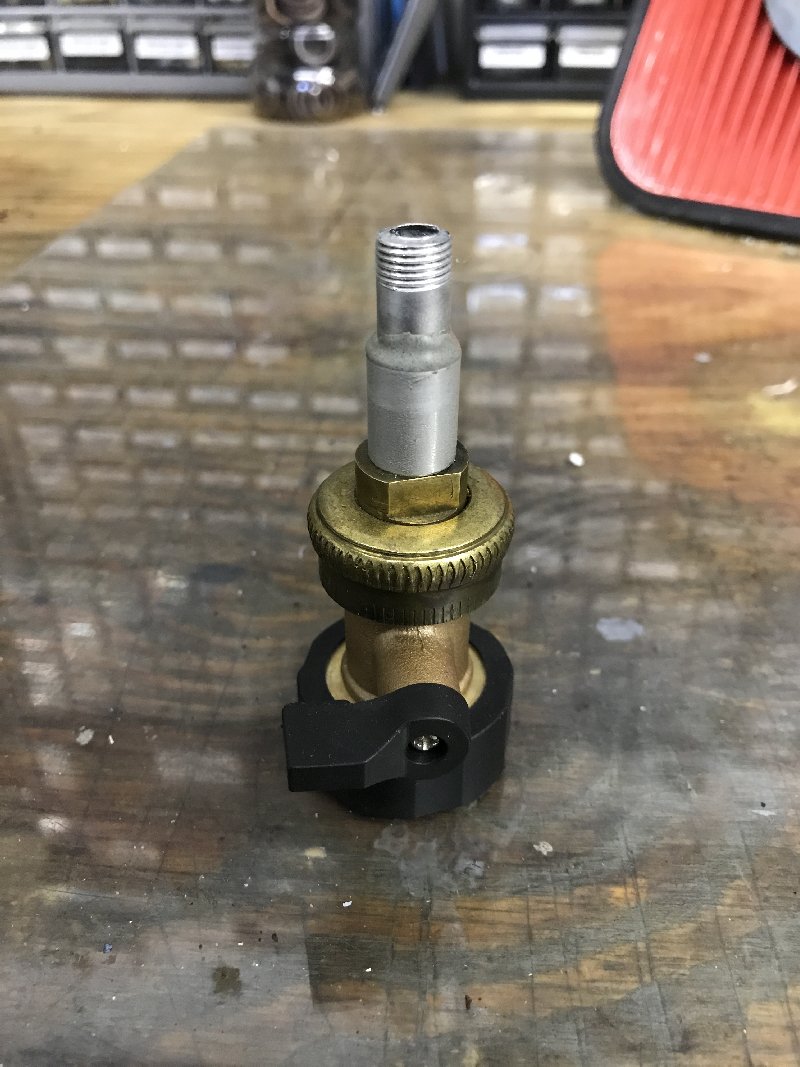
| New shock
absorber for tail wheels... Members Mike Lush and Brian Robertson from "The Great White North", have invented a new shock for the tail wheel on our Seabees. Works on steerable and locking tail wheels. Evidently the humongous spring was the big hurdle ($$). For a detailed file (PDF) click here! Price is $1975.00 USD. Mike and Don write: "Yes! Finally a shock strut is available for your Seabee. Improved ground handling, and a much better ride for you and your old Seabee, especially on rough runways, is now available. High quality components, plus ease of installation, make this the perfect mod to replace those old rubber pucks. For more information contact Mike Lush (519) 940-8329, or via Email at mrlush@sympatico.ca, or Brian Robinson at brian@v8seabee.com
(Click on
images for
full size)
|
||||||||
| More on the
Seabee Hydraulic Pump... From Bernie Nolen (melbern1@charter.net), Thanks Bernie! The electrol hydro pump from simuflight (I think he means Prestolite Pump - Steve for the IRSOC) came from the tilt outdrive actuator off a boat. Most of the ski boat runabouts use this to control the tilt and trim of the out drive in an Inboard/Outboard installation. Try the local boat repair shop. |
||||||||
|
Seen your info on
seabee site re
prestolite pump. I will be using a Parker Oildyne for my experimental
Seabee s/n 1038. I'm down to choosing between two pumps. Prestolite pumps are no longer
manufactured so info is
scarce. Pressure is adjustable and I know Prestolite hyc5005 pump delivers 45 cu inches
fluid/minute @ 1000
psi. Is it possible you could time your flaps down from 0 to full while
parked? I'd also like your opinion on
whether flaps and gear actuate fast enough. It will help me choose pump. Response: "Dear Pius,
I'm sorry for getting back to you so late. My prestolite pump works real well. The flaps take about 5 seconds to go down and about 7 seconds to retract. The gear takes a while longer (about 20 seconds to retract and 15 to go down). I haven't seen a Seabee gear retract much faster than that. Not that it is so fast it's just the nature of the beast I suppose. The "valve body" has alot to do with the efficiency of the hydraulics as well but they all seem to work flawlessly if they are maintained well. I have no complaints about the Seabee hydraulic system other than the parts are a little hard to find. If you need someone to work on it, I would recommend Richie Brumm in NY (Seabee Owner and member). He is the hydraulic expert hands down. Please keep me updated and I will include your information on the website for others if you don't mind. Thanks! Steve Mestler for the IRSOC" Re-response: I will keep you posted on Oildyne/Parker pump progress. The electrol is an easy one to work on. As for the Prestolite according to Air-Parts of Lock Haven, it was also used on Aero Commander 112/114, Beech 24/26, Bellanca 17-30 series, Cessna 177 RG, Piper 28,32,34,44. These could be a source for prestolite parts. Thanks. Tamfor Canada Ltd. 9719-63 Avenue Edmonton, Alberta, Canada T6E 0G7 Phone 780-433-9575 Fax 780-439-7057 pius@tamfor.com |
||||||||
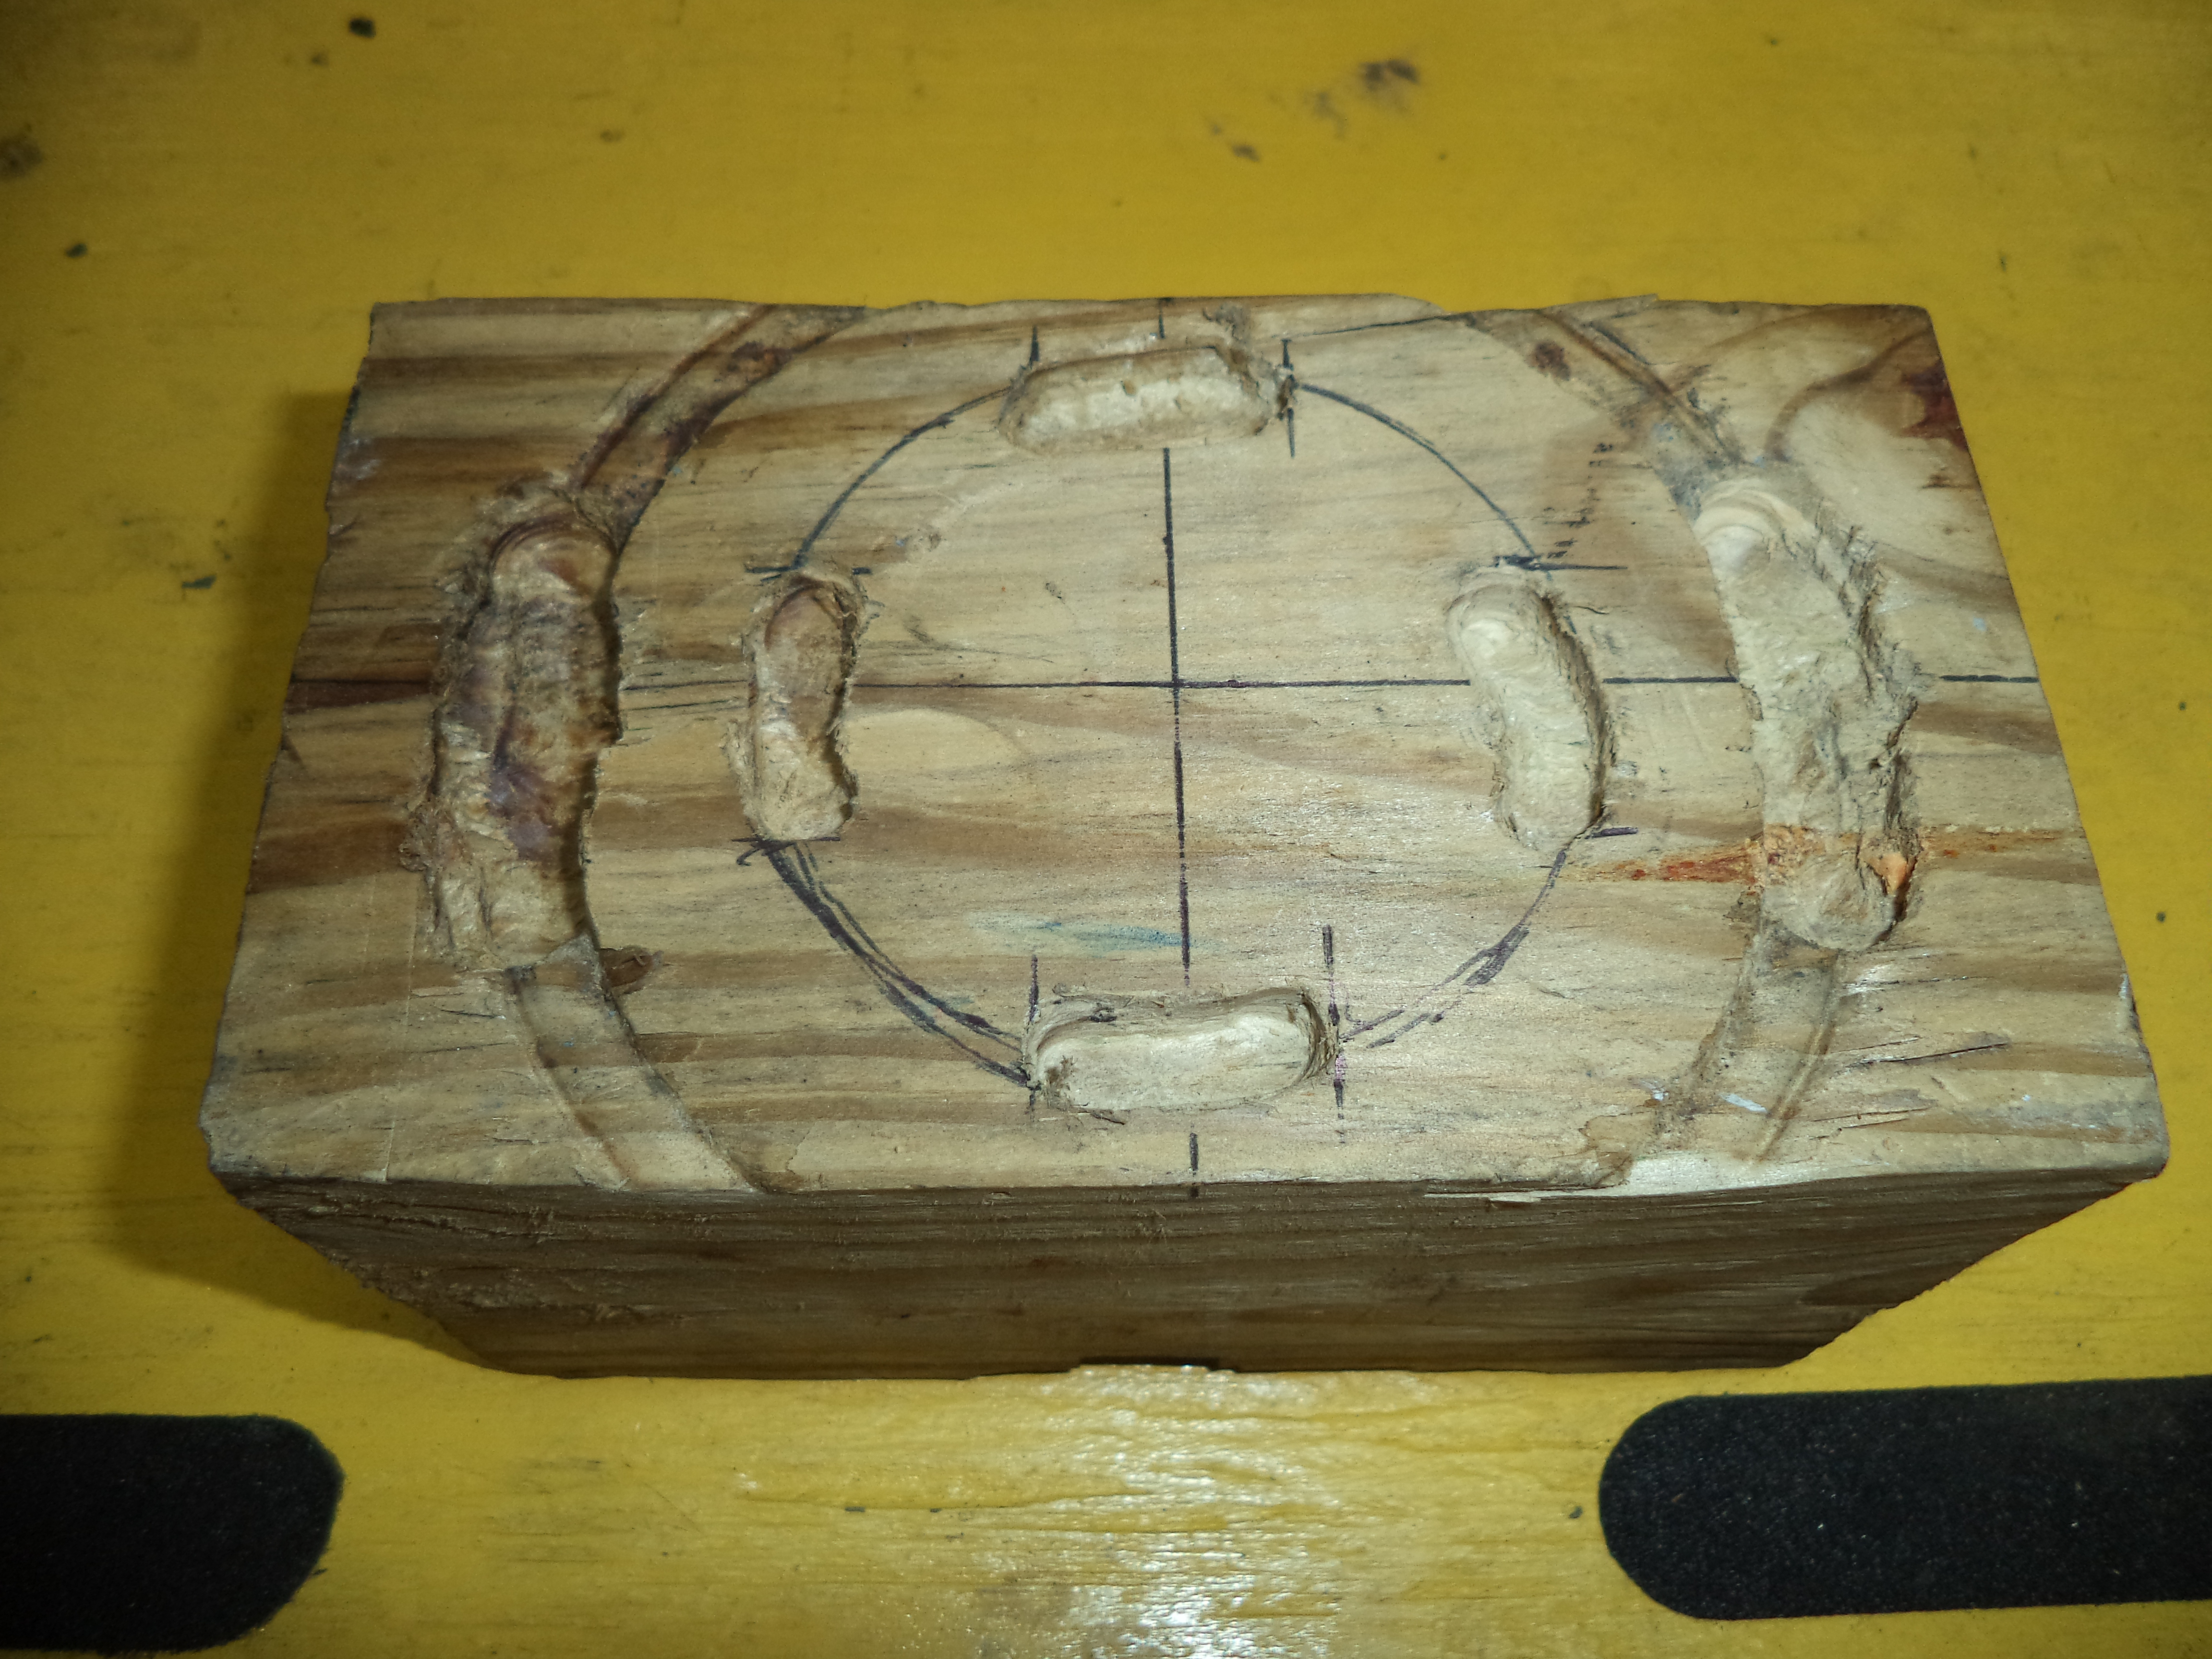
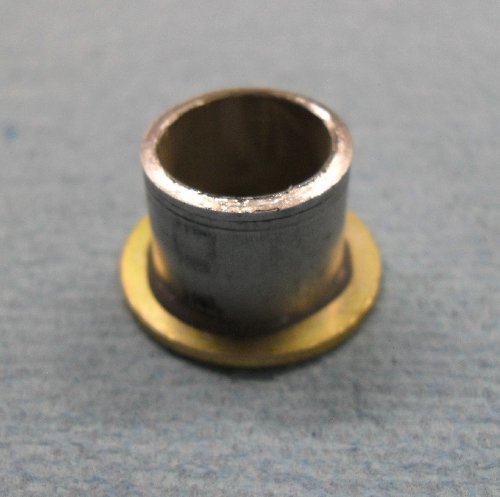
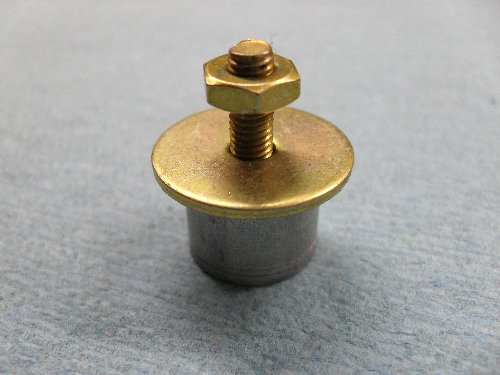
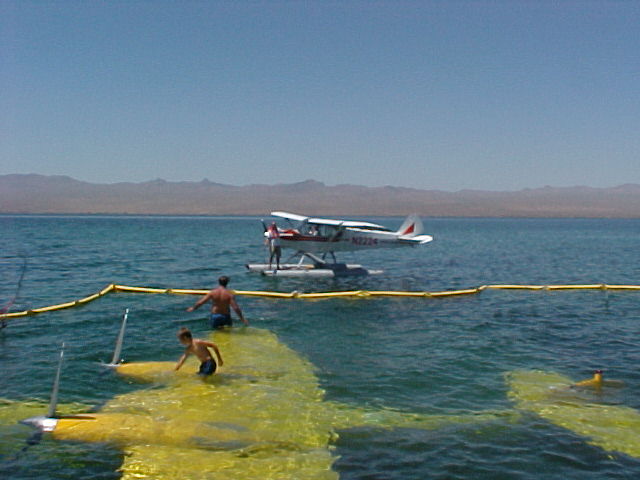
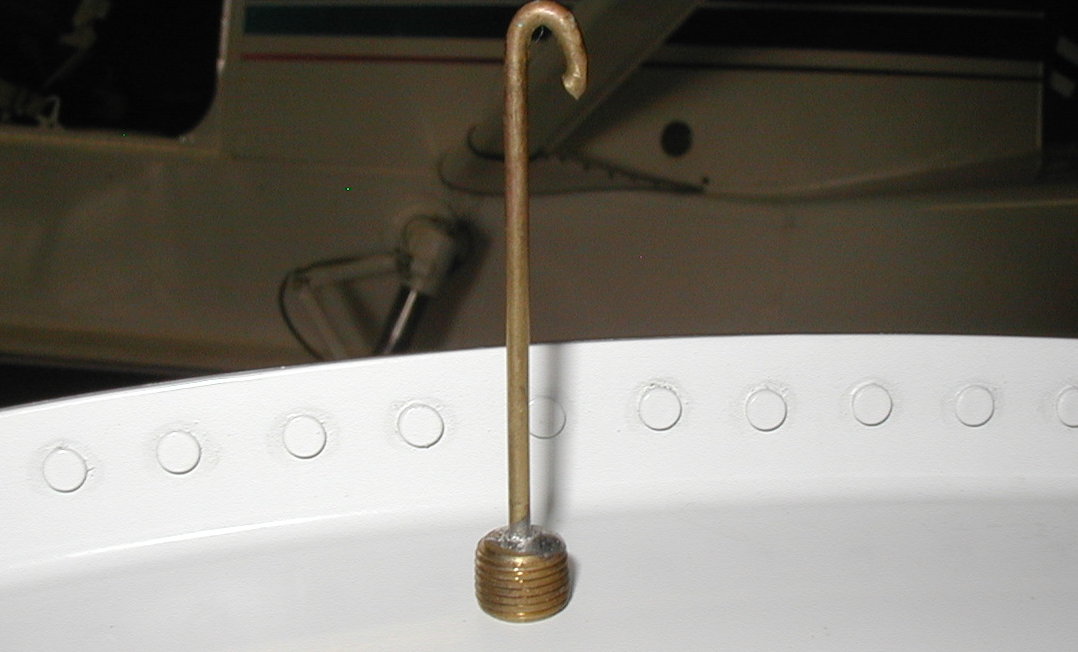
| Hull Plug
Modification... (This Tip comes from our friend Bruce Hinds out on the west coast. Thanks Bruce!)
Even the professionals
make mistakes, an interesting story in the Kenmore book was
about
an annual on a Bee. They delivered it to the owner who wanted
it
right away for an event at Whidbey where he moored it for several
hours. The plugs were left out and not noticed. The
owner
returned from the event to find his Bee floating upside down.
The
story of the recovery is even more amazing. But that's
another
story.
I drill a small pilot hole in the bottom, or in this case the top of
the plug and braise or hard solider in a piece of braising
rod.
Bend a hook in the end so it will fit though the hole, then when you
push it up in the hole all you have to do is hook it inside and pull
the bend a little bit wider.
This has worked great, they're easy to see hanging down and you always
know where they are."(Ed Note: Thanks Bruce! I would like to say I never forgot my plugs but I can't! Steve for the IRSOC) |
||||||||
| CHECK YOUR TAIL-WHEEL
MICROSWITCH!!... This anonymous member had a little "incident" with his Seabee that each member should be aware of...okay, it's me. You happy now! Read about it here. Your tail wheel microswitch could ruin your whole day! Steve for the IRSOC Thanks to Jerry Belcher up in Penn Yan (PEO), N.Y. for helping me fix it! |
||||||||
| Hydraulic
Pump Plug Covers... To
prevent a TOTAL hydraulic failure and the embarrasment of landing with
the gear up on a runway or worse with the wheels down on the water,
make sure your Electrol Hydraulic Pump (the manually operated one) has
the plug covers installed. Some covers have rivets driven in from the
pump side so that the head just touch the plugs when the covers are
tightened so that the plugs will remain in place regardless of plug
integrity. See
a rough
sketch here and check it out on your airplane TOMORROW!! The
aluminum plates are about 1/8" thick and the screws are #8 or #10
machine
Phillister heads that are safetied together in pairs. The plate on the
aft side of the pump body may be made as one piece but still has four
(4) screws in it for security.
Caution: If your pump body is not already drilled out for the plate screws (#8 Phillister Head) be very careful about the drill depth as there are numerous cavities and passageways that are not too far from the surface of the pump body! Mine are about 1/4" deep, that's all! Use a bottoming tap to prevent the tap from piercing the Pump Body orifices. Steve for the IRSOC |
||||||||
| Spark Plug
Helicoil Tool... Skywaytools.com
has a 14mm Spark
Plug Thread Repair
Tool Kit for $ 29.99 (part number: 5334-14. Skyway tool #:
779).
N868CB |
||||||||
| Window
Rubber insert tool... This tool is required when installing new (or removed) rubber window moulding. See the plans on the Seabee CD (Seabee Newsletter #30A) or download it here. (or order one from Sommer & Maca below-part #: 201-1195) Steve (for the IRSOC) |
||||||||
| Window Rubber Moulding... If you need rubber moulding for your windows, the following is provided by Les Christianson by way of John Haffner. Thanks guys! Update! Company name change... Company: C.R. Laurence and Co. (http://www.crlaurence.com/default.aspx) Original two-piece weatherstripping: Channel: AS1179, Stock No 101-2206. Lock Rubber: AS937, Stock No 101-2253 Tool No 201-1195 (Member KC Ostronik tried to order one but the company said they don't carry this any more. 12/5/2019) One roll of channel and one roll of lock rubber should be enough for allwindows and sky light. |
||||||||
| Corrosion Proofing... Here is a tip I
got from Henry
Ruzakowski. He has been operating his Seabee in salt water for years,
and recommends using LPS-3 to prevent corrosion, it is, in his opinion,
just as effective as Corrosion X or ACF-50 but is less expensive. He
also uses an LPS product called Hard coat for fittings and bolts. He
uses the Corrosion X spraying system to get the LPS into the interior
of the structure. The spray system costs about $400, but that may be a
good investment.
All the best, John Haffner |
||||||||
| Seabee Seatbelts (that
is...shoulder
harnesses...) Here is the part number for the Davis seat restraints we installed for the rear seats. If anyone wants to use our 337 to duplicate the installation, this is the part they should order. Bob Gould PART NUMBER FDC6400-568-5-080. PLEASE FIND DRAWING ATTACHED. ANY QUESTIONS PLEASE CALL OR EMAIL ME. Davis Aircraft Products Co.,Inc. http://www.davisaircraftproducts.com/ Thomas Clark email: tclark@davisaircraftproducts.com phone: (631) 563-1500 ext. 126 fax: (631) 563-1117 |
||||||||
| Trim Tab Lock... The following clip is from the December 1984 Newsletter from Capt. Richard W. Saunders' and his device should be in every Seabee owners' inflight toolbag. "Another “voice of
experience”, Karl
Johnstone, relates that he learned the hard way about the trim tab on
preflighting the airplane. One of the most serious occurrences that the
Seabee can spring on you, and has done so to three owners that I know
of, is trim tab failure in flight. All three were extremely lucky to
have survived. The Elevator Trim Tab Actuating Rod and the Fork are the
culprits. Of the utmost importance on your walk-around inspection, and
whenever you fly in some one else’s ‘Bee
– check the play in each trim
tab. No more than 1/4" play should be in the system. Think about this:
if the trim tab becomes free in flight, it’s going to move
with the
airflow change. Any movement of either tab is going to cause the
elevators to move to full travel up and down, under the influence of
that big, free-floating trim tab.
Imagine the ship’s
pitch changes when those big elevators are oscillating stop-to-stop.
Now imagine trying to get her safety back to earth in that condition.
It happened to the Judge and to a long-time friend in Texas, who
described it as a miracle that the oscillation of the nose just
starting an upward curve coincided with his being only about 5 feet
above the surface of a lake. Gave new meaning to the term,
“We just
dropped in”. The oscillation could have been in the middle of
the
downward curve when he was that close to the surface. A footnote to
that incident: his passenger on that flight was his priest, up for his
first plane ride. Divine guidance?
In my tool kit/spare
parts, I keep a bolt, nut and two skin washers together so that if I
find a loose tab while 58K and I are away from home base, I can secure
the bolt/washer arrangement in the slot between trim tab and elevator,
thereby locking the tab to the elevator. It’s like a
miniature gust
lock. Go put it together now.
Judge Johnstone’s
incident was probably the same lucky coincidence of the oscillation,
but resulted in a $20,000 repair bill, even though he was able to fly
his tough old bird, the Seabee (Twin), back home after tightly securing
the trim tab. He had “landed” in snow-covered
tundra."
|
||||||||
| Seabee O-Rings... This is the list of Seabee O-rings as compiled by Mr. George Mojonnier and Mr. Don Booth back in the 1960's. I know some are different by now with all the "mods" we have but most are still good. If you have an additions, let me know! Thanks. Need to buy o-rings? See them here at Club prices. Steve for the IRSOC |
||||||||
| Parking Brake... (Long-time
IRSOC member Bruce Hinds, editor-in-chief of the Seabee Newsletter,sent
this along. Bruce, I can tell you that you are not alone!!
The good news is your parking brake valves must be in pretty good shape! Steve-for the IRSOC)
"Someone passed me
a picture recently of an Airbus with all the tires blown due to some
bonehead landing with the parking break set. I have heard of
this
before, mostly in small planes and I've wondered how that can
happen. Here's one way:
At Lake
Goodwin I was to work the
event on Saturday and didn't want to take a buoy just in case we had a
bunch of folks show up. Besides, if I put it in shallow water
I
could walk to the dock. This wasn't something we encouraged
due
to some big rocks, but I'd been there several times getting things
ready and knew where most of them were. So, as I taxied in to
the
shallows I just figured I'd put the gear down and that would stabilize
the airplane on the bottom and I wouldn't have to anchor.
I've
done this before, it works great.
The
airplane was mostly
afloat, and there were some waves, so just to make sure it didn't go
anywhere I set the parking brake. Can you see this
coming?
The airplane sat fine all day long. When I was ready to
leave, I
just powered out. It seemed like I'd snagged a good size rock
on
the gear or a wheel was in a hole which stopped my progress, so I
selected the gear up and away I went. There was a pretty good
wind blowing back at the Narrows when I got back and
with a
short ground roll I made my taxiway, turned off the runway and
came to a stop. Hmmm, I didn't plan on stopping.
But
with a right turn into the strong wind, I just need
more
power to taxi... more power... more power? What's going on
here? That's when I realized the brakes
were still
set. What a Bone Head!
Seems odd, just that weekend
I'd talked to someone that had put the Cessna 421 8" brakes on his
Seabee. He questioned why the STC was for 6" brakes
on an 8"
wheel, and, I'd wondered what it would take to upgrade to the
bigger brakes. Fortunately the 6" Clevelands on the
Bee are
sufficient to hold it in place with full power.
That's all I
really need!
It would
seem silly to have the
parking brake on the landing checklist, but
who knows?
Just be careful if you use your brakes while parking in shallow
water.
BH"
|
||||||||
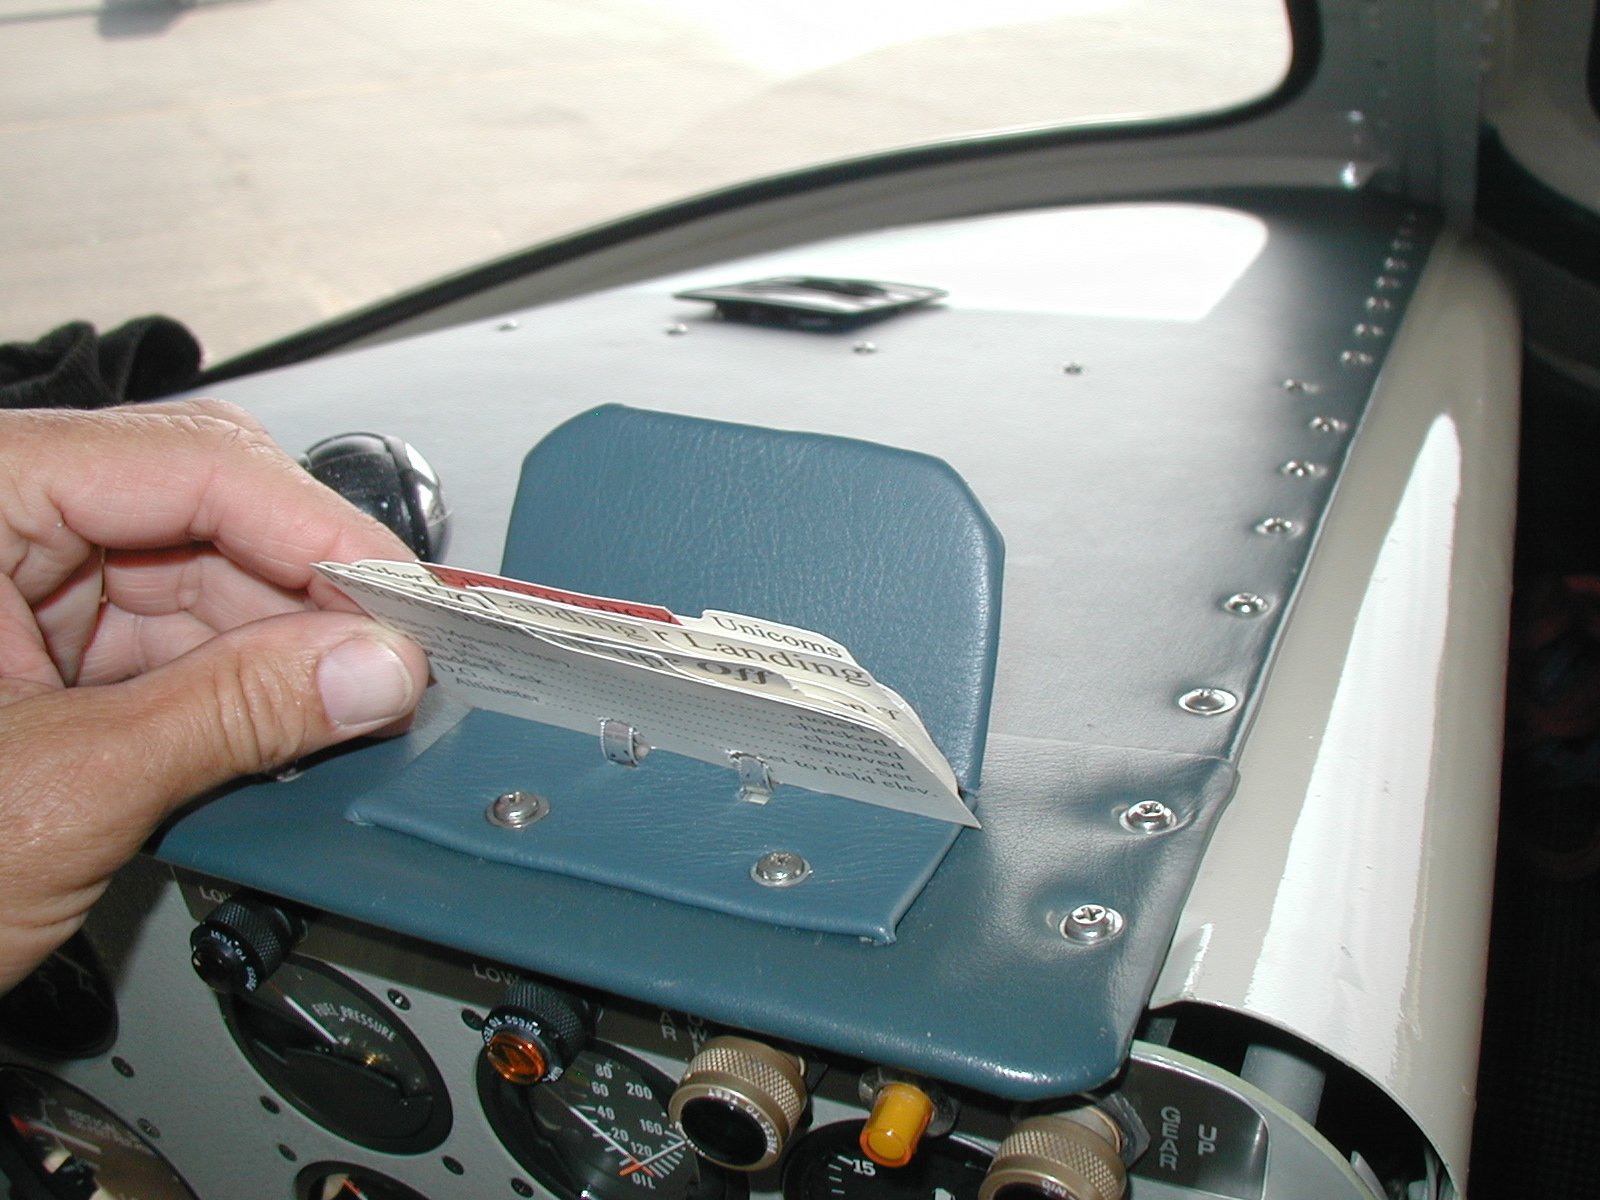
| Checkists... CHECK YOUR CHECKLIST!
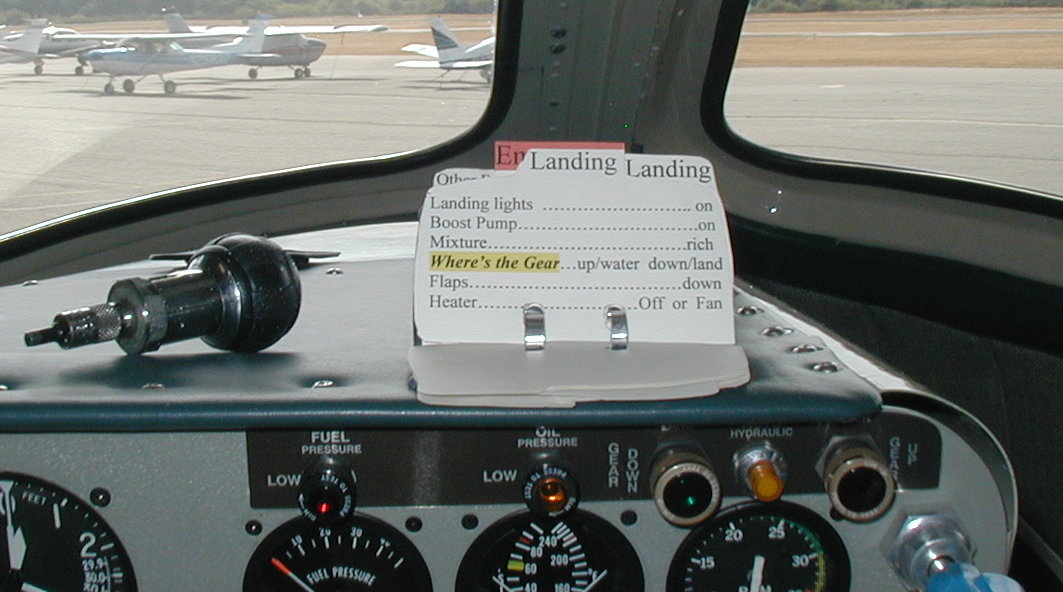 (Click on image for full size view)
Member Bruce Hinds sent this handy checklist. Easy and light! Thanks Bruce! Note: His hull plug wrench is always on the dash unless he's airborne. Photo #2 here |
||||||||
| Hull Leak Adapter... If you are draining more water out of your hull than you think you should, you can use this simple device to narrow down the leaks. It's simply an aluminum tube with a 1/8 x 27 NPT thread to match the existing hull plug holes, a garden hose shut off valve and a female hose end. Total cost? About $3.00 US. You can attach the garden hose to the adapter and fill each compartment and watch for the drips. It may take a little searching to find the leak but at least it's a start. 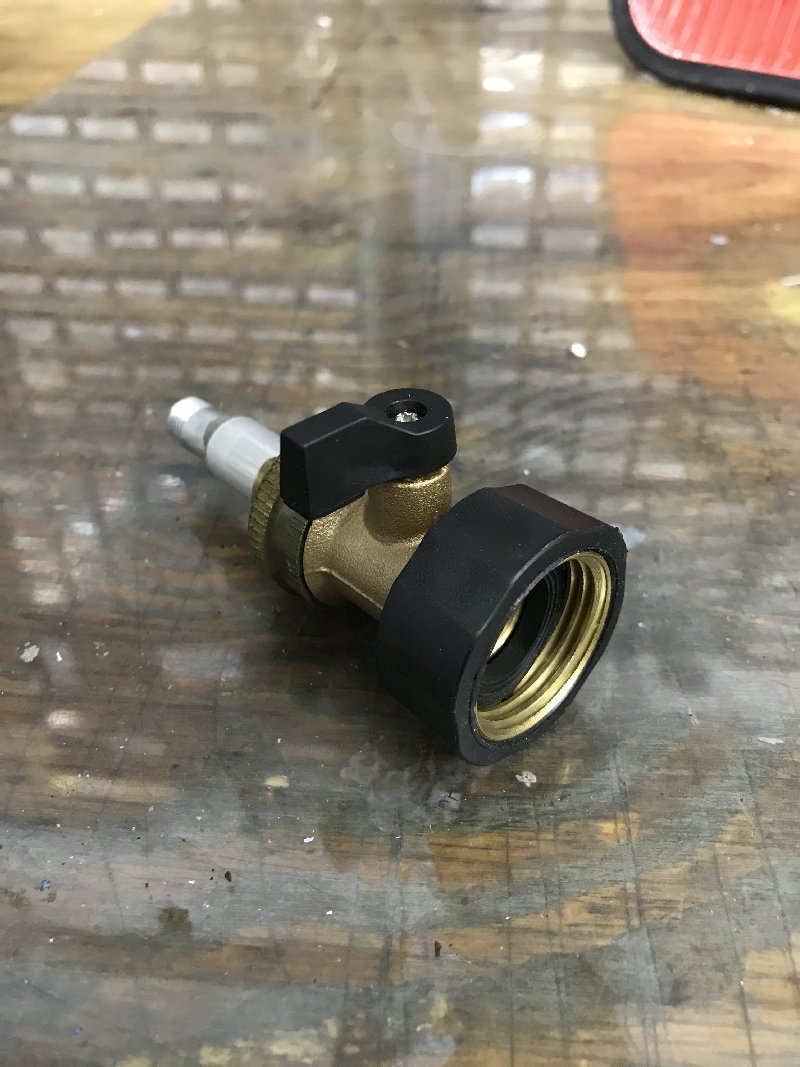
 |
||||||||
| iPad Holder... Member Bruce Hinds made this from things in his "junk" box. This will keep your iPad in a convenient location during your flights and folds away during takeoff and landing. "Hi guys, We were talking about the iPad mount – here's one I made with some left over cabinet parts and toilet seat hinges (NEW). The sides are just over 1/2 the height in landscape mode (Photo #1).
There's a hole for the charger plug as you can see in a later photo (#3) . . . here it is folded (Photo #2 and #3). Here you can see the hole for the charger (Photo #3).
Locating pins hold it in place in the folded or viewing position (Photo #4). It just lifts out of the mounting brackets on the dash.
Here you can see the location pins (Photo #4). All that's attached to the dash are these two female hinges (Photo #5)."
   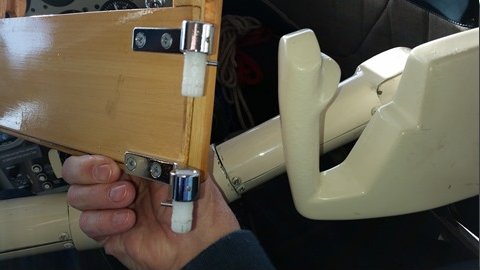 1 2 3 4 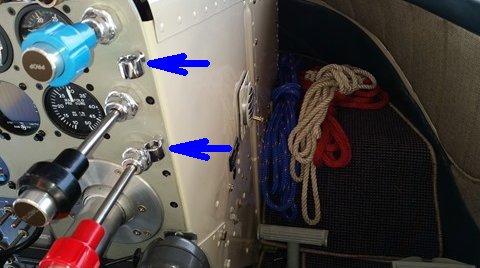 5 |
||||||||
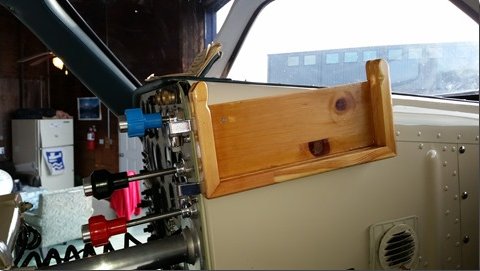
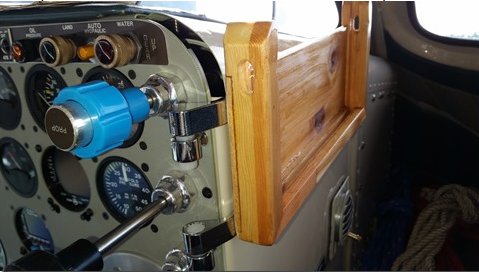
|
Thanks
again to member Bruce Hinds for his unending suggestions. This one
mounts the Paddle/Boathook overhead where it is easily accessible without
getting out of your seat.
He and I both used to keep the Paddle in the baggage compartment but changed our minds when Bruce told a story of a situation that required his immediate retrieval of the Paddle/Boathook. This is a great idea and is simple to mount. I think the photos will be self explanitory. Bruce's installation is a little neater than mine! A small "U" shaped aluminum bracket is attached to the rear ceiling and a strap holds the front in place. The forward strap has one end bolted in place and a snap attached to the other end. These snaps are available at most hardware stores and the remaining hardware is standard stuff. Make sure any forward movement of the Paddle/Boathook will not dislodge it from the aft mount. The left photo is a Lake and Air Boathook ($35), the right is a standard wooden Paddle ($20).  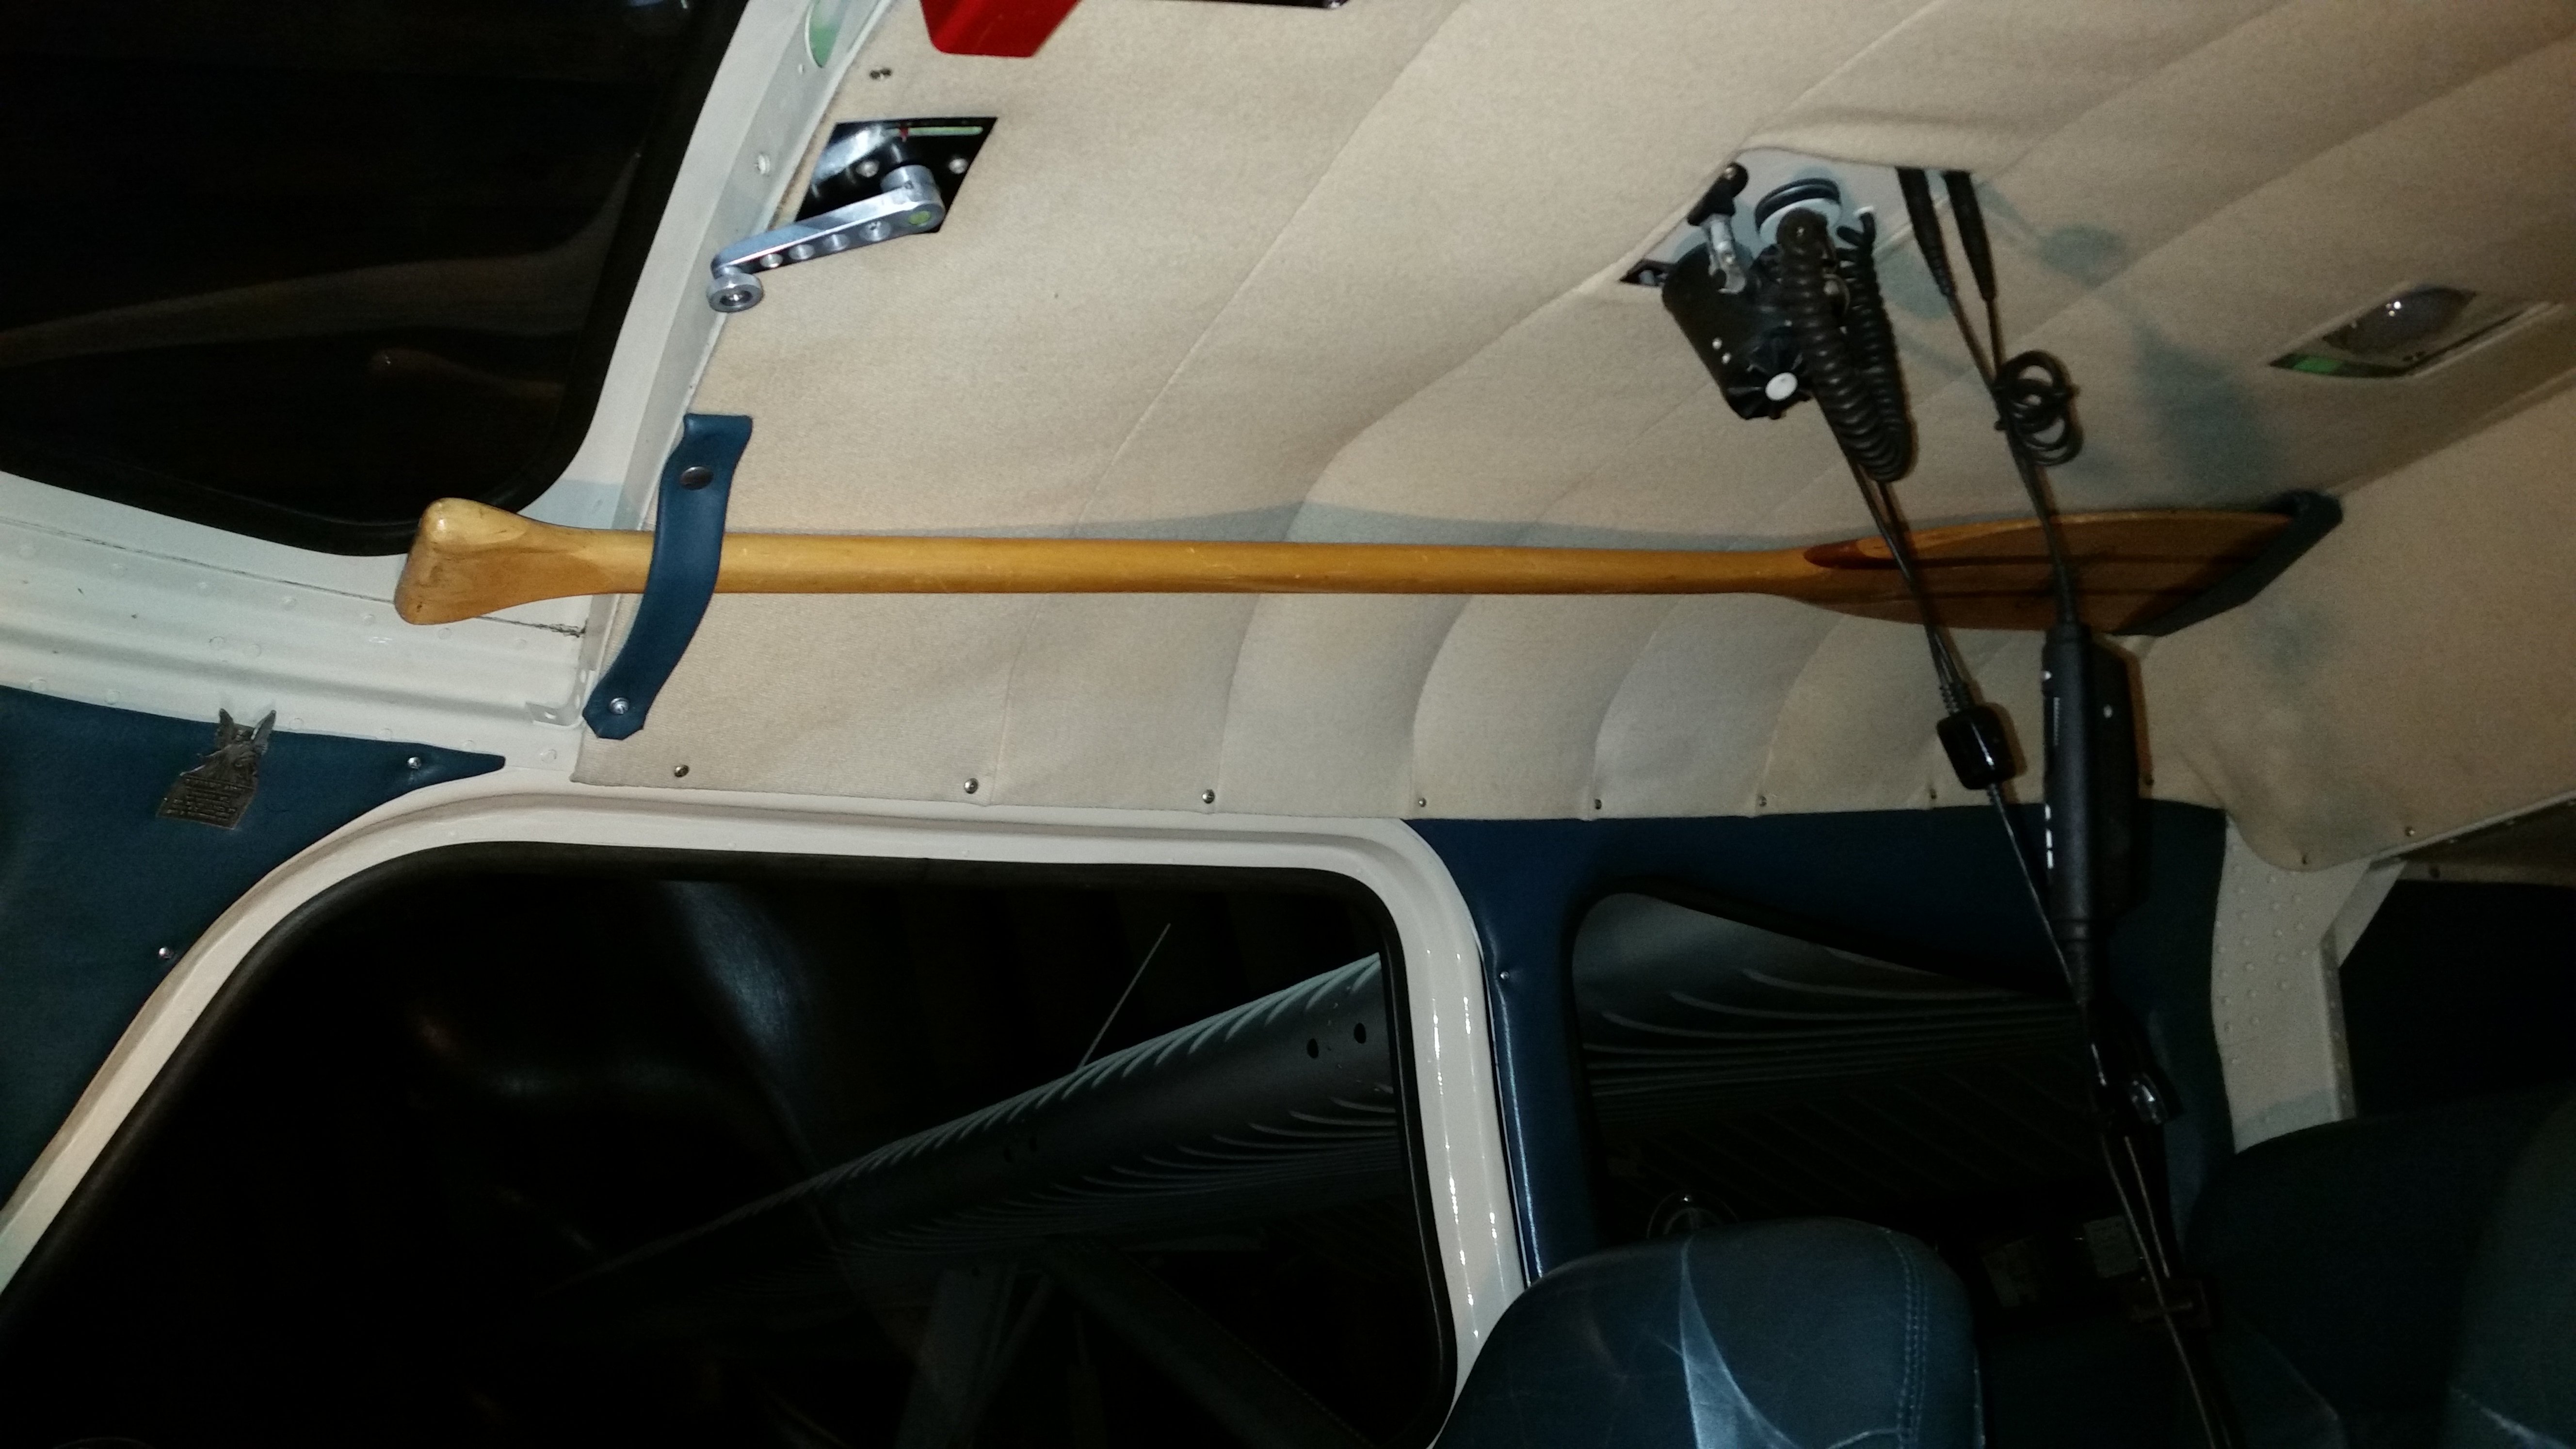 Steve's installation Bruce's Installation (Click on images for larger view) |
||||||||
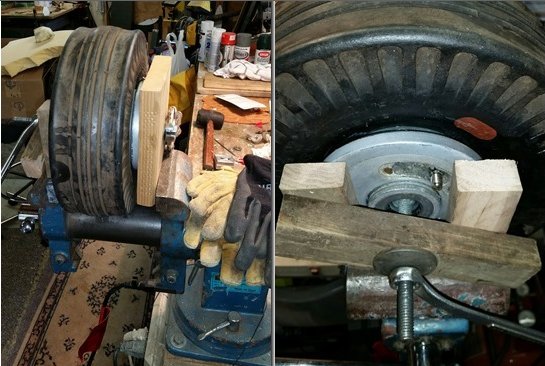
| Tail Wheel tire installation tool... If you've ever had trouble mounting a tail wheel tire on your hub, this may help. Thanks to member Bruce Hinds. Bruce says: "My threaded rod SC wheel
squeezer worked out. I had a 1 x 6 piece of deck board on the
bottom with a hole in the center. I double nutted one end of the
threaded rod and passed it through the wheel. Then on the clip
ring side I used two smaller blocks on either side of the stem and one
across the top. That allowed me room to slip in the clip ring after it
was all compressed. The bead didn't seat until I had about 60 psi
in it." (It may be difficult to get apart later)
 |
||||||||
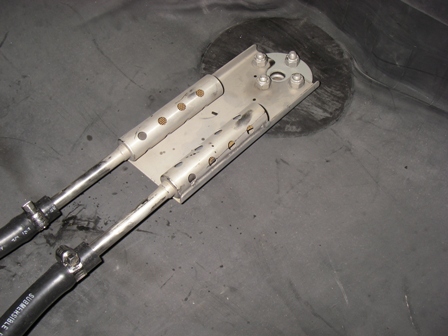
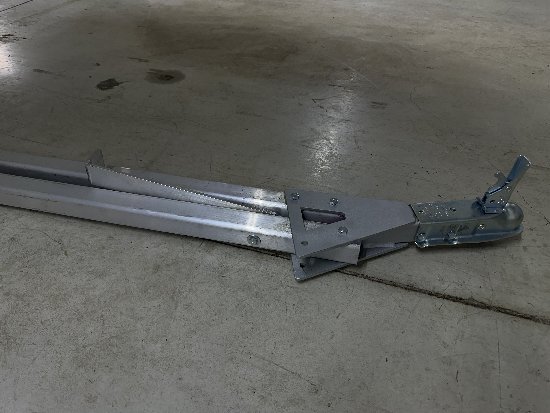
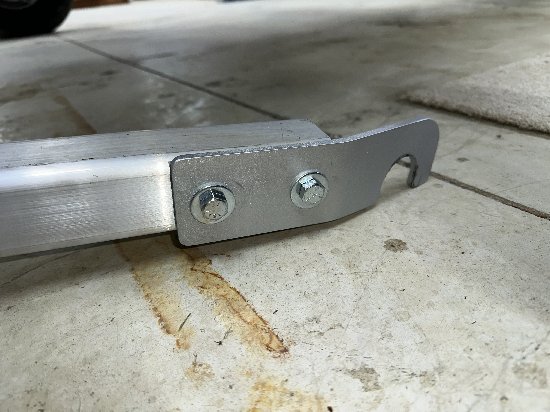
Tail Wheel and Main Gear towbars...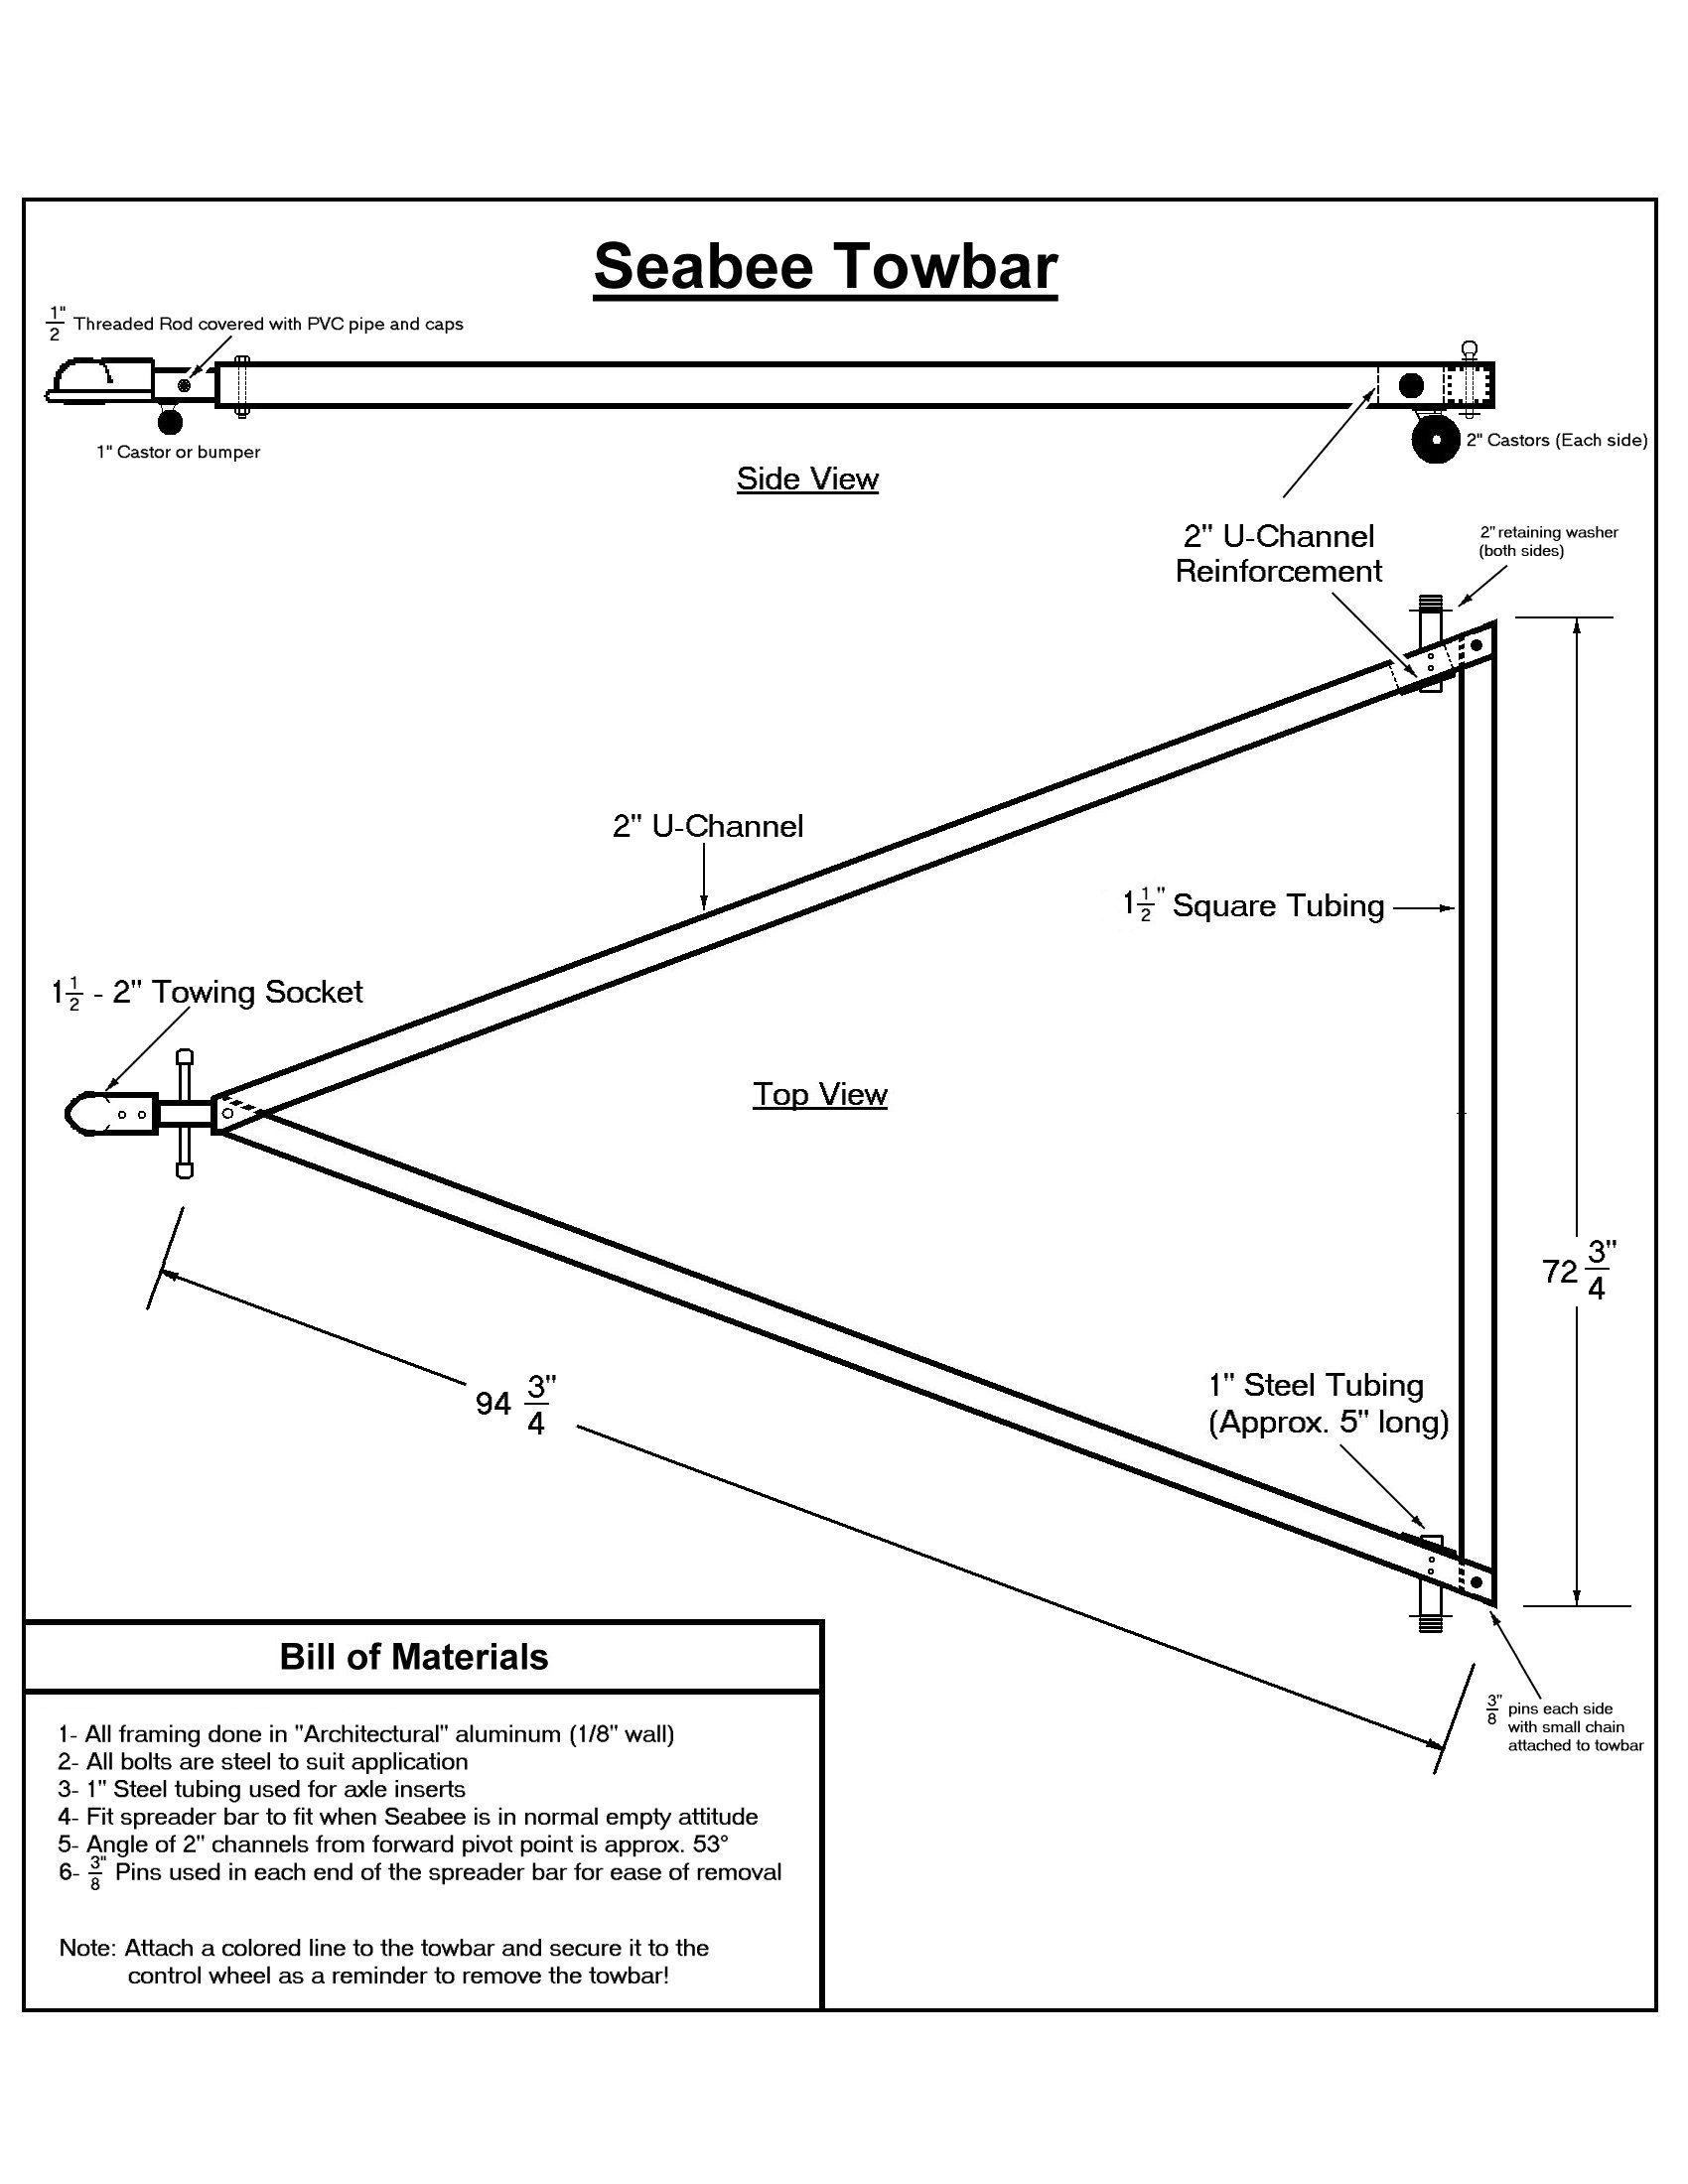 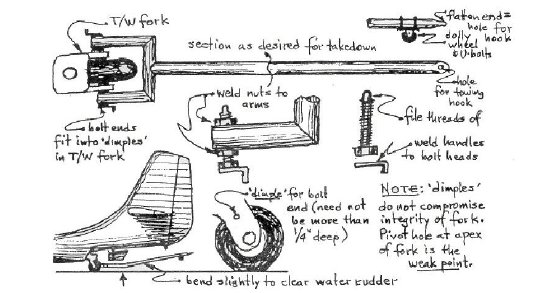 Main Gear Towbar Tail Wheel Towbar (Zip file with photos) (PDF file) The files above describe two ways to tow your Seabee; one from the main gear and one from the tail wheel. The tail wheel towbar image above is an excerpt from Dick Sanders' newsletter (Vol 01 N09 Jul 1986) and is a PDF file as noted above. There is one change Marty Bennett made with mine; he didn't drill holes in the fork instead he welded a socket onto a threaded rod with a "T" handle attached to one side of the tail wheel towbar fork and a pin on the other tail wheel towbar fork. There is a hole in the center axle that allows the pin to recess into and the socket fits over the axle nut. No holes in the tail wheel fork at all. The "T" bar then screws the socket onto the axle nut. A bar is also attached to the end of the towbar so you can pull it by hand. The main gear towbar was designed by me and has worked very well. Photos are included in the ZIP file above. |
||||||||
| Make your own tail wheel donuts. See article by memberKen Dayo here: Donuts |
||||||||
|
Franklin Propeller Jack...
This comes from member KC Ostronik. A simple device that allows you to change the air filter on your Franklin or change the fuel pump. Simple to use and easy to construct. 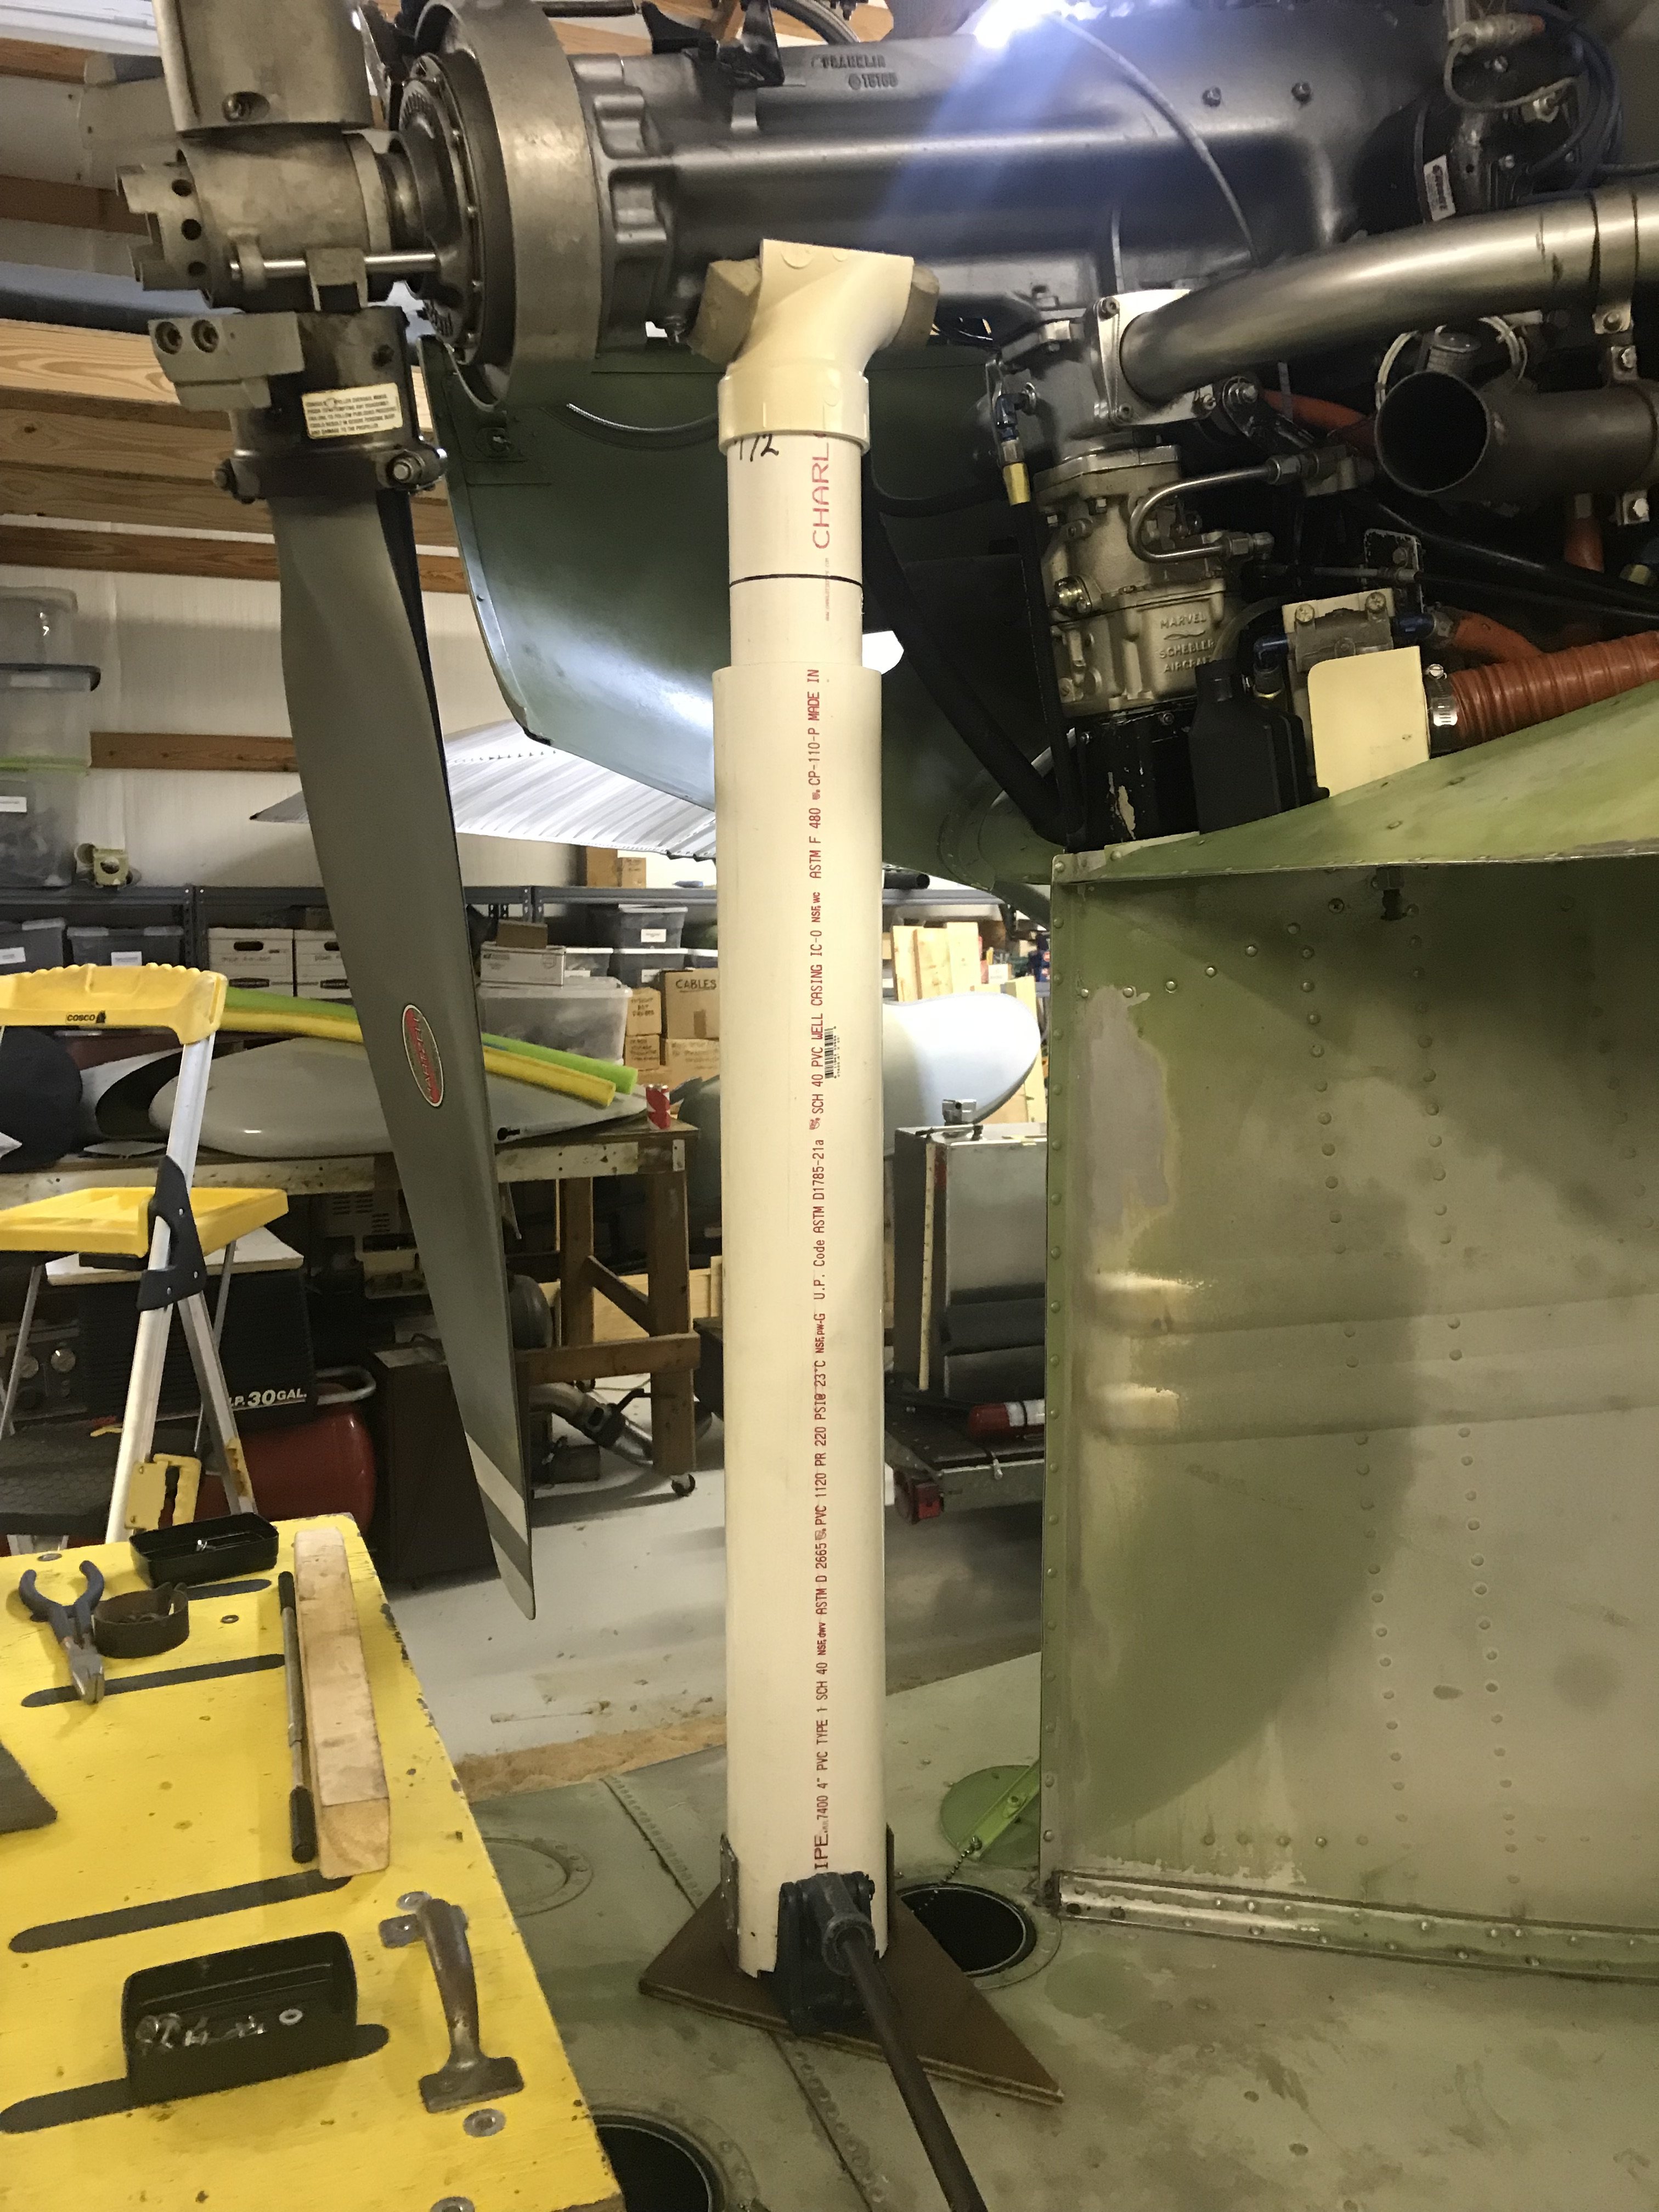 Thanks KC! See the article here.
|


